
User's Guide


liveCache Installation Step: LC060
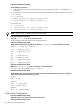
Do the following to continue:
1. Copy the content of the <lcsid>adm home directory to the backup node. This is a local directory on
each node.
2. Rename the environment scripts on the secondary nodes. Some of the environment scripts may not exist.
For example:
su - <lcsid>adm
mv .dbenv_<primary>.csh .dbenv_<secondary>.csh
mv .dbenv_<primary>.sh .dbenv_<secondary>.sh
For liveCache 7.6:
su - <lcsid>adm
mv .lcenv_<primary>.csh .lcenv_<secondary>.csh
mv .lcenv_<primary>.sh .lcenv_<secondary>.sh
NOTE: Never use the relocatable address in these file names.
liveCache Installation Step: LC061
Copy file
/etc/opt/sdb
to the second cluster node.
This file contains global path names for the liveCache instance
liveCache Installation Step: LC062
Verify that the symbolic links listed below in directory
/var/spool/sql
exist on both cluster nodes.
dbspeed -> /sapdb/data/dbspeed
diag -> /sapdb/data/diag
fifo -> /sapdb/data/fifo
ini
ipc -> /sapdb/data/ipc
pid -> /sapdb/data/pid
pipe -> /sapdb/data/pipe
ppid -> /sapdb/data/ppid
liveCache Installation Step: LC070
Make sure
/var/spool/sql
exists as a directory on the backup node.
/usr/spool must be a symbolic link to /var/spool.
liveCache Installation Step: LC080
On the backup node, create a directory as future mountpoint for all relevant directories from the table of
section that refers to the layout option you chose.
Option 1:
mkdir /sapdb
Option 2:
mkdir -p /sapdb/data
mkdir /sapdb/<LCSID>
Option 3:
mkdir -p /sapdb/<LCSID>
Cluster Node Configuration
liveCache Installation Step: LC100
Repeat the steps in this section for each node of the cluster.
liveCache Installation Step: LC110
100 SAP Supply Chain Management