Poster Designer Pro QuickStart Guide QuickStart Guide Welcome to Serif Poster Designer Pro for HP, the software program that provides all the tools and features you’ll need to create and print your own custom posters. Poster Designer Pro has been developed with ease of use in mind, and you’ll be surprised by how simple it is to produce superb results.
Poster Designer Pro QuickStart Guide This document, and the software described in it, is furnished under an end user License Agreement, which is included with the product. The agreement specifies the permitted and prohibited uses. Digital Images ©2008 Hemera Technologies Inc. All Rights Reserved. Digital Images ©2008 Jupiterimages Corporation, All Rights Reserved. Digital Images ©2008 Jupiterimages France SAS, All Rights Reserved. Bitstream Font content © 1981-2005 Bitstream Inc. All rights reserved.
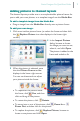
Poster Designer Pro QuickStart Guide Installing Poster Designer Pro You can install Poster Designer Pro automatically using AutoPlay, or manually from Windows Explorer. To install using AutoPlay: 1 Insert the Poster Designer Pro DVD into your DVD drive. 2 If AutoPlay is enabled on the drive, the Setup process starts automatically. 3 Follow the on-screen installation instructions.
Poster Designer Pro QuickStart Guide Microsoft Windows Vista®: 1 From the Windows Start menu, select Control Panel. 2 Double-click Programs and Features. 3 In the list of installed programs, select Poster Designer Pro. 4 To modify the installation: · Click Change. · In the Setup Wizard, click Next, click Modify, and then follow the on-screen instructions. To repair the installation: · Click Repair. · In the Setup Wizard, click Next, click Repair, and then follow the on-screen instructions.
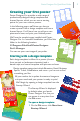
Poster Designer Pro QuickStart Guide Creating your first poster Poster Designer Pro provides a wide range of professionally-designed design templates and themed layouts, which you can use as starting points for your own custom posters. In the following pages, we’ll show you how to create a poster from a design template and from a themed layout. You’ll learn how to add your own pictures and text, and print your finished poster. We’ll use the sample images installed with Poster Designer Pro.
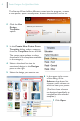
Poster Designer Pro QuickStart Guide The Startup Wizard offers different routes into the program—create a new poster, open a saved poster, browse the tutorials, and so on. 2 Click the Use Design Template option. 3 In the Create New Poster From Template dialog, select a category from the Templates list on the left. The center pane updates to show thumbnails of the templates available in the category. 4 Select a thumbnail to view its associated designs in the Designs pane on the right.
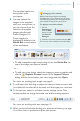
Poster Designer Pro QuickStart Guide The template opens as a new poster in the workspace. 8 You can replace the images in the template with your own photos, or you can choose from the selection of template images included with Poster Designer Pro. These images are displayed by default in the Media Bar at the bottom of the workspace.
Poster Designer Pro QuickStart Guide Starting with a themed layout As an alternative to the design templates, Poster Designer Pro also provides a wide range of themed layouts. Each theme offers a selection of layout variations and color schemes. To open a themed layout: 1 On the File menu, click New from Startup Wizard. 2 Click the Use Themed Layout option. 3 In the Create New Poster From Themed Layout dialog, scroll the left Themed Layouts pane and select a theme thumbnail.
Poster Designer Pro QuickStart Guide Adding pictures to themed layouts The themed layouts provide one or more placeholder picture frames for you to add your own photos, or a template image from the Media Bar. To add a template image from the Media Bar: · Drag an image from the Media Bar directly onto a picture frame. To add your own image: 1 Click once inside a picture frame (or select the frame and then click the Replace Picture icon that displays in the lower-right corner).
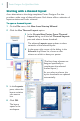
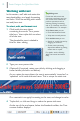
Poster Designer Pro QuickStart Guide Working with text In this section, we’ll edit and resize the text placeholders, and apply formatting and color. We’ll be working with artistic text and frame text. To select, edit, and format text: 1 Click inside the text object containing the words ‘Your poster title here,’ then triple-click to select all of the text. The placeholder text is shaded in blue for clear editing.
Poster Designer Pro QuickStart Guide 5 On the Text context toolbar, in the Fonts drop-down list, select your preferred font. 6 (Optional) Depending on the font selected, you may need to resize the text object to fit the page. To do this, you can drag a resize handle to stretch or squash the text (see step 3), or use the point size drop-down list on the Text context toolbar. 7 Click and drag to select all the text.
Poster Designer Pro QuickStart Guide Moving, rotating, and aligning The following steps show you how to move, rotate, and align objects on the page. To move an object: 1 On the Tools toolbar, click the Pointer Tool, and then click to select the object you want to move. 2 In the upper-left corner of the Move object, click the button, and then drag the object into its new position.
Poster Designer Pro QuickStart Guide To align objects: 1 Hold down the Shift key and, using the Pointer Tool, click to select the objects you want to align. 2 On the Align tab, click an alignment option In the example illustrated below, we chose Center Horizontally and selected the Include margins check box so that our text objects would be centered relative to the page edges. 3 When you have finished adjusting your pictures and text, you’re ready to preview and print your poster.
Poster Designer Pro QuickStart Guide Previewing your poster You can preview your poster before printing, to see how it will appear on the printed page. To preview your poster: 1 On the Standard toolbar, click Print Preview. 2 Use the tools in the lower-left corner of the Preview window to adjust your preview. Zoom Out: Click to zoom out of the poster. Zoom In: Click to zoom into the poster. Zoom Tool: Click the tool, and then click and drag on the area you want to zoom into.
Poster Designer Pro QuickStart Guide Printing your poster Poster Designer Pro supports printing on paper rolls. You can set print quality and scale your poster to fit your selected paper size. For a list of supported printers, see online Help. To print your poster: 1 On the Standard toolbar, click to open the Print dialog. 2 On the General tab, in the Name drop-down list, select your HP Designjet printer. 3 Select your paper size from the Paper Size dropdown list.
Poster Designer Pro QuickStart Guide 7 Depending on your printer model, the Paper Type drop-down list may be enabled or grayed out. · If enabled, select your paper type from the list. · If grayed out, you’ll see ‘Loaded in Printer.’ This indicates that the paper type set in your printer will be used. 8 Click Print. Well done, you’ve created and printed your first poster! You should now be feeling familiar with the tools and techniques required to create a poster from a layout and a template.