HP Secure Encryption Installation and User Guide Abstract This document includes feature, installation, and configuration information about HP Secure Encryption and is for the person who installs, administers, and troubleshoots servers and storage systems. HP assumes you are qualified in the servicing of computer equipment and trained in recognizing hazards in products with hazardous energy levels.
© Copyright 2014 Hewlett-Packard Development Company, L.P. The information contained herein is subject to change without notice. The only warranties for HP products and services are set forth in the express warranty statements accompanying such products and services. Nothing herein should be construed as constituting an additional warranty. HP shall not be liable for technical or editorial errors or omissions contained herein. Microsoft® is a U.S. registered trademark of Microsoft Corporation.
Contents Overview ..................................................................................................................................... 5 About HP Secure Encryption .......................................................................................................................... 5 Benefits ............................................................................................................................................. 6 Encryption features .................................
Clearing the controller ...................................................................................................................... 50 Replacing an encrypted controller ...................................................................................................... 50 Replacing a server while retaining the controller .................................................................................. 50 Preconfiguring replacement components ....................................................
Overview About HP Secure Encryption HP Secure Encryption is a controller-based, enterprise-class data encryption solution that protects data at rest on bulk storage hard drives and SSDs attached to a compatible HP Smart Array Controller. The solution is compatible with the HP Enterprise Secure Key Manager, and can operate with or without the presence of a key manager in the environment, depending on individual customer settings.
Benefits Broad encryption coverage • Encrypts data on both the attached bulk storage and the cache memory of HP Smart Array Controllers • Supports any hard drive or SSD in the Smart Drive portfolio for HP ProLiant Gen8 or later servers or the Supported Storage Enclosures High availability and scalability • • Scales with the amount of data privacy requirements o Server counts up to 25,000 o Millions of drives o Millions of encryption keys The HP ESKM supports High Availability Clustering, from
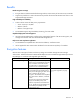
Feature Description Notes Controller key cache HP Smart Array Controllers can optionally store all keys required at boot time inside the controller, enabling the server to survive a variety of network outages. Protects the server in the event of theft by applying a secondary password upon boot to lock down the controller.
Feature Description HP iLO Management is a comprehensive set of embedded management features supporting the complete lifecycle of the server, from initial deployment, through ongoing management, to service alerting and remote support. HP iLO is provided on all HP ProLiant Gen8 and later servers. HP iLO 4 Advanced or Scale Out editions v1.40 or later connect and auto-register with the HP ESKM.
Feature Description Notes Volume level encryption Provides flexibility in allowing the user to — selectively encrypt at the volume or logical drive level regardless of RAID level.
For more information about HP SSA, see the HP website (http://www.hp.com/go/hpssa). Minimum requirements For minimum operating system requirements to run any HP SSA format, see the HP website (http://www.hp.com/go/ossupport). Minimum video requirements to run the HP SSA GUI include a minimum monitor resolution of 1024x768 and 16-bit color. The GUI supports the following browsers: • Mozilla Firefox 9.0 or later • Microsoft Internet Explorer 8.
management database, key management, encryption activation, and audit support for the devices within the platform. For the full implementation of HP Secure Encryption with the HP ESKM, HP iLO Advanced or HP iLO Scale Out editions are required to connect and auto-register with the HP ESKM. HP iLO provides key exchange support between the HP Smart Array Controller and the HP ESKM to enable pre-boot support for OS disk encryption. Audit support is provided for all for key management transactions.
Licensing HP Secure Encryption licensing is based on the number of physical drives requiring encryption. You will need one HP Secure Encryption license per drive.
Planning Encryption setup guidelines When setting up HP Secure Encryption, consider the information described in the following table. Configuration Options Deciding factors Encryption mode • Choose Local Key Management Mode when: • Local Key Management Mode Remote Key Management Mode • • • Data is stored at a site without network access. In a small deployment center or lab Manual key management is available.
unencrypted when accessed from the host system and placed on tape. Software or hardware utilizing an independent encryption feature is not impacted by HP Secure Encryption. Security domains A security domain is a blueprint for separating out different groups of servers or key management escrows where access to a set of keys is inhibited by the structure of the various domains.
Configuration Local key management mode Local Key Management Mode, or Local Mode, is a solution designed for small to medium-size data centers using few encrypting controllers. The solution utilizes a paraphrase password, or Master Encryption Key name, to set the security on the controller and enable encryption. The paraphrase password must be tracked independently of the controllers, in case the controller needs replacement or drive migration is required among controllers with different passwords.
2. Click Perform Initial Setup. The following screen appears. 3. Complete the following: o Under Create Crypto Officer Password, enter, and re-enter the password in the fields provided. o Under Encryption Mode, select either: — Enable and Allow Future Plaintext Volumes: Allowing future plaintext volumes still requires authentication by the Crypto Officer or the User before a plaintext volume can be created.
o Under Key Management Mode, select Local Key Management Mode. 4. Click OK. 5. A warning appears, prompting the user to record the Master Key. Click Yes to continue. 6. If you have read and agree to the terms of the EULA, select the check box and click Accept. 7. A summary screen appears indicating the controller has been successfully configured for encryption use. Click Finish to continue. 8. The Encryption Manager screen appears with updated Settings, Accounts and Utilities options.
4. Configure the HP Smart Array Controller ("Configuring the controller (remote mode)" on page 31, "Configuring the controller (local mode)" on page 15). Configuring the HP ESKM 1. Log in to the HP ESKM ("Logging in to the HP ESKM" on page 18). 2. Create initial user accounts ("Adding a user" on page 18). a. Create a temporary user account for deployment. b. Create a user account to host Master Encryption Keys. 3. Create a group ("Adding a group" on page 20). 4.
2. Click the Security tab. 3. Click Local Users & Groups. 4. Under Local Users, click Add.
The following fields appear. 5. Complete the following fields: a. Username b. Password c. If this is the deployment user account, select the User Administration Permission and Change Password Permission check boxes. d. If this is a standard user account, leave the User Administration Permission and Change Password Permission check boxes empty. 6. Click Save. Adding a group Groups enable you to organize a set of servers together and restrict access only to a specific set of users. To add a group: 1.
3. Click Local Users & Groups. 4. Under Local Groups, click Add. 5. Enter the group name in the Group entry field. 6. Click Save. Assigning a user to a group 1. Log in to the HP ESKM ("Logging in to the HP ESKM" on page 18).
2. Click on the Security tab. 3. Click Local Users & Groups. 4. Under Local Groups, select the group name and click Properties.
A new window appears, listing the group properties. 5. Click Add. 6. Enter the Username in the field provided. 7. Click Save.
Creating a Master Key The steps below outline how to create a key in the HP ESKM. The HP ESKM does not differentiate between key types such as Master Encryption Key or Drive Encryption Key. If creating a Master Encryption Key, HP recommends applying a specific Master Encryption Key naming convention to distinguish the Master Key from all other keys created in the HP ESKM. To create a key: 1. Log in to the HP ESKM ("Logging in to the HP ESKM" on page 18). 2. Click the Security tab. 3.
4. Under the section Create Key, complete the following: o Key Name: Enter the preferred key name. The name must consist only of US-ASCII letters, numbers, or the underscore or hyphen characters, and must be between 8 and 64 characters. The minimum character length is required by the Smart Array controller, not by the ESKM. 5. o Owner Username: Enter the name of the user account to be paired with the key. If creating the Master Encryption Key, do not assign keys to the deployment user account.
3. From the left side panel, expand the Keys menu and click Query Keys.
The following screen appears. 4. Under Create Query, complete the following: a. Query Name: Enter a query name here. Your query will be saved for future use. b. Choose Keys Where drop down menu: select Owner, or Key Name. Two additional Choose Keys Where fields appear. 5. Complete the following fields: a. Field 1: Leave as default. b. Field 2: Leave as default. c. 6.
3. Select the key, and then click Properties. 4. A new Key and Policy Configuration screen appears. Click the Permissions tab. 5. Under Group Permissions, complete the following: a. In the Group field, enter the Group name created previously. b. Under Export, select Always. 6. Click Save. The screen will refresh and list the group permissions. Configuring HP iLO Integrated Lights Out (iLO) manages key exchanges between the HP ESKM and the Smart Array controller.
• The HP ESKM must be configured with a deployment user. For more information, see "Configuring the HP ESKM (on page 18)." • HP iLO must be installed and operating properly with the appropriate iLO-supporting license. For more information, see the HP website (http://www.hp.com/go/ilo). Connecting HP iLO to HP ESKM If you intend to use a second HP ESKM for a redundant key repository, complete the fields under Secondary Key Server and select the Enable Enterprise Secure Key Manager Redundancy checkbox.
3. The Enterprise Secure Key Manager configuration page appears. 4. Under Key Manager Servers, complete the following: a. Primary Key Server: — Enter the primary IP address of the HP ESKM in the Address field. — Enter the primary port number of the HP ESKM in the Port field. This port number should match the value on the HP ESKM, located on the Device tab under KMS Server Settings. SSL should be enabled on the HP ESKM as well. b.
6. Under Key Manager Configuration, enter the group name created previously in the HP ESKM in the Group field. 7. Under ESKM Administrator Account, complete the following fields using the deployment username and password created earlier on the HP ESKM. a. Login Name: Enter the deployment account username. b. Password: Enter the deployment account password. 8. Click Update ESKM. A confirmation screen appears indicating the configuration was saved and connected successfully.
3. Complete the following: o Under Create Crypto Officer Password, enter and re-enter the password in the fields provided. o Under Encryption Mode, select one of the following: — Enable and Allow Future Plaintext Volumes: Allowing future plaintext volumes still requires authentication by the Crypto Officer or the User if attempting to create a plaintext logical drive. — Enable and Disallow Future Plaintext Volumes: This option prevents the creation of new plaintext volumes on the controller.
Operations Accessing Encryption Manager Opening Encryption Manager 1. Start HP SSA. For more information, see the HP Smart Storage Administrator User Guide. 2. Select an HP Secure Encryption-compatible controller. 3. Click Configure. 4. Under Tools, click Encryption Manager. Logging into Encryption Manager 1. Open Encryption Manager ("Opening Encryption Manager" on page 33).
2. Click Encryption Login. 3. A new window appears. Select an account to log in with and enter the password in the field provided. 4. Click OK to continue. Managing passwords NOTE: Valid passwords must be 8 to 16 US-ASCII characters long and contain the following: • • • • At At At At least least least least one one one one lowercase letter uppercase letter number non-alphanumeric character, such as # or $ Set or change the Crypto Officer password 1.
4. A new window appears. Enter in the new password in the New Password fields. 5. Click OK. Set or change the password recovery question 1. Open Encryption Manager ("Opening Encryption Manager" on page 33). 2. Log in as the Crypto Officer ("Logging into Encryption Manager" on page 33). 3. Under Accounts, locate Crypto Officer Password Recovery Parameters. Click Set/Change Password Recovery Question. A new window appears. 4. Complete the following fields: a.
IMPORTANT: If this is the first time setting the User password, you must be logged in as the Crypto Officer. The User account is disabled by default until the Crypto Officer sets the User account password for the first time. To set or change the User account password: 1. Open Encryption Manager ("Opening Encryption Manager" on page 33). 2. Log in to the Encryption Manager ("Logging into Encryption Manager" on page 33). 3. Under Accounts, locate User Password. Click Set/Change User Password. 4.
3. Under Settings, locate Controller Password. Click Set/Change Controller Password. 4. A new window appears. Enter and re-enter the new password in the New Password fields. 5. Click OK. Suspending the controller password The controller does not prompt for a password at system startup if the controller password is suspended. If suspended, the controller password feature can be resumed without requiring a password reset. To suspend the controller password: 1.
3. Under Settings, locate Controller Password. Click Suspend Controller Password. 4. A new window appears, asking if you want to suspend the controller password. Click Yes to continue. Resuming the controller password Resuming a suspended controller password re-enables password prompts at system startup. To resume the controller password: 1. Open Encryption Manager ("Opening Encryption Manager" on page 33). 2. Log in to Encryption Manager ("Logging into Encryption Manager" on page 33). 3.
Working with keys Changing the Master Encryption Key IMPORTANT: HP recommends that you keep a record of the Master Encryption Keys when encryption is configured in Local Mode. The local Master Encryption Key is not displayed by any available tool or firmware because it is considered a cryptographic secret by FIPS 140-2. HP Secure Encryption design follows the NIST architecture requirements and does not allow HP to assist in the recovery of a lost Master Encryption Key.
3. Under Settings, locate Encrypted Physical Drive Count. Click Drive Key Rekey. 4. A prompt appears, indicating new Drive Encryption Keys will be created for all physical drives. Click OK to continue. Rescanning keys In Remote Mode, this procedure signals the controller to retrieve all encryption keys from the HP ESKM. This procedure resolves potentially locked volumes that could have been locked as a result of failure to initially retrieve the associated keys. To rescan keys: 1.
2. Under Controller Devices, click on Unassigned Drives. 3. Select drives.
4. Click Create Array. A new window appears. 5. Complete the following fields: a. Create Plaintext Volume: Select Yes. b. My Account: Select the account to log in with. c. Password: Enter the account password. 6. Complete remaining fields as necessary. 7. Click Create Logical Drive.
8. Array Details, Logical Drives, Physical Drives and Device Path specifications appear. Click Finish to complete. Converting plaintext volumes into encrypted volumes NOTE: The controller must read and rewrite the entire volume in order to complete the conversion process. Conversion may take some time to complete, especially if there is competing drive activity from the host system. To convert plaintext volumes into encrypted volumes: 1. Open Encryption Manager ("Opening Encryption Manager" on page 33).
5. Under Actions, click Convert Plaintext Data to Encrypted Data. A new window appears. 6. Select one of the following: a. To preserve existing data, select Yes. b. To discard existing data, select No. If selected, a warning prompt appears after clicking OK, confirming your selection. Click OK to continue past the warning. 7. Click OK. A new window appears, listing the Logical Drive Details, Logical Drive Acceleration Method, and Device Path details. 8. Click Finish.
3. Under Settings, locate Key Management Mode. Click Change. 4. A new window appears with the key management mode selected. Enter the Master Key in the field provided. The Master Key name must be between 10 and 64 characters. 5. Click OK. 6. A warning appears, prompting the user to record the Master Key. Click Yes to continue. Enabling/disabling plaintext volumes IMPORTANT: Plaintext volumes are unencrypted.
3. Under Settings, locate Allow New Plaintext Volumes. 4. Do one of the following: a. If encryption is disabled, click Allow Plaintext Volumes. b. If encryption is enabled, click Disallow Plaintext Volumes. 5. A prompt appears, asking you to confirm the change. Click Yes to continue. Enabling/disabling the firmware lock The firmware lock prevents the updating of firmware on the controller and is disabled by default. For security purposes, HP recommends enabling the firmware lock function.
5. A prompt appears, asking you to confirm the change. Click Yes to proceed. Enabling/disabling local key cache 1. Open HP Encryption Manager ("Opening Encryption Manager" on page 33). 2. Log in to Encryption Manager ("Logging into Encryption Manager" on page 33). 3. Under Settings, locate Local Key Cache Enabled. Click Set/Change Local Key Cache. 4. Do one of the following: 5. o To disable, select No. o To enable, select Yes. If you select Yes, two new fields appear.
6. o Number of Access Attempts Before Deleting Local Key Cache o Retry Interval in Minutes Click OK. Importing drive sets in Local Key Management Mode When the Master Encryption Key on an imported drive set is different from the Master Encryption Key on the receiving HP Smart Array Controller, the importing volumes remain offline until user intervention is taken. HP SSA can be used to supply the Master Key name for the importing drives.
10. A new screen appears. Enter the new Master Encryption Key name assigned to the drives being imported in the Master Key field. 11. Click OK. The drives will be incorporated, unlocked, and assigned the Master Encryption Key of the receiving controller.
Maintenance Controllers Clearing the controller To clear all logical drives and arrays on controllers: 1. Start HP SSA. For more information, see the HP Smart Storage Administrator User Guide. 2. Select the controller to be cleared. 3. Under Actions, click Clear Configuration. 4. A new window appears, confirming your request to clear the controller's configuration. To continue, click Clear. 5. A new window appears, displaying controller settings and configuration. To continue, click Finish.
Flashing firmware If the firmware lock function is enabled, the firmware lock on the controller must be unlocked before attempting to flash the controller. To disable the firmware lock function, see "Enabling/disabling the firmware lock (on page 46)." Drives Replacing a physical drive No HP Secure Encryption-related steps are associated with this procedure. To replace a drive, see the server maintenance and service guide.
Groups Locating groups associated with a drive Use one of the following methods to locate the group name associated with a drive. • Query by drive serial number (on page 52) • Query by previous server name (on page 54) Query by drive serial number 1. Log in to the HP ESKM ("Logging in to the HP ESKM" on page 18). 2. Click the Security tab. 3. Under Keys, click Query Keys.
The Key Policy and Configuration screen appears. 4. If you want to save this query, enter a name in the Query Name field. 5. Under Choose Keys Where, do the following: a. Field 1: Select Key Name from the drop down menu. b. Field 2: Select Contains from the drop down menu. c. Field 3: Enter the serial number of one of the drives in the server. 6. If you assigned a name to this query, click Save and Run Query. Otherwise, click Run Query without Saving. 7. Click on the key.
Query by previous server name 1. Log in to the HP ESKM ("Logging in to the HP ESKM" on page 18). 2. Click the Security tab. 3. Under Keys, click Query Keys.
The Key Policy and Configuration screen appears. 4. If you want to save this query, enter a name in the Query Name field. 5. Under Choose Keys Where, do the following: a. Field 1: Select Custom: Server_Name from the drop down menu. b. Field 2: Select Equals from the drop down menu. c. Field 3: Enter the previous server name associated with the drive. 6. If you assigned a name to this query, click Save and Run Query. Otherwise, click Run Query without Saving. 7. Click on the key.
8. Click the Permissions tab to view the group name. Displaying log information The event log displays events for all controllers in the system and does not differentiate between events produced by different controllers.
2. From the left side panel, expand the Administration menu. 3. Click Key Manager. The Enterprise Secure Key Manager Events appears at the bottom of the screen. Navigating away from the page and returning or clicking Test ESKM Connections refreshes the list of events. Running queries To run a query: 1. Log in to the HP ESKM ("Logging in to the HP ESKM" on page 18). 2. Click the Security tab.
3. From the left side panel, expand the Keys menu and click Query Keys.
A new screen appears. 4. Under Create Query, complete the following: a. If you want to save the query for future use, fill in the following fields: — Query Name — Description b.
— Exportable — Deletable — Algorithm — Creation Date — Versioned Key — Custom attributes d. When you have finished structuring the query, click one of the following buttons: — Save and Run Query — Save Query — Run Query without saving The report appears with the selected criteria.
Troubleshooting Common issues Lost or forgotten Crypto Officer password 1. Open Encryption Manager ("Opening Encryption Manager" on page 33). 2. Under Accounts, locate Crypto Officer Password. Click Recover Crypto Officer Password. A new window appears. 3. Do the following: a. Answer the security question in the Password Recovery Answer field. b. Enter and then re-enter a new password in the New Password fields. 4. Click OK.
If the OS logical drive is encrypted, offline HP SSA will be required to perform the steps below. For more information, see the HP Smart Storage Administrator User Guide. To clear the controller password: 1. Open Encryption Manager ("Opening Encryption Manager" on page 33). 2. Log in as the Crypto Officer ("Logging into Encryption Manager" on page 33). 3. Under Settings, locate Controller Password. Click Remove Controller Password. 4.
2. Click the Security tab. 3. From the left side panel, expand the Keys menu and click Keys. 4. The Key and Policy Configuration page displays a list of all keys. Scroll through the list to locate the Master Key. 5. If you remember specific attributes about the Master Key, run a key query ("Running queries" on page 57). If you cannot locate the Master Key name, it may have been accidentally deleted from the HP ESKM. You may be able to locate the key by using an HP ESKM backup.
2. From the left side panel, expand the Administration menu. 3. Click Key Manager. The Enterprise Secure Key Manager Events appears at the bottom of the screen. Review the event log for the missing key. Forgotten which Master key goes with which drive Recovery of the Master Encryption Key name corresponding to a specific set of drives is possible when operating HP Secure Encryption in Remote Key Management Mode. To recover the Master Encryption Key name: 1.
2. Run a key query with the following search parameters ("Running queries" on page 57): a. Choose Keys Where drop down menu: select Custom: Server_Name. Two new fields appear. b. In the second drop down menu, select Equals. c. In the third field, enter the name of the server to be associated with the Master Encryption Key. d. Under Custom Attributes, select Master_Key. Logical drives remain offline If cryptographic information is missing, logical drives remain offline after system start.
Testing the connection between HP iLO and the HP ESKM HP iLO connects and manages key exchanges between the controller and HP ESKM. If you suspect HP iLO has lost its connection to the HP ESKM, you can test the connection in HP iLO. To test the connection between HP iLO and the HP ESKM: 1. Log into HP iLO using your server's credentials. 2. From the left side panel, expand the Administration menu and then click Key Manager.
The following screen appears. 3. Under Key Manager Configuration, click Test ESKM Connections: o If HP iLO is connected to the HP ESKM, a green checkmark appears indicating the key managers are accessible. o If the connection has been lost, you will need to re-configure HP iLO to communicate with the HP ESKM. For more information, see "Connecting HP iLO to HP ESKM (on page 29).
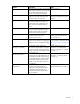
Error Description Slot X Encryption Failure – Communication issue prevents drive keys from being retrieved. Encrypted logical drives are offline. System may not boot. Slot X Encryption Failure – Incorrect or missing Master Key on Remote key manager Master Encryption Key is incorrect or not retrieved from HP ESKM. Encrypted logical drives may be offline. System may not boot. Invalid Drive Encryption Keys Volume Key decryption failure on HP ESKM. Encrypted logical drives may be offline. System may not boot.
Error Description Action NVRAM failure Non-volatile storage corrupted. Critical Security Parameters erased per policy. Encrypted drives are offline. Encryption engine hardware failure. Encrypted logical drives are offline until the problem is corrected. While logged into the system, you are unable to create a plaintext volume. Use HP Smart Storage Administrator to reestablish CSPs.
Support and other resources Before you contact HP Be sure to have the following information available before you call HP: • Active Health System log (HP ProLiant Gen8 or later products) Download and have available an Active Health System log for 3 days before the failure was detected. For more information, see the HP iLO 4 User Guide or HP Intelligent Provisioning User Guide on the HP website (http://www.hp.com/go/ilo/docs).
Appendix Encryption algorithms In keeping with the encryption standards outlined in FIPS 140-2 (http://csrc.nist.gov/groups/STM/cmvp/documents/fips140-2/FIPS1402IG.pdf), controllers utilizing HP Secure Encryption are designed to meet FIPS-140-2 Level 2 requirements by implementing both physical security and cryptographic methods in protecting data-at-rest.
Glossary ACU Array Configuration Utility Controller key A key created by the controller and permanently saved to the Remote Key Manager after being wrapped by the Master Encryption Key. This key is used on a temporary basis to alleviate potential bottlenecks to the Remote Key Manager during volume creation/change events. Use of a Controller Key is on a temporary basis only and is ultimately transitioned via a rekey operation to the appropriate Drive Encryption Key.
ESKM Enterprise Secure Key Manager FIPS Federal Information Processing Standard HIPAA Health Insurance Portability and Accountability Act HITECH Health Information Technology for Economic and Clinical Health HP SSA HP Smart Storage Administrator iLO 4 Integrated Lights-Out 4 Local Master Encryption Key The equivalent of a Master Encryption Key in Local mode.
Remote Key Manager A server used to store, backup and retrieve keys for a group of controllers in a data center. Volume encryption key The key used in conjunction with hardware-based algorithms to perform the encryption of data resident on logical volumes.
Documentation feedback HP is committed to providing documentation that meets your needs. To help us improve the documentation, send any errors, suggestions, or comments to Documentation Feedback (mailto:docsfeedback@hp.com). Include the document title and part number, version number, or the URL when submitting your feedback.
Index A F access 33 algorithms, supported 71 Array Configuration Utility (ACU) 9 factory defaults, resetting 69 features, overview 6 features, standard 6 firmware 46, 51 firmware lock 46 firmware update 46 B backing up data 13 before you contact HP 70 benefits 6 C common problems 61 components 9 configuration 13, 15, 17, 28 configuration overview 17 configuration, troubleshooting 69 configuring the ESKM 18 connection problems 66 connection status 66 contacting HP 70 controller 10, 11, 15, 31, 36, 37, 3
log information, displaying 56 logging in 18, 33 logical drive 65 logical drive, troubleshooting 65 M T technical support 70 telephone numbers 70 troubleshooting 61 U maintenance 50 Master key 24, 25, 27, 39, 48, 62, 64, 65 minimum requirements 10 user account, adding 18 user account, modifying 21, 34, 35 O V operations 33 overview 5 volume 40, 43, 45 P website, HP 70 W password recovery, administrator 35, 61 password, changing 34, 35, 36 passwords 34, 35, 36, 37, 38, 61 phone numbers 70 plaint