
User's Manual
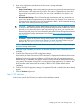
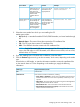


1. Select a VSA type.
If you do not want to deploy the HP StoreVirtual VSA software, select Continue without
deploying VSA and click the Continue right arrow. A screen is displayed indicating VSA will
not be installed. Click the Continue right arrow to continue.
VSA validation begins. If VSA is not available, click the Continue right arrow to confirm OS
selections.
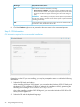
2. Enter an optional VSA Host Name.
3. Select the VSA Network type (DHCP or Static).
4. If Static is selected, enter the associated network parameters.
5. Click the Continue right arrow.
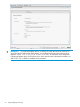
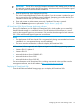
Entering VSA contact information
You must provide all required contact information to deploy HP StoreVirtual VSA. If you do not
wish to provide contact information, it will be necessary to select Continue without deploying VSA.
NOTE: The collected contact data is managed according to the HP privacy statement, available
at http://www.hp.com/go/privacy. You may be contacted by HP.
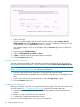
1. Enter the appropriate contact information. All required fields must be entered.
The contact information is validated and if any fields are not valid you are prompted to enter
them.
2. If you want to receive new product information, select the Sign me up... option.
3. Click the Continue right arrow.
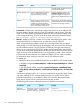
Completing VSA deployment
Before you can begin using VSA you must perform the following tasks. The VSA instructional videos
at the HP website http://www.hp.com/go/vsa1TB will guide you through these tasks.
1. Select the appropriate HP StoreVirtual Centralized Management Console, download and
install it
2. Retrieve your free 1 TB license key and activate it.
3. Configure the Centralized Management Console.
If you do not want to deploy VSA, you can do so at a later time.
28 Using Intelligent Provisioning