HP Scanjet Enterprise Flow 5000 s2 User Guide Edition: Edition 1, 8/2013
Copyright and license Trademark credits © 2013 Copyright Hewlett-Packard Development Company, L.P. ENERGY STAR is a U.S. registered service mark of the United States Environmental Protection Agency. Reproduction, adaptation or translation without prior written permission is prohibited, except as allowed under the copyright laws. The information contained herein is subject to change without notice.
Table of contents 1 Product basics ............................................................................................................................................... 1 Product features .................................................................................................................................................... 2 Front view .......................................................................................................................................................
Scan long or extra-long documents .................................................................................................................... 20 Scan to cloud ........................................................................................................................................................ 20 Faster scanning with hardware compression .....................................................................................................
Scanned images are not straight ...................................................................................................... 46 Vertical white stripes appear on the printed page ........................................................................... 47 Vertical colored stripes appear on the printed page ........................................................................ 47 Scan files are too large ............................................................................................
vi ENWW
1 Product basics This User Guide covers what you need to know about using your product.
Product features Table 1-1 Features Resolution 600 pixels per inch (ppi) Memory 256 MB of DDRII random-access memory (RAM) Paper-handling ● Document input tray: Holds up to 50 sheets ● Two-sided scanning: Two-sided documents scan in a single pass ● Delete blank pages: Deletes blank pages from scanned output (works best with white or lightcolored pages) ● Multi-feed detection: Detects when multiple pages feed through simultaneously ● Standard output tray: The output tray is located near the bot
Front view 4 3 2 5 1 ENWW 1 Document output tray 2 Front panel and LCD 3 Power button 4 Document input tray 5 Document feeder latch Front view 3
Front panel Use the buttons on the scanner front panel to start a scan and to configure some scanner settings.
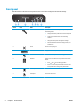
Back view 1 2 3 Callout Description 1 Slot for a cable-type security lock 2 USB input 3 Power supply input About scan profiles If you have scan tasks that you perform frequently, you can use a scan profile to create and save a set of scan settings. This lets you quickly use the same settings each time you perform a specific scan task. You can also map a scan profile to a scanner button.
Scanner software The scanner comes with a variety of scanning and document-management programs, including: ● HP Smart Document Scan Software ● HP Scanner Tools Utility ● HP TWAIN ● ISIS HP Smart Document Scan Software HP Smart Document Scan Software guides you through the scanning process. To open the software, double-click the HP Smart Document Scan Software icon on the desktop. For more information, see the HP Smart Document Scan Software Help.
HP Scanner Tools Utility Use the HP Scanner Tools Utility to: ● Configure the list of scan profiles on the scanner front panel ● Create scan profiles that use non-HP scanning software ● Set maintenance and status update notification options ● Change the scanner's power management settings ● View scanner information (firmware version, serial number, total number of pages scanned) To open the utility, do one of the following: ● Press the Tools ( ● Windows XP, Vista, Windows 7: Double-click the HP
8 Chapter 1 Product basics ENWW
2 Use the scanner The following topics describe how to load and scan originals. ● Load originals ● Scan documents Load originals ● Document loading tips ● Load documents ● Load cards into the document input tray Document loading tips ● The maximum capacity of the document input tray is 50 sheets of 75 g/m2 (20 lb) paper. When using heavier paper, the maximum capacity is decreased. ● The maximum card capacity, for card stock up to 15 points, is approximately 9–10 cards.
Wrinkled or creased documents Curled documents Torn documents (including those torn from spiral notebooks) Documents with paper clips or staples Carbon paper Coated paper Extremely thin, translucent paper Paper with adhesive notes or flags attached Photos Overhead transparencies Papers that are stuck together Paper where the toner has not fully dried, or with wet substances such as glue or correction fluid ● Smooth out any folds or curls in your documents before placing them into the document i
Load documents 1. 2. Extend the document input and output trays. a. Locate the recessed input tray extension at the top of the input tray, and then press down at the arrow and release to extend the input tray extension. b. Slide out the output tray, and then fold out the output tray extension and paper guides. Adjust the paper guides on the document input tray to the width of the documents. Take care not to overtighten the guides, which can restrict paper feeding.
3. Fan the stack of document pages to ensure that the pages do not stick together. Fan the edge that will be pointing into the feeder in one direction, and then fan that same edge in the opposite direction. 4. Align the edges of the documents by resting the side of the stack against a flat surface (such as a table top), then gently tapping the upper edge until the pages are aligned. Never tap the stack against the table top.
3 1 2 a. Arrange documents face down with the largest document on the bottom of the stack (1). b. Place the next largest document face down on the largest document, top-justified and centered horizontally. Repeat this step for each document in the stack. c. When the stack is top-justified and centered horizontally, rotate the stack 180 degrees (2), and place the stack in the document input tray (3). TIP: Avoid feeding a document with a leading edge that has been folded or frayed.
Load cards into the document input tray To load cards into the document input tray, follow these steps: 1. Place the stack of cards face down with the long dimension parallel to the paper guides. 2. Adjust the paper guides to center the cards, making sure the paper guides touch the edges of the cards. Scan documents The following topics describe how to scan originals using the scanner and the scanner software.
Scan from the front panel buttons To scan using the front panel buttons, follow these steps: 1. Load the originals. 2. Use and to select the scan profile you want. TIP: Pressing OK displays the selected scan profile's file type, color mode, and resolution. To return to the profiles list, press the Back ( ) button. 3. Press either the Scan Simplex ( ) button for one-sided scans or the Scan Duplex ( ) button for twosided scans.
16 Chapter 2 Use the scanner ENWW
3 Overview of scanning software features Experienced document management professionals might be interested in the following scan features. These features are available from any document ISIS or TWAIN application that allows you to modify the scan settings in its user interface.
View profiles To view the existing HP Smart Document Scan Software profiles, follow these steps: 1. Click Start, point to Programs or All Programs, point to HP, point to HP Smart Document Scan Software 3.7, and then click HP Smart Document Scan Software 3.7. NOTE: 2. The version number may be different. View the list of profiles. To view all existing scan profiles, follow these steps: 1. Turn on the scanner and start the HP Scanner Tools Utility. 2. Click the Profiles tab.
Create scan profiles that use non-HP scanning software If you have scanning software that you want to use with your scanner, you can create profiles that use your software. To create a scan profile that uses non-HP scan software, follow these steps: 1. Turn on the scanner and start the HP Scanner Tools Utility. 2. Click the Profiles tab. 3. In the Other application profiles area, click Create. 4. Complete the fields in the Create/Edit other Application dialog box.
Scan long or extra-long documents By default, the scanner will automatically detect your page size using the Auto detect size selection in the page size drop-down list. If you select Auto detect standard size, the scanner will identify the page size based upon one of the standard sizes in the list. These auto-detect selections work on any page size up to 356 mm (14 in) in length. NOTE: Only one page at a time can be scanned when using a long or extra-long page setting.
Faster scanning with hardware compression The scanner supports multiple levels of JPEG compression to increase the rate of data transfer from the scanner to the scanning software on the computer. The scanning software can uncompress the data in order to create scanned images. JPEG compression works on grayscale and color scans. To enable faster data transfer in an HP Smart Document Scan Software profile, follow these steps: 1. Open the HP Smart Document Scan Software. 2.
NOTE: Use the ISIS or TWAIN user interface to set crop options when scanning from non-HP scanning software. For information about the auto-crop settings, see the online help for the scanning software that you are using. Automatically crop scanned image To automatically crop a scanned image using HP Smart Document Scan Software, follow these steps: 1. Open the HP Smart Document Scan Software. 2. Select a scan profile, and then click Edit profile. 3. Select your crop options.
Automatically detect color You can use this feature to reduce the size of the scanned file by only saving pages that contain color as color scans, and saving all other pages as black and white. To automatically detect color in a scanned image, follow these steps: 1. Open the HP Smart Document Scan Software. 2. Select a scan profile, and then click Edit profile. 3.
24 Chapter 3 Overview of scanning software features ENWW
4 Care and maintenance This section presents information about how to care for and maintain the scanner. For the latest maintenance information, see www.hp.com/support. ● HP Scanner Tools Utility Maintenance tab ● Order maintenance and scanning supplies ● Clean the scanning strips ● Clean the paper path ● Clean the rollers ● Replace the rollers Occasional cleaning of the scanner helps ensure high-quality scans.
Clean the scanning strips Clean both strips of glass inside the document feeder periodically, including any time a scanned image has streaks. Lightly dust the small strips of gray reflective material if debris is present. To clean these components, follow these steps: 1. Press the Power ( ) button to turn off the scanner, and then disconnect the USB cable and power supply from the scanner. 2. Open the document feeder hatch. 3.
ENWW 4. Dry the scanning strips with a dry, soft, lint-free cloth, making sure to wipe the small strips of gray reflective material on each strip. 5. Close the document feeder hatch, reconnect the USB cable and power supply to the scanner, and then press the Power ( ) button to turn on the scanner.
Clean the paper path If scanned images have streaks or scratches, use an HP paper path cleaning cloth to clean the paper path. NOTE: If you experience repeated document jams, clean the rollers. To clean the paper path, follow these steps: 1. Open the sealed HP paper path cleaning cloth container, starting at the notch. Take care not to tear the cleaning cloth. 2. Remove the cleaning cloth and unfold it. 3. Place the unfolded cloth into the document input tray. 4. Press the Tools ( 5.
Clean the rollers Clean the rollers under the following conditions: ● The HP Scanner Tools Utility indicates that cleaning is needed. ● You experience repeated document jams. ● The document feeder does not pull pages into the paper path. ● The scanned images are elongated.
3. On the rear of the open document feeder, raise the feed roller covers to expose the upper feed rollers. 1 2 4. On the front of the open document feeder, squeeze in on the tabs on the roller cover assembly and pull gently forward to expose the upper feed rollers.
5. Using an HP paper path cleaning cloth or a clean, lint-free cloth moistened with distilled water or clean tap water, wipe the feed rollers on both sides of the open hatch. Wipe the rollers from the top down, rotating the rollers a full 360 degrees to ensure that you wipe the complete surface. CAUTION: Wait two minutes for the feed rollers to dry before loading documents into the document input tray. 6. Close the roller covers on the front and rear of the open document feeder hatch. a.
Replace the rollers Replace the rollers under the following conditions: ● When the Maintenance Recommended dialog box indicates they are due for maintenance. ● If you experience repeated document jams and cleaning the rollers did not help. The roller replacement kit contains rollers and installation instructions. To order the replacement kit, go to www.hp.com/support. NOTE: The roller replacement kit is a consumable and is not covered under warranty or standard service agreements.
3. On the rear of the open document feeder, raise the feed roller covers to expose the upper feed rollers. 1 2 ENWW 4. Slide each of the feed rollers to the right to free them from their respective pins and set the rollers aside. 5. Replace the feed rollers with the comparable rollers from the roller replacement kit.
CAUTION: figure. 6. 7. Make sure to insert the new rollers onto their respective pins, as shown in the previous ● Insert the medium-sized double roller onto the top pin and slide it to the left. ● Insert the single roller onto the center pin and slide it to the left. ● Insert the large double roller onto the bottom pin and slide it to the left. Close the roller covers on the rear of the open document feeder hatch. a.
2 3 1 9. a. Slide your fingertip behind the roller pin (1) and pull forward to release the pin from its housing (2). b. Slide the roller forward to free it from the pin (3) and set the roller aside. Replace the front roller with the comparable roller from the roller replacement kit. 3 4 1 2 a.
a. Press the Tools ( b. Under Record Replacement, click Record Replacement to log this replacement activity and update the roller replacement history. ) button on the scanner front panel to open on the HP Scanner Tools Utility. For more information, see the HP Scanner Tools Utility Help. NOTE: HP recommends that you replace the rollers every 100,000 scans.
5 Troubleshooting This section contains solutions for common problems with the scanner. ● Scanner errors ● Basic troubleshooting tips ● Scanner installation troubleshooting ● Scanner initialization or hardware problems ● Scanner operation problems ● Scanner buttons are not working correctly ● Scanner paper path problems For additional troubleshooting, see the Help for the HP scanning program that you are using.
Scanner errors For help responding to an error, see the appropriate topics below. Error Description USB Error 1. Check the USB connection between the scanner and the computer. 2. Use the Windows Device Manager tool to verify that the computer recognizes the scanner. ● Windows 8: Right-click the Start screen, click All apps, scroll to the right until you see the Windows System heading, click Control Panel, click Hardware and Sound, and then click Device Manager.
Basic troubleshooting tips Simple issues such as smudges on the scanning strips or loose cables can cause your scanner to produce fuzzy scans, operate in an unexpected manner, or fail to operate. Always check the following items when you encounter scanning problems. ● If scans are fuzzy, check to see if the scanning strips inside the document feeder are dirty or smudged. If so, clean the scanning strips.
Scanner installation troubleshooting ● Check the cables ● Uninstall and then reinstall the HP Scanjet drivers and tools Check the cables Cable type Action Power cable The power cable is connected between the scanner and a power outlet. USB cable ● Ensure that the power cable is securely connected between the scanner and a live electrical outlet or surge protector. ● If the power cable is connected to a surge protector, ensure that the surge protector is plugged into an outlet and turned on.
Scanner initialization or hardware problems ● Check the USB connection ● Check that the scanner has power ● Reset the scanner ● The scanner has stopped working correctly Check the USB connection Check the physical connection to the scanner. ● Use the cable that was included with the scanner. Another USB cable might not be compatible with the scanner. ● Ensure that the USB cable is securely connected between the scanner and the computer.
Check that the scanner has power The power cable is connected between the scanner and a power outlet. ● Ensure that the power cable is securely connected between the scanner and a live electrical outlet. ● If the power cable is connected to a surge protector, ensure that the surge protector is plugged into an outlet and turned on. ● Ensure that the scanner is receiving power. ◦ Check that the green LED on the power supply case is on.
ENWW a. Check that the green LED on the power supply case is on. b. If the green LED is not on, ensure that power is available to the power outlet or surge protector that the power supply is plugged into. c. If power is available to the power outlet or surge protector but the green LED is still not on, the power supply might be defective. Contact www.hp.com/support for assistance. 3. Unplug the power cable from the power source, wait 30 seconds, and then plug it back in. 4. Restart your computer.
Scanner operation problems ● Scanner will not turn on ● Scanner keeps turning off ● The LCD is having display issues or scanner buttons are not working as expected ● Scanner does not scan right away ● Scanner scans only one side of a two-sided page ● Scanned pages are missing at the scan destination ● Scanned image is fuzzy ● Scanned pages are out of order at the scan destination ● Optimize scanning and task speeds ● The scan is completely black or completely white ● Scanned images are
● To specify the period of inactivity after which the scanner goes into Sleep Mode, select 15 minutes or 1 hour from the Sleep: Put the scanner to sleep after: drop-down list. ● To specify the period of inactivity after which the scanner automatically turns off, select the appropriate value (1 hour, 2 hours, 4 hours, or Never) from the Auto-Off: Turn off the scanner after: drop-down list.
Scanned pages are out of order at the scan destination ● Verify that the page order of the original document is correct before placing the document face down into the document input tray. ● Make sure that there are no staples, paper clips, or any other attached material (such as adhesive notes) that may cause the pages to feed incorrectly. ● Verify that pages are not stuck together. Optimize scanning and task speeds Several settings influence the total time for a scanning job.
● If you are scanning a mixed-size stack, make sure the pages are properly prepared and placed in the document input tray as shown 3 1 2 ◦ Arrange documents face down with the largest document on the bottom of the stack (1). ◦ Place the next largest document face down on the largest document, top-justified and centered horizontally. Repeat this step for each document in the stack.
Scanning at a higher resolution than necessary creates a larger file with no additional benefit. 48 ● Color scans create larger files than do black and white scans. ● If you are scanning a large number of pages at one time, consider scanning fewer pages at a time to create more, smaller files.
Scanner buttons are not working correctly After each step, press a button to see if it is working correctly. If the problem persists, proceed with the next step. 1. A cable might be loose. Ensure that the USB cable and the power supply are securely connected. 2. The HP Scanner Tools Utility might have been used to disable the buttons. If so, use the HP Scanner Tools Utility to re-enable the buttons. 3. Turn off the scanner, wait 30 seconds, and then turn the scanner back on. 4. Restart your computer.
Scanner paper path problems ● Paper jamming, skewing, misfeeds, or multiple-page feeds ● Scanning fragile originals ● Paper does not feed from the scanner ● Originals are curling up in the scanner output tray ● The bottom of the scanned image is cut off ● The scanned images have streaks or scratches ● An item loaded in the scanner jams repeatedly ● Clear jams from the scanner paper path Paper jamming, skewing, misfeeds, or multiple-page feeds ● Scanning damp or wet pages can cause paper jam
● The input tray or output tray might contain more than the maximum number of pages. Load fewer pages in the input tray, and remove pages from the output tray. ● Clean the scanner paper path to help reduce misfeeds. If misfeeds still occur, clean the rollers. If misfeeds still occur, replace the rollers.
The scanned images have streaks or scratches After each step, try another scan to see if the streaks or scratches are still apparent. If so, then try the next step. For information on cleaning the scanner, see the Care and maintenance section of the User Guide. ● Check that the originals are clean and unwrinkled. ● Clean the scanning strips inside the document feeder. ● Clean the rollers. An item loaded in the scanner jams repeatedly ● The item might not meet the guidelines for acceptable originals.
6 Product accessibility and support Accessibility options on this scanner include an LCD Reader and the ability to enable and disable scanner buttons. ● LCD Reader ● Control of the scanner buttons LCD Reader The LCD Reader is software that outputs the status of the LCD on the scanner front panel to the computer monitor as the LCD changes. The LCD Reader enables accessibility software tools to express what is being shown on the scanner front panel. NOTE: The LCD Reader is English-only.
54 Chapter 6 Product accessibility and support ENWW
7 Specifications and warranty This section contains regulatory information and product specifications for your scanner.
Scanner specifications Name Description Scanner type Duplex sheet-feed scanner Size Width: 310 mm (12.2 in), Depth: 183.8 mm (7.23 in), Height: 182.4 mm ( 7.18 in) Weight 4.82 kg (10.63 lbs) Scanning element Contact image sensor (CIS) Interface USB 2.0 high speed (compatible with USB 1.1) Optical resolution 600 x 600 dpi hardware Power adapter information ● This product is intended to be supplied by a Listed Power Unit, marked with LPS or Limited Power Source and rated O/P: 32 Vdc, 1.
Environmental specifications Name Description Temperature Operating the scanner: 10° to 35° C (50° to 95° F) Storage: -40° to 65° C (-40° to 149° F) Relative humidity Operating the scanner: 10% to 80% noncondensing 10° to 35° C (50° to 95° F) Storage: up to 90% at 0° to 65° C (32° to 149° F) NOTE: HP is committed to providing our customers with information about the chemical substances in our products as needed to comply with legal requirements such as REACH (Regulation EC No 1907/2006 of the European
Disposal of Waste Equipment by Users in Private Households in the European Union This symbol on the product or on its packaging indicates that this product must not be disposed of with your other household waste. Instead, it is your responsibility to dispose of your waste equipment by handing it over to a designated collection point for the recycling of waste electrical and electronic equipment.
Hewlett-Packard limited warranty statement HP Scanjet Enterprise Flow 5000 s2 scanner Model Asia/Pacific Americas Europe/Middle East/Africa 5000 s2 1 year 1 year 1 year 1. HP warrants to you, the end-user customer, that HP hardware, accessories, and supplies will be free from defects in materials and workmanship after the date of purchase, for the period specified above.
60 Chapter 7 Specifications and warranty ENWW
Index A about scan profiles 5 accessibility 53 applications scan from 15 Auto color detect 23 automatically crop or pad scanned image to selected page size 22 automatically detect page size 21 B Back button 4 bins locating 3 black scans troubleshoot 46 blank page suppression 2 blurry images 45 buttons scanner front panel 4 C cables troubleshoot 40 Cancel button 4 capacity, document input tray 2 clean paper path 28 rollers 29 scanning strips 26 cleaning cloth 28 cloud, scan to 20 Color dropout 21 colored st
paper path clean 28 feeding problems 50 paper-handling 2 parts order 32 power management 44 power supply troubleshoot cable 40 power switch, locating 3 problems with LCD 45 product Sleep Mode 7 product info 1 product support 53 profiles import from and export to SDSS 19 import from and export to TWAINcompliant software 19 profiles, about 5 programs scan from 15 J jams troubleshoot 52 L LCD 4 LCD problems 45 LCD Reader 53 lines troubleshoot 47 long-page support 20 M maintenance clean paper path 28 clean rol
fuzzy images 45 installation 40 jams 52 large scan files 47 misfeeds 50 page order 46 pages missing 45 paper not feeding 50 power 44 reset scanner 42 scanning fragile items 51 speed 45, 46 stops working 42 streaks 52 two-sided scans 45 uninstall and reinstall software 40, 42 white lines 47 white scans 46 troubleshooting buttons 45 display 45 LCD 45 turn on scanner troubleshoot 44 TWAIN 7 TWAIN-compliant programs scan from 15 two-sided scans troubleshoot 45 U uninstall and reinstall software 40, 42 USB 2.