
Hardware Reference Manual
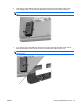
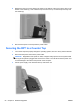
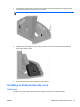
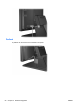
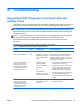
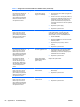
Table Of Contents
- Product Features
- Hardware Upgrades
- Tools Needed
- Warnings and Cautions
- Mounting the RP7 to a Wall or Swing Arm
- Installing the RP7 Adjustable Stand
- Routing Cables to External Devices
- Installing Optional Integrated USB Modules
- Installing an Optional HP Retail RP7 10.4” Customer Display
- Installing an Optional HP Retail RP7 VFD Customer Display
- Installing Additional Memory
- Removing and Installing a Hard Drive
- Replacing the Battery
- Using the USB Security Cover
- Securing the RP7 to a Counter Top
- Installing an External Security Lock
- Configuring the Software
- Troubleshooting
- Electrostatic Discharge
- Computer Operating Guidelines, Routine Care and Shipping Preparation
- Index

Table A-1 Diagnostic Front Panel LEDs and Audible Codes (continued)
Activity Beeps Possible Cause Recommended Action
Red Power LED flashes four
times, once every second,
followed by a two second
pause. Beeps stop after fifth
iteration but LEDs continue
until problem is solved.
4 Power failure (power
supply is overloaded).
1. Ensure the DC power cable is plugged into
the I/O panel.
2. Check if a device is causing the problem by
removing ALL attached devices (such as a
hard drive). Power on the system. If the
system enters the POST, then power off
and replace the device to see if the problem
is resolved.
3. Replace the power supply.
4. Replace the system board.
Red Power LED flashes five
times, once every second,
followed by a two second
pause. Beeps stop after fifth
iteration but LEDs continue
until problem is solved.
5 Pre-video memory error. CAUTION: To avoid damage to the SODIMMs
or the system board, you must unplug the
computer power cord before attempting to
reseat, install, or remove a SODIMM module.
1. Reseat SODIMMs.
2. Replace SODIMMs one at a time to isolate
the faulty module.
3. Replace third-party memory with HP
memory.
4. Replace the system board.
Red Power LED flashes six
times, once every second,
followed by a two second
pause. Beeps stop after fifth
iteration but LEDs continue
until problem is solved.
6 Pre-video graphics error. 1. Unplug the power cord. Press the CMOS
reset button. Install the FDO jumper to
disable ME (or remove the FDO jumper to
disable ME if it was installed).
2. Replace the system board.
Red Power LED flashes
seven times, once every
second, followed by a two
second pause. Beeps stop
after fifth iteration but LEDs
continue until problem is
solved.
7 System board failure
(ROM detected failure
prior to video).
Replace the system board.
Red Power LED flashes eight
times, once every second,
followed by a two second
pause. Beeps stop after fifth
iteration but LEDs continue
until problem is solved.
8 Invalid ROM based on
bad checksum.
1. Reflash the system ROM with the latest
BIOS image.
2. Replace the system board.
Red Power LED flashes nine
times, once every second,
followed by a two second
pause. Beeps stop after fifth
iteration but LEDs continue
until problem is solved.
9 System powers on but is
unable to boot.
1. Replace the processor.
2. Replace the system board.
62 Appendix A Troubleshooting ENWW