
Hardware Reference Manual
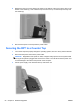
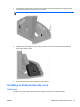
Table Of Contents
- Product Features
- Hardware Upgrades
- Tools Needed
- Warnings and Cautions
- Mounting the RP7 to a Wall or Swing Arm
- Installing the RP7 Adjustable Stand
- Routing Cables to External Devices
- Installing Optional Integrated USB Modules
- Installing an Optional HP Retail RP7 10.4” Customer Display
- Installing an Optional HP Retail RP7 VFD Customer Display
- Installing Additional Memory
- Removing and Installing a Hard Drive
- Replacing the Battery
- Using the USB Security Cover
- Securing the RP7 to a Counter Top
- Installing an External Security Lock
- Configuring the Software
- Troubleshooting
- Electrostatic Discharge
- Computer Operating Guidelines, Routine Care and Shipping Preparation
- Index

Configuring Powered Serial Ports
The serial ports can be configured as standard (non-powered) serial ports or powered serial ports.
Some devices use a powered serial port. If the serial port is configured as a powered port, devices
that support a powered serial interface do not require an external power source.
NOTE: The computer ships with all serial ports configured in standard serial mode by default unless
the powered serial port AV numbers are ordered.
The serial ports can be configured using the Computer F10 Setup utility. Under the Onboard
Devices menu, you are given the option to select the following three settings for each individual serial
port:
●
Standard
●
5v on pins 1 and 9
●
12v on pins 1 and 9
NOTE: To access the Computer F10 Setup utility, restart the computer and press the F10 key as
soon as the HP logo screen is displayed (before the computer boots to the operating system).
60 Chapter 3 Configuring the Software ENWW