
Hardware Reference Manual


Installing an Optional 12-Volt Powered USB Expansion Card
The computer is equipped with a 24-volt Powered USB connector on the riser card and one 12-volt
Powered USB connector on the system board. It may also have an optional 12-volt Powered USB
expansion card installed with three extra 12-volt Powered USB ports. The 24-volt Powered USB
connector and the 12-volt Powered USB connector are keyed differently as a precaution to prevent
connection errors.
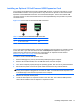
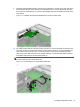
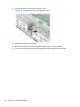
Figure 2-14 24-volt and 12-volt Powered USB Connectors
Table 2-3 24-volt and 12-volt Powered USB Connectors
No. Connector Color
1 24-volt Powered USB Red
2 12-volt Powered USB Teal
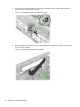
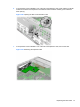
The 12-volt Powered USB expansion card must be installed in the PCI Express x1 expansion socket
on the riser card. If your riser card does not have a PCI Express x1 expansion socket, you can
replace the riser card with one that does have a PCI Express x1 expansion socket. Refer to
Replacing the Riser Card on page 20 for more information.
To install a 12-volt Powered USB expansion card:
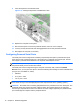
1. Remove/disengage any security devices that prohibit opening the computer.
2. Remove all removable media, such as USB flash drives, from the computer.
3. Turn off the computer properly through the operating system, then turn off any external devices.
4. Disconnect the power cord from the power outlet and disconnect any external devices.
CAUTION: Regardless of the power-on state, voltage is always present on the system board
as long as the system is plugged into an active AC outlet. You must disconnect the power cord
to avoid damage to the internal components of the computer.
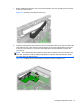
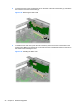
5. Remove the computer access panel.
6. Locate the PCI Express x1 expansion socket on the riser card. The Powered USB expansion
card must be installed in the PCI Express x1 expansion socket.
Installing an Expansion Card 17