
HP Designjet Z2100 Printing Guide [HP Raster Driver] - Proof the output on the monitor [Adobe Photoshop CS2 - Windows]
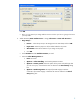

Click OK.
• Now, you can retouch your image and the monitor will show you how it’s going to look once
you’ve printed it.
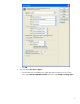
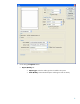
6. Adobe Photoshop Print with Preview… settings, File menu > Print with Preview…:
• Page Setup…:
o Printer...: Select the printer (ex. HP Designjet Z2100 24in Photo) and click OK.
o Paper Size: Select the paper size of the media loaded on the printer.
o Orientation: Select the orientation of your image on the paper.
o Click OK.
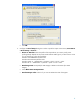
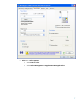
• Set the Position and the Scaled Print Size you need.
• Select the Color Management tab:
o Print: Document.
o Options > Color Handling: Let Photoshop Determine Colors.
o Options > Printer profile: Select the profile of the printer and media type that
you will use to print, it should be the same as selected in the Proof Setup dialog
box.
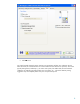
o Options > Rendering Intent: Perceptual (for RGB images) or Relative
Colorimetric (for CMYK images), it should be the same as selected in the Proof
Setup dialog box.
5