
HP Designjet Z2100 Printing Guide [HP Raster Driver] - Printing in Black & White [Adobe Photoshop CS2 - Mac OS X]


The simplest approach to creating a black and white image is taking a color image and converting it
to grayscale in a photo imaging program such as Photoshop. In addition, although converting an
image from color to grayscale is easy, the opposite operation is complex, in this case it is better to
have it already in color. If your image is already converted, you only have to bypass the section 5.
1. First recommendations:
• See the
Media type functionality & features and choose the most appropriate media.
• It is essential to have the media type correctly calibrated with the printer and print mode,
consult the
Calibrate my printer document.
• In order to get a correct display, it’s also essential to have the monitor calibrated, consult the
Profile my monitor section.
2. Open Adobe Photoshop CS2.
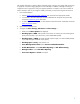
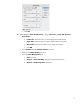
3. Configure the Color Settings, Edit menu > Color Settings…:
• Make sure the More Options are displayed.
• Working Space > RGB: Select profile of the scanner or camera you have used to get the
photo (source profile), if you don’t have it, select Adobe RGB (1998).
• Working Space > CMYK: Euroscale Coated v2 (for Europe), U.S. Web Coated (SWOP)
v2 (for US) and Japan Standard v2 (for Japan).
• Working Space > Gray: Gray Gamma 2.2.
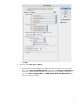
• Color Management Policies: Select Preserve Embedded Profiles.
• Profile Mismatches: Check Ask When Opening and Ask When Pasting.
• Missing Profiles: Check Ask When Opening.
• Conversion Options > Intent: Perceptual.
2