
HP Designjet Z6100 Printer Series - Quick Reference Guide


Insert a printhead
1.
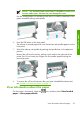
If the printhead is new, shake it vigorously before removing the protective caps.
Hold the printhead upright (with the protective caps facing down) and shake
the printhead vigorously in a smooth up and down motion for about 15 seconds.
NOTE: Be careful not to strike the printhead against anything while
shaking it, because this could cause damage.
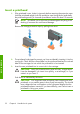
Remove the orange protective caps by pulling them down.
2.
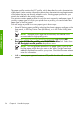
The printhead is designed to prevent you from accidentally inserting it into the
wrong slot. Check that the colored label on the printhead matches the colored
label of the carriage slot into which the printhead is to be inserted.
3.
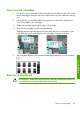
Insert the new printhead into its correct slot in the carriage.
CAUTION: Insert the printhead slowly and vertically, straight down.
It can be damaged if you insert it too quickly, or at an angle, or if you
rotate it as you insert it.
Push down as indicated by the arrow.
CAUTION: You might feel some resistance when installing the new
printhead, so you need to press it down firmly but smoothly. You should
hear a beep and see confirmation on the front-panel display that the
printhead has been inserted. If you have difficulty, see Cannot insert a
printhead in Using your printer.
32 Chapter 3 Handle the ink system
Handle the ink