
Reference Guide


reference guide
wireless network setup
165
wireless network setup
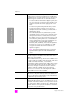
confirm settings screen
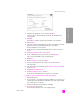
23 Verify that the settings are correct, and then click Next.
The installation software attempts to find your device on the wireless
network and verify proper communications. The installation switches your
wireless settings back to their original settings.
The Verifying Printer Settings screen appears as Setup tries to communicate
with the HP PSC using the new settings. This might take several minutes.
If Setup is able to communicate with the HP PSC, the Congratulations
screen appears.
24 Click Quit.
The Installer re-activates and the software installer screen reappears.
25 Click Continue.
26 Follow the instructions provided by the hp all-in-one installer to check and
prepare the system, and install drivers, plug-ins, and software.
The Congratulations! screen appears.
27 Enable your network interface card (NIC), and reconnect your Internet
access.
28 At the Congratulations! screen, click Continue.
29 Select a default paper size for your device, and click Continue.
Page 1 of the HP All-in-One Setup Assistant appears.
30 Click Next.
31 On the Select Device screen, select TCP/IP.
32 Select your HP PSC from the list of devices shown and click Next.
Fax Setup begins.
33 Follow the instructions provided by the HP All-in-One Setup Assistant and
finish Fax Setup.
34 Complete the Print Queue Setup.
35 At the Congratulations screen, click Done.
The HP Photo and Imaging Director launches on your desktop.
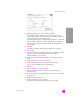
Confirm Settings
Setup recommends the following settings for the printer.
The printer has been configured. Click ‘Next’ to accept these settings.
Printer Name:
TCP/IP Settings:
IP Address:
Automatically Obtained
To modify the settings on this computer, click ‘Change
Settings.’
Change Settings
Wireless Settings:
Mode:
Network Name (SSID):
Encryption:
Ad Hoc
8GS97TW
Enabled