
Reference Guide


hp psc 2500 series
chapter 15
154
wireless network setup
28 Click Next and follow the instructions provided by the Installer to check and
prepare the system, and install drivers, plug-ins, and software.
This will take several minutes.
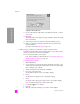
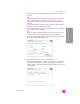
connection type screen
29 At the Connection Type screen, select Through the network and then click
Next.
The Searching screen appears as Setup searches for your configured
HP PSC on the network.
When the search is finished, the Confirm Settings screen appears.
30 Verify the wireless printer settings and then click Next.
The Installer status screen appears as Setup installs the software. This might
take several minutes.
31 At the prompt, restart your computer to finish the installation process.
32 After your computer is restarted, complete the Fax Setup Wizard and
product registration.
Fax setup is described in fax setup on page 175.
33 Enable your network interface card (NIC), and reconnect your Internet
access.
install your hp psc software on a Macintosh (infrastructure mode)
The recommended method of connecting a Macintosh to your HP PSC in
infrastructure mode is to set up and configure the HP PSC through a wired
connection.
Connect your HP PSC to the access point with an Ethernet cable and, after Setup
is complete, remove the cable and switch to a wireless connection. Your
computer can be connected to the access point either wired or wirelessly.
Note: Before installing your HP PSC software, see connect your hp psc to a
wireless network or computer on page 147.
Note: Installation time can range from 20 minutes to 1 hour depending on
your OS, the amount of available space, and the processor speed.
to install your hp psc software
1 Print a network configuration page.
For more information, see use the network configuration tools on page 75.
2 Quit all applications.
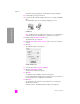
Choose how you will connect your device to this computer.
Directly to this computer (for example, using a USB cable).
Through the network.
Click Next to continue.
Connection Type