
Reference Guide


hp psc 2500 series
chapter 3
24
memory card
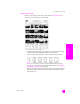
the memory card. The file name, index number, and date appear under each
thumbnail. Proof sheets are also a quick way to create a printed catalog of your
digital photos.
This section contains the following topics:
• print a proof sheet on page 24
• complete the proof sheet on page 25
• print photos by scanning a proof sheet on page 26
• create a video action print by scanning a proof sheet on page 26
Tip: You can optimize the quality of the photos you print with your
HP PSC by purchasing a photo print cartridge. Remove the black
print cartridge and insert the photo print cartridge in its place.
With the tri-color print cartridge and photo print cartridge
installed, you have a six-ink system, which provides enhanced
quality photos. When you want to print regular text documents,
swap the black print cartridge back in.
For more information, see order supplies on page 91.
print a proof sheet
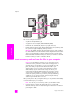
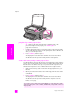
1 Insert the memory card into the appropriate slot on your HP PSC.
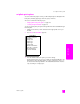
2 Press Proof Sheet, and then press 1.
This displays the Proof Sheet Menu and then selects Print Proof Sheet.
Note: Depending on how many photos are on the memory card, the time it
takes to print a proof sheet can vary greatly.
3 If there are more than 20 photos on the card, the Select Photos Menu
appears. Press the number next to the command you want to select:
–1. All
–2. Last 20
– 3. Custom Range
Note: Use the proof sheet index number to select which photos to print for
a custom range. This number might be different from the number associated
with the photo on your digital camera. If you add photos to, or delete photos
from, your memory card, you need to reprint the proof sheet to see the new
index numbers.
4 If you choose Custom Range, enter the photo index numbers for the first
and last photos you want to print as prompted.
Note: You can erase index numbers by pressing to backspace.
Do you want to do more than just print your photos? You can enhance and edit
digital photos before printing them by using the HP Image Editor available
through the HP Director. Just start the HP Director and click HP Gallery. Select
the photo you want to edit, and click Image Editor in the top pane. Add text or
special effects to the photo, improve a poor quality photo, or get rid of red eye.
Macintosh users can simply double-click an image in the HP Gallery to open it
for editing in an Image Window.