
Reference Guide


reference guide
use a photo memory card
25
memory card
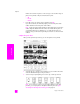
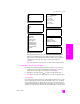
3 Load the proof sheet face down on the right front corner of the glass.
Position the proof sheet so the top of the page is along the right edge of
the glass.
proper placement of the proof sheet
print photos by scanning a proof sheet
After you have printed and completed a proof sheet (see print photos by using
a proof sheet on page 23 and complete the proof sheet on page 24), you can
print photos from the memory card by scanning the proof sheet.
Note: You might want to use a photo print cartridge for superior print
quality. With the tri-color and photo print cartridges installed, you have a
six-ink system. See work with print cartridges on page 62 for more
information. When you want to print regular text documents, swap the
black print cartridge back in.
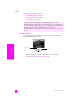
1 Make sure the memory card is inserted into the appropriate slot on your
HP PSC.
2 Load the appropriate paper, such as photo paper, in the input tray.
3 Press Proof Sheet, and then press 2 to scan the proof sheet.
The HP PSC scans the proof sheet and prints the selected photos.
Did you know you can create dazzling slide shows with the software that came
with your HP PSC? A multimedia presentation of your photos can be more
effective than simple prints. If your computer is equipped with an internal or
external CD writer, you can create multimedia presentations of your photo
collections by using the Memories Disc feature available through the HP
Director. Just start the HP Director and open the HP Photo & Imaging Gallery.
Click the Make CD tab to begin creating a movie-like presentation of selected
photos. You can add music, titles, and much more. On a Macintosh see the
hp gallery section in the hp photo and imaging help book for information on
the Memories Disc.