hp psc 2170 series all-in-one reference guide
© Copyright Hewlett-Packard Company 2003 All rights are reserved. No part of the document may be photocopied, reproduced, or translated to another language without the prior written consent of Hewlett-Packard Company. This product incorporates Adobe’s PDF technology, which contains an implementation of LZW licensed under U.S. Patent 4,558,302. Adobe and the Acrobat logo are either registered trademarks or trademarks of Adobe Systems Incorporated in the United States and/or other countries.
contents 1 get help . . . . . . . . . . . . . . . . . . . . . . . . . . . . . . . . . . . . . . . 1 2 front panel overview . . . . . . . . . . . . . . . . . . . . . . . . . . . . . . 3 tutorial . . . . . . . . . . . . . . . . . . . . . . . . . . . . . . . . . . . . . . . . . . . . . . 3 use your hp psc with a computer . . . . . . . . . . . . . . . . . . . . . . . . . . . . 6 3 load originals and load paper . . . . . . . . . . . . . . . . . . . . . . . 9 load originals . . . . . . . . . . . . . . . . . . .
7 maintain your hp psc . . . . . . . . . . . . . . . . . . . . . . . . . . . . .37 clean the glass . . . . . . . . . . . . . . . . . . . . . . . . . . . . . . . . . . . . . . . . 37 clean the lid backing . . . . . . . . . . . . . . . . . . . . . . . . . . . . . . . . . . . . 37 clean the exterior. . . . . . . . . . . . . . . . . . . . . . . . . . . . . . . . . . . . . . . 37 work with print cartridges . . . . . . . . . . . . . . . . . . . . . . . . . . . . . . . . .38 restore factory defaults . . . . . . .
index . . . . . . . . . . . . . . . . . . . . . . . . . . . . . . . . . . . . . . . .
vi hp psc 2170 series
get help 1 This Reference Guide contains information on using your HP PSC and provides additional troubleshooting assistance for the installation process. The Reference Guide also contains information on how to order supplies and accessories, technical specifications, support, and warranty information. The table below lists additional sources of information for your HP PSC. help description Setup Poster The Setup Poster provides instructions for setting up and configuring your HP PSC.
chapter 1 2 hp psc 2170 series
front panel overview 2 You can perform many functions using either the front panel or the HP PSC software. Even if you do not connect your HP PSC to a computer, you can use the front panel to copy documents or photos, print a proof sheet for a photo card, and print photos from a photo card. You can change a wide variety of settings using the front-panel buttons and menu system. tutorial This brief tutorial teaches you how to use your HP PSC to make a copy, adjust copy settings, and print a report.
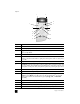
chapter 2 1 2 4 5 3 6 7 9 8 10 11 12 13 14 button purpose 1 On: Turn the HP PSC on or off. 2 Cancel: stop a job, exit a menu, or exit settings. 3 Copy: select the copy function. When the button is lit, the copy function is selected. This button is lit by default. 4 Scan: select the scan function. When the button is lit, the scan function is selected. 5 Photo Card: select the Photo Card function. When the button is lit, the Photo Card function is selected.
front panel overview Review the rest of this HP PSC 2170 Series help to find out how to make other changes and use other features. make a copy Follow the instructions below to make a copy of your color photo or picture. 1 Open the lid of your HP PSC and place your picture face down in the bottom-right corner of the scanner glass with the sides of the picture touching the right and bottom edges. lid 2 Top edge of original Press Start Color.
chapter 2 If you do not do anything else with your HP PSC, the settings that you adjusted will return to their default settings within two minutes. The number of copies returns to one and the copy percentage returns to 100%. 8 If you do not want to wait for two minutes, press Cancel. Next you will use the Fit to Page option to enlarge your photograph. 9 Press Options until Reduce/Enlarge appears. 10 Press until Fit to Page appears. 11 Press Start Black or Start Color.
front panel overview 1 2 9 3 4 5 6 7 8 the hp photo & imaging director feature purpose 1 Select Device: Use this feature to select the product you want to use from the list of installed HP products. 2 Settings: Use this feature to view or change various settings for your HP device, such as print, scan, copy, or image unload. 3 Scan Picture: Scans an image and displays it in the HP Photo & Imaging Gallery.
chapter 2 The following figure shows some of the features available through the HP Director for Macintosh. Consult the legend for a brief explanation of a specific feature. 3 1 2 6 4 5 8 7 the hp photo and imaging director for macintosh, in OS9 and OSX feature 8 purpose 1 Unload Images: Unloads the images from a photo card. 2 Scan Picture: Scans an image and displays it in the HP Photo and Imaging Gallery.
load originals and load paper 3 You can make copies from originals loaded on the glass. You can also print and copy onto a variety of paper types, weights, sizes, and transparency films. It is important, however, that you choose the appropriate paper and make sure that it is loaded correctly and not damaged. load originals You can copy or scan any original by placing it on the glass.
chapter 3 For best results, adjust the paper settings each time you change paper types or paper sizes. For more information, see set the paper type on page 14. to load the paper tray 1 Remove the output tray, and slide the paper-width and paper-length guides to their outermost positions. Note: Diagrams stamped on the output tray provide tips for installing print cartridges. The location of the Support Web site for HP PSC products, www.hp.com/support, is also provided.
load originals and load paper 6 To prevent printed paper from falling off the tray, fully extend the outputtray extender. load envelopes Use the print feature of your software to print to envelopes with your HP PSC. Your HP PSC provides two methods for working with envelopes. Do not use shiny or embossed envelopes, or envelopes that have clasps or windows. • If you are printing one envelope, slide the envelope into the envelope slot, which is located on the right side toward the back of the output tray.
chapter 3 load 4 x 6 inch photo paper Following is the procedure for loading 4-by-6 inch (10-by-15 cm) photo paper into your HP PSC. 1 Remove all paper from the paper tray, and then slide a stack of photo paper into the tray until it stops. Make sure the print side (glossy) faces down. If the photo paper you are using has perforated tabs, load the photo paper so that the tabs are closest to you. Refer to the icons stamped on the input that indicate how tabbed media should be loaded.
load originals and load paper tips for loading other types of paper in the paper tray The following table provides guidelines for loading certain types of paper and transparency film. For best results, adjust the paper settings each time you change paper types and paper sizes. For more information, see set the paper type on page 14. paper tips HP papers • HP Premium Inkjet Paper: Locate the gray arrow on the nonprinting side of the paper, and then insert paper with the arrow side facing up.
chapter 3 paper tips Continuous (banner) paper (works only with printing) Continuous banner paper is also known as computer or z-fold paper. • Before loading banner paper, remove all other paper from the paper tray, then remove the output tray. • If you use non-HP banner paper, use 20-lb. paper and fan the paper before loading it. • Verify that the stack of banner paper contains at least five pages in the stack.
load originals and load paper 1 Press Copy or Photo Card, if not already lit. 2 Press Options until Paper Size appears. 3 Press 4 Press Enter to choose the displayed paper size. until the appropriate paper size appears. To avoid jams, remove papers from the output tray frequently. The output tray capacity is affected by the type of paper and the amount of ink you are using. For more information about output-tray capacity, see technical information on page 51.
chapter 3 16 hp psc 2170 series
4 use a photo card what is a photo card? If your digital camera uses a photo card to store photos, you can insert the photo card in your HP PSC to print or save your photos. You can print a Proof Sheet, which may be several pages long and shows thumbnail views of photos stored on the photo card, and print photos from the photo card, even if your HP PSC is not connected to a computer. Your HP PSC can read SmartMedia, CompactFlash, Memory Stick, and SecureDigital photo cards.
chapter 4 insert a photo card After you take photos with your digital camera, you can print them immediately or save them directly to your computer. 1 Insert the photo card into the appropriate slot on your printer. When the photo card is inserted correctly, both the Photo Card button on the front panel and the LED next to the slot blink. 2 Reading camera photo card... appears on the front panel display. The light next to the card slot blinks green when the card is being accessed.
use a photo card hp photo & imaging gallery You can use the HP Photo & Imaging Gallery for viewing and editing image files. You can print images, send images by e-mail or fax to family and friends, upload images to a website, or use images in fun and creative printing projects with the HP Photo & Imaging Gallery. When you save photo card files to your computer, the HP Photo & Imaging Gallery opens automatically and displays thumbnails (small versions) of your images.
chapter 4 1 Select the photos to print by filling in the circles located underneath the thumbnail images on the Proof Sheet with a dark pen. 2 Select the number of prints, image size, paper size, and frame style by filling in the circles in step 2 of the Proof Sheet. 3 Place the top of the Proof Sheet face down on the scanner glass in the front-right corner with the sides of the originals touching the right and front edges, then close the lid.
use a photo card 1 Make sure that the photo card used to print the proof sheet is inserted into the appropriate slot on your HP PSC. 2 Load the appropriate paper, such as photo paper, in the paper tray. 3 Place the proof sheet on the glass. 4 Press Proof Sheet, then press 2. The glass is scanned and the HP PSC prints the photos you specified on the Proof Sheet.
chapter 4 7 Press Options or Photo Card repeatedly to scroll through, and modify, Photo Card options. 8 Press Start Black or Start Color. print a DPOF file The Digital Print Order Format (DPOF) is an industry-standard print file request that can be created by some digital cameras. See your digital camera documentation to see if it supports Digital Print Order Format (DPOF).
reference guide x 6 inch x 7 inch x 10 inch 1/2 x 3 1/4 inch x 4 inch 1/2 x 5 inch * sizes vary based on country settings. 4 5 8 2 3 3 Image Size* Letter A4 4 x 6 inch Paper Size Press and to move to the setting you want. Press Enter to select the displayed setting. Use when the Photo Card button is illuminated. Press Options or Photo Card to display the menu options.
chapter 4 24 hp psc 2170 series
use the copy features 5 The copy features let you do the following: • Produce high-quality color and black-and-white copies using a variety of paper types and sizes, including iron-on transfers. • Reduce or enlarge the size of the copies you make from 25% to 400% of the copy’s original size. (Percentages vary by model.) • Make the copy lighter or darker, adjust the color intensity, select the number of copies, and specify the quality of the copies you make.
chapter 5 increase copy speed or quality The HP PSC provides three options that affect copy speed and quality. • Best produces the highest quality for all paper and eliminates the banding (striping) effect that sometimes occurs in solid areas. Best copies more slowly than the other quality settings. • Normal delivers high-quality output and is the recommended setting for most of your copying. Normal copies faster than Best. • Fast copies faster than the Normal setting.
use the copy features make copies lighter or darker Use Lighter/Darker to adjust the lightness and darkness of the copies you make. 1 Press Copy, if not already lit. 2 Press Options until Lighter/Darker appears. The range of Lighter/Darker values appears as a circle on a scale on the front-panel display. 3 Press to lighten the copy or to darken it. The circle moves to the left or right, depending on the button you press. 4 Press Start Black or Start Color.
chapter 5 4 Press Enter to set the option as a default. Your settings are saved as the default settings. perform special copy jobs In addition to supporting standard copying, your HP PSC can also do the following: • copy a photo • fit a copy to the page • print several copies on one page • make a poster • prepare a color t-shirt transfer copy a photo When copying a photo, you should select options for the correct paper type and photo enhancement.
use the copy features Original Fit to Page 1 Load the original on the glass. 2 Press Copy, if not already lit. 3 Press Options until Reduce/Enlarge appears. 4 Press 5 Press Start Black or Start Color. until Fit to Page appears. print several copies on one page You can place multiple copies of an original on one page by selecting a photo size and then selecting the number of copies you want.
chapter 5 make a poster When you use the Poster feature you divide your original into sections, then enlarge the sections so you can assemble them into a poster. Original Poster 1 Load the original on the glass. 2 Press Copy, if not already lit. 3 Press Options until Reduce/Enlarge appears. 4 Press until Poster appears, then press Enter. The default poster size is 2-pages wide. 5 Do one of the following: – Press Enter to select the default poster size.
use the copy features 1 Load the original on the glass. 2 Load the T-shirt transfer paper in the paper tray. 3 Press Copy, if not already lit. 4 Press Options until Paper Type appears. 5 Press until Iron-On appears. Selecting this option automatically copies a mirror-image of your original so that it appears properly on the T-shirt. 6 Press Start Black or Start Color. stop copying ` To stop copying, press Cancel on the front panel.
chapter 5 Number of Copies 1 Copy (numeric input, 1 - 99) Enhancements Text Photo Mixed None Reduce/Enlarge Actual Size Fit to Page Custom 100% hagaki 2L-Size Mutsugiri Card E-Size L-Size Poster Paper Size A4 Letter Copy Quality Normal Best Fast Color Intensity Paper Type Lighter/Darker Plain Paper Premium Inkjet Premium Photo Photo Paper PhotoQual Inkjet Everyday Photo Transparency Iron-On Brochure Glossy Brochure Matte Automatic Set New Defaults No Yes Press Options or Copy to display the c
use the scan features 6 Scanning is the process of converting text and pictures into an electronic format for your computer. You can scan just about anything: • Photos • Magazine articles • Text documents (PC only) • 3D objects (be careful not to scratch the glass) to put into catalogs and flyers Because the scanned image is an electronic format, you can bring it into your graphics program and modify it to suit your needs.
chapter 6 4 In the HP Preview window, you can edit the scanned image. When you have finished, click Accept. For more information about making changes to an image during the preview, see adjust an image during the preview in scan pictures and documents in the HP Photo & Imaging Help for more information. The HP PSC does a final scan of the original and sends the image to the HP Photo & Imaging Gallery.
use the scan features learn more For Windows, see scan pictures and documents in how to use the software in the HP Photo & Imaging Help to learn more about: • scanning pictures or documents • scanning documents using optical character recognition (Readiris OCR software) to create editable text • scanning from other programs • adjusting scanned images • changing scan settings For Macintosh, see the Scan chapter in the HP PSC 2170 Series section of the HP Photo and Imaging Help for more information
chapter 6 36 hp psc 2170 series
maintain your hp psc 7 This section provides instructions for keeping your HP PSC in top working condition. Perform these maintenance procedures as necessary. clean the glass Dirty glass, from fingerprints, smudges, hair, and so on, slows down performance and affects the accuracy of features such as Fit to Page and Copy. 1 Turn off the unit, unplug the power cord, and raise the lid. 2 Clean the glass with a soft cloth or sponge slightly moistened with a nonabrasive glass cleaner.
chapter 7 work with print cartridges To ensure the best print quality from your HP PSC, you will need to perform some simple maintenance procedures, and when prompted by a front-panel message, replace the print cartridges. print a self-test report If you are experiencing problems with printing, before cleaning or replacing the print cartridges, you should print a self-test report. This report provides useful information about your print cartridges, including status information. 1 Press Setup.
maintain your hp psc replace the print cartridges Front-panel display messages appear to let you know that you should replace your print cartridges. You may also need to replace a print cartridge when you want to use the photo print cartridge for printing high-quality photos. See order print cartridges on the inside back cover for information on ordering replacement print cartridges. 1 Turn on the unit, then open the print-carriage access door by lifting the handle until the door locks into place.
chapter 7 3 If you are removing the black print cartridge in order to install the photo print cartridge, store it in the print cartridge protector. 4 Remove the new print cartridge from its packaging and, being careful to touch only the black plastic, gently remove the plastic tape. Caution! Do not touch the copper contacts or ink nozzles. 5 40 Push the new print cartridge into the appropriate slot until it clicks into place.
maintain your hp psc 6 Pull the end of the latch toward you, press down until it stops, and then release. Make sure the latch catches below the bottom tabs. 7 Close the print-carriage access door. align the print cartridges The HP PSC prompts you to align cartridges every time you install or replace a print cartridge. Aligning the cartridges ensures high-quality output. To align the print cartridges when prompted: 1 Press Enter on the front panel. A page of patterns is printed.
chapter 7 clean the print cartridges Use this feature when the Self-Test Report shows streaking or white lines through any of the colored bars. Do not clean print cartridges unnecessarily. This wastes ink and shortens the life of the ink nozzles. 1 Press Setup. 2 Press 2, then press 1. This selects the Maintenance menu, and then selects the Clean Print Cartridges option. If copy or print quality still seem poor after you clean the print cartridges, replace the print cartridge that is affected.
maintain your hp psc set scroll speed The Scroll Speed option lets you control the rate that text messages appear in the front-panel display. You can choose Normal, Fast, or Slow. The default is Normal. 1 Press Setup. 2 Press 2, then press 6. This selects Maintenance, and then selects Set Scroll Speed. 3 Press until the desired speed appears, then press Enter.
chapter 7 44 hp psc 2170 series
additional setup information 8 This section covers how to handle messages that may or may not appear during installation, how to set up the connection between your computer and your HP PSC, and how to add and remove the HP PSC software. The standard installation instructions are provided in your Setup Poster, which you should keep for later use. If the HP Director displays all of the icons in the example below, then the software has been successfully installed.
chapter 8 • Turn your HP PSC off and then on again, then restart your computer. • If the previous steps do not solve the problem, remove and reinstall the software. For more information, see remove and reinstall your hp psc software on page 48.
additional setup information Note: You may also want to refer to the readme file for more information on possible installation problems. On Windows, you can access the readme file from the Start button on the taskbar; select Programs, HewlettPackard, hp psc 2000 series, View the Readme File. On Macintosh, you can access the readme file by double-clicking on the icon located in the toplevel folder of the HP PSC software CD-ROM.
chapter 8 connect your hp psc to your computer Your HP PSC supports HOT Swapping, meaning you can connect to the HP PSC while the power is on at your computer and on the HP PSC. Note: HP recommends that you install the HP PSC software before attempting to HOT Swap your HP PSC. connect your usb port Connecting your computer to your HP PSC with USB is straightforward. Simply plug one end of the USB cable into the back of your computer and the other in the back of the HP PSC.
additional setup information to uninstall from a Windows computer 1 On the Windows taskbar, click Start, choose Programs or All Programs (XP), choose Hewlett-Packard, choose hp psc 2000 series, then choose uninstall software. 2 Follow the directions on the screen. 3 If you are asked whether you would like to remove shared files, click No. Other programs that use these files may not work properly if the files are deleted.
chapter 8 50 hp psc 2170 series
9 technical information system requirements The following specifications are subject to change without notice.
chapter 9 paper specifications This section contains the following topics: • paper-tray capacities • paper sizes paper-tray capacities Type Paper Weight Input Tray1 Output Tray2 Plain paper 16 to 24 lb. (60 to 90 gsm) 100 50 black, 20 color Legal paper 20 to 24 lb. (75 to 90 gsm) 100 50 black, 20 color Cards 110 lb. max (200 gsm) 40 40 Envelopes 20 to 24 lb. (75 to 90 gsm) 15 10 Banners 16-24 lb.
technical information print specifications • 1200 x 1200 dpi black with resolution enhancement technology (REt) • 1200 x 1200 dpi color with HP PhotoREt III • Method: Drop-on-demand thermal inkjet • Language: HP PCL Level 3, PCL3 GUI or PCL 10 • Print speeds vary according to the complexity of the document.
chapter 9 Top (leading edge) Bottom (trailing edge)1 Left Right ISO and JIS A6 .07 in. (1.8 mm) .46 in. (11.7 mm) .13 in. (3.2 mm) .13 in. (3.2 mm) hagaki (100 x 148 mm) .07 in. (1.8 mm) .46 in. (11.7 mm) .13 in. (3.2 mm) .13 in. (3.2 mm) Borderless photo (4 x 6 in.) 0 .46 in. (11.7 mm) 0 0 Borderless A6 card (105 x 148.5 mm) 0 .46 in. (11.7 mm) 0 0 Borderless hagaki (100 x 148 mm) 0 .46 in. (11.
technical information • Scan speeds vary according to the complexity of the document Item Description Resolution 1200 x 2400 dpi optical, up to 9600 dpi enhanced Color 48-bit color 8-bit grayscale (256 levels of gray) Interface TWAIN-compliant Scanning Area US Letter, A4 physical specifications • Height: 8.7 in. (22 cm) • Width: 18.2 in. (46.3 cm) • Depth: 15.7 in. (40 cm) • Weight: 19.5lb. (8.
chapter 9 energy consumption Energy usage drops significantly while in Power Save mode, which saves natural resources, and saves money without affecting the high performance of this product. This product qualifies for ENERGY STAR®, which is a voluntary program established to encourage the development of energy-efficient office products. ENERGY STAR is a U.S. registered service mark of the U.S. EPA.
technical information is not guarantee that interference will not occur in a particular installation. If this equipment does cause harmful interference to radio or television reception, which can be determined by turning the equipment off and on, the user is encouraged to try to correct the interference by one or more of the following measures: • Reorient the receiving antenna. • Increase the separation between the equipment and the receiver.
chapter 9 notice to all users of the European Economic Area (EEA) This product is designed to interwork with the analogue telephone networks in the following countries/regions: German UK Netherlands France Spain Italy Belgium Luxembourg Sweden Austria Denmark Ireland Norway Finland Switzerland Greece Portugal Network compatibility depends on customer selected settings, which must be reset to use the equipment on a telephone network in a country/region other than where the product was purc
technical information notice to Korean customers reference guide 59
chapter 9 60 hp psc 2170 series
get hp psc 2170 series support 10 This section explains the support services information provided by Hewlett-Packard. If you are unable to find the answer you need in the printed or onscreen documentation supplied with your product, you can contact one of the HP support services listed in the following pages. Some support services are available only in the U.S. and Canada, while others are available in many countries/regions worldwide.
chapter 10 U.S. phone support is available in both English and Spanish languages 24 hours a day, 7 days a week (days and hours of support may change without notice). call elsewhere in the world The numbers listed below are current as of the printing date of this guide. For a list of current international HP Support Service numbers, visit this address and choose your own country/region or language: http://www.hp.com/support For Korea, you can also visit this address: http://www.hp.co.
get hp psc 2170 series support country/region hp technical support country/region hp technical support Denmark +45 39 29 4099 Russia, Moscow +7 095 797 3520 Ecuador 1-800-225528 Russia, St. Petersburg +7 812 346 7997 Europe (English) +44 (0) 207 512 5202 Saudi Arabia +800 897 14440 Egypt 02 532 5222 Singapore (65) 6272-5300 Finland +358 (0) 203 47 288 Slovakia +421 2 682 08080 France (0.34 Euro/min.) +0836696022 South Africa (RSA) 086 000 1030 Germany (0.12 Euro/min.
chapter 10 1 Turn on the unit. Disregard steps 1 through 6, if your unit will not turn on and the print carriage is in the home position. You will not be able to remove the print cartridges. Proceed to step 7. 2 Open the print cartridge access door. 3 Remove the print cartridges from their holders, and lower the latches. See replace the print cartridges on page 39 for information on removing the print cartridges. Place cartridges in an airtight bag.
11 warranty information hp psc 2170 series Duration of Limited Warranty (hardware and labor): 1 Year Duration of Limited Warranty (CD media): 90 Days Duration of Limited Warranty (print cartridges): Until the HP ink is depleted or the “end of warranty” date printed on the cartridge has been reached, whichever occurs first. warranty service express service To obtain HP express repair service, the customer must contact an HP service office or an HP Customer Support Center for basic troubleshooting first.
chapter 11 For each software Product, HP’s limited warranty applies only to a failure to execute programming instructions. HP does not warrant that the operation of any Product shall be uninterrupted or error free.
warranty information To the extent this Limited Warranty Statement is inconsistent with local law, this Statement shall be deemed modified to be consistent with such local law. Under such local law, certain disclaimers and limitations of this Statement may not apply to the Customer.
chapter 11 68 hp psc 2170 series
index Numerics banner paper tips on loading 14 best copy quality 26 buttons front panel 3 setup 6 Start Black 33 Start Color 33 enhancements 27 enlarge 26 fit to page 28 lighten 27 make a poster 30 make copies 25 photo 28 quality 26 reduce 26 resize 5, 26 set number of copies 5, 26 several copies on a page 29 special copy jobs 28 specifications 54 speed 26 stop 31 T-shirt transfer 30 Customer Support 61 call from U.S. 61 call outside U.S.
paper 9 photo paper 12 postcards 12, 13 print cartridges 39 set the paper size 14 tips 13 M maintenance align print cartridges 41 clean print cartridges 42 clean the exterior 37 clean the glass 37 clean the lid backing 37 power save mode time 42 replace print cartridges 39 restore factory defaults 42 self-test report 38 memory card, see photo card Memory Stick 17 menus copy setup 31 maintenance 43 print reports 43 multiple copies on a page 29 N normal copy quality 26 number of copies set 5, 26 O options
copy defaults 27 copy quality 26 copy speed 26 darken a copy 27 enlarge a copy 26 fast copy quality 26 lighten a copy 27 normal copy quality 26 power save mode 42 prompt delay 43 reduce a copy 26 scroll speed 43 text enhancement 27 setup additional information 45 button 6 SmartMedia 17 software introduction 6 remove and reinstall 48 specifications additional 55 copy 54 environmental 55 paper 52 paper sizes 52 paper-tray capacities 52 photo card 54 physical 55 power 55 print 53 print margins 53 scan 54 stop
72 hp psc 2170 series
declaration of conformity According to ISO/IEC Guide 22 and EN 45014 Manufacturer’s Name and Address: Hewlett-Packard Company, 16399 West Bernardo Drive, San Diego, CA 92127-1899, USA declares that the product Product Name: hp psc 2170 series (Q3066A) Model Number(s): psc 2170 (Q3067A), psc 2175 (Q3068A), psc 2175xi (Q3069A), psc 2175v (Q3070A), psc 2171 (Q3072A), psc 2179 (Q3071A) Product Options: All conforms to the following Product Specifications: Safety: EN60950:1992 +A1, A2, A3, A4 & A11 IEC609
order media To order media such as HP Premium Inkjet Paper, HP Premium Inkjet Transparency Film, HP Iron-On T-shirt Transfer paper, or HP Greeting Cards, go to www.hpshopping.com For orders in countries other than the U.S. and Canada, select other countries, then click Yes to leave hpshopping.com. From this website, you can access hpshopping.com for your specific language or region.