
Specifications


4. Screw the four mounting screws with grommets through the sides of the hard drive cage into the
2.5-inch drive adapter (2). Be sure to keep the blue rubber grommets behind each screw.
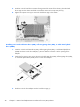
5. With the 2.5-inch drive connector facing toward the center of the chassis, place the drive cage
into the chassis and slide it toward the center until it snaps into place (1).
6. Tighten the captive screw (2) to secure the hard drive cage in the chassis.
Replacing the optical disc drive
The optical disc drive is located above the hard drive on the left side of the computer (when viewed
from behind).
1. Prepare the computer for disassembly (see
Preparing to disassemble the computer on page 27).
Replacing drives
39