
User guide


Hardware options installation 59
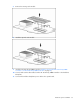
16.
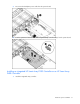
Connect and route the battery pack power cable to the HP Smart Array P400i Controller cache
module.
17. Install fan modules 1 and 2 ("Remove and install a fan module" on page 22).
18. Install the air baffle.
19. Install the access panel (on page 20).
20. Slide the server into the rack.
21. Power up the server (on page 18).
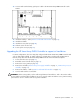
Upgrading the HP Smart Array P400i Controller to support six hard drives
In certain configurations, the server may ship configured with the HP Smart Array P400i Controller and
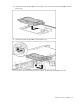
only one data cable installed. To enable support for six hard drives, install an optional Mini-SAS 4i
0.35 m (14 in) cable from the HP Smart Array P400i Controller to the hard drive backplane.
1. Power down the server (on page 18).
2. Extend the server from the rack (on page 19).
3. Remove the access panel (on page 20).
4. Remove the air baffle. ("Remove the power supply air baffle" on page 21, "Remove the processor
air baffle" on page 22)
5. Remove fan modules 1 and 2 ("Remove and install a fan module" on page 22).
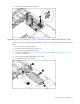
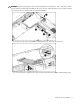
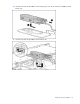
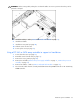
6. Connect and route the second cable.
CAUTION: When routing cables, use the cable trough between fan modules 1 and 2. Be sure the cables
do not interfere with fan module installation. Be sure to route the cables around the access panel mounting
pin bracket so as not to interfere with access panel installation.