
User Manual
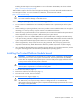
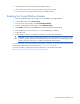
Table Of Contents
- HP ProLiant SL210t Gen8 Server User Guide
- Abstract
- Notice
- Contents
- Component identification
- Operations
- Power up the nodes
- Power down the node
- Remove the node from the chassis
- Remove the 1U cable guard
- Install the 1U cable guard
- Remove the PCI riser cage
- Install the PCI riser cage
- Remove the 2U adapter board bracket
- Install the 2U adapter board bracket
- Remove the Mini-SAS cable
- Connect the Mini-SAS cable
- Remove the 2U air baffle
- Install the 2U air baffle
- Remove the 1U air baffle
- Install the 1U air baffle
- Setup
- Hardware options installation
- Introduction
- Processor option
- Memory options
- Expansion board options
- GPU power cable option
- Smart Array controller cable options
- Installing the Mini-SAS P222 cable in a 1U node
- Installing the Mini-SAS P222 cable in a 2U node
- Installing the Mini-SAS P430 cable in a 1U node
- Installing the Mini-SAS P430 cable in a 2U node
- Installing the Mini-SAS P420 SFF cable in a 1U node
- Installing the Mini-SAS P420 SFF cable in a 2U node
- Installing the Mini-SAS P420 LFF cable in a 1U node
- Installing the Mini-SAS P420 LFF cable in a 2U node
- Installing the Mini-SAS P830 cable in a 2U node
- Controller options
- HP Trusted Platform Module option
- Cabling
- Software and configuration utilities
- Troubleshooting
- System battery
- Regulatory information
- Electrostatic discharge
- Specifications
- Support and other resources
- Acronyms and abbreviations
- Documentation feedback
- Index

Hardware options installation 58
• Always store the recovery key/password in multiple locations.
• Always store copies of the recovery key/password away from the node.
• Do not save the recovery key/password on the encrypted hard drive.
Enabling the Trusted Platform Module
1. When prompted during the start-up sequence, access RBSU by pressing the F9 key.
2. From the Main Menu, select Server Security.
3. From the Server Security Menu, select Trusted Platform Module.
4. From the Trusted Platform Module Menu, select TPM Functionality.
5. Select Enable, and then press the Enter key to modify the TPM Functionality setting.
6. Press the Esc key to exit the current menu, or press the F10 key to exit RBSU.
7. Reboot the node.
8. Enable the TPM in the OS. For OS-specific instructions, see the OS documentation.
CAUTION: When a TPM is installed and enabled on the node, data access is locked if you fail
to follow the proper procedures for updating the system or option firmware, replacing the system
board, replacing a hard drive, or modifying OS application TPM settings.
For more information on firmware updates and hardware procedures, see the HP Trusted Platform Module
Best Practices White Paper on the HP website (http://www.hp.com/support).
For more information on adjusting TPM usage in BitLocker™, see the Microsoft website
(http://technet.microsoft.com/en-us/library/cc732774.aspx).