
User Manual
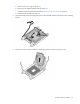
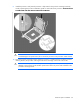
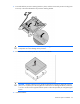
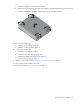

Table Of Contents
- HP ProLiant SL210t Gen8 Server User Guide
- Abstract
- Notice
- Contents
- Component identification
- Operations
- Power up the nodes
- Power down the node
- Remove the node from the chassis
- Remove the 1U cable guard
- Install the 1U cable guard
- Remove the PCI riser cage
- Install the PCI riser cage
- Remove the 2U adapter board bracket
- Install the 2U adapter board bracket
- Remove the Mini-SAS cable
- Connect the Mini-SAS cable
- Remove the 2U air baffle
- Install the 2U air baffle
- Remove the 1U air baffle
- Install the 1U air baffle
- Setup
- Hardware options installation
- Introduction
- Processor option
- Memory options
- Expansion board options
- GPU power cable option
- Smart Array controller cable options
- Installing the Mini-SAS P222 cable in a 1U node
- Installing the Mini-SAS P222 cable in a 2U node
- Installing the Mini-SAS P430 cable in a 1U node
- Installing the Mini-SAS P430 cable in a 2U node
- Installing the Mini-SAS P420 SFF cable in a 1U node
- Installing the Mini-SAS P420 SFF cable in a 2U node
- Installing the Mini-SAS P420 LFF cable in a 1U node
- Installing the Mini-SAS P420 LFF cable in a 2U node
- Installing the Mini-SAS P830 cable in a 2U node
- Controller options
- HP Trusted Platform Module option
- Cabling
- Software and configuration utilities
- Troubleshooting
- System battery
- Regulatory information
- Electrostatic discharge
- Specifications
- Support and other resources
- Acronyms and abbreviations
- Documentation feedback
- Index

Setup 31
3.
During the initial boot:
o To modify the server configuration ROM default settings, press F9 when prompted from the start up
sequence to enter the RBSU. By default, RBSU runs in the English language.
o If you do not need to modify the server configuration and are ready to install the system software,
press F10 to access Intelligent Provisioning.
NOTE: If an HP Smart Array controller has been added or is embedded in the system, the
controller defaults to a RAID configuration based on the size and number of drives installed. For
more information on modifying the controller default settings, see the documentation in the HP
Smart Storage Information Library (http://www.hp.com/go/smartstorage/docs).
For more information on automatic configuration, see the HP ROM-Based Setup Utility User Guide in the HP
RBSU Information Library (http://www.hp.com/go/rbsu/docs).
Installing the system software
To access and configure Intelligent Provisioning on a single node:
1. Access Intelligent Provisioning by rebooting the server and pressing F10.
2. The first time you log into Intelligent Provisioning, follow the steps to set preferences and activate
Intelligent Provisioning.
3. From the Home screen, click Perform Maintenance, and then click Firmware Update.
4. Ensure the latest drivers are available for installation. Select Intelligent Provisioning Software from the
list of firmware, and click Update. If the check box is not selected, the latest drivers are already installed.
Registering the server
To experience quicker service and more efficient support, register the product at the HP Product Registration
website (http://register.hp.com).