
User guide

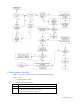
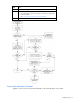


Table Of Contents
- HP ProLiant SL6000/6500 Scalable System User Guide
- Notice
- Contents
- Operations
- Setup
- Hardware options installation
- Introduction
- Processor option
- Memory options
- Hard drive options
- Hard drive backplane options
- Optical drive option
- PCI I/O device option
- Fan option
- Power supply options
- SAS or SATA power cabling options
- HP Trusted Platform Module option
- Cable management options
- Rack Control Manager option
- Switch options
- PDU rack-mounting hardware options
- Software and configuration utilities
- SmartStart Scripting Toolkit
- HP ROM-Based Setup Utility
- Array Configuration Utility
- Option ROM Configuration for Arrays
- ROMPaq Utility
- StorageWorks library and tape tools
- HP Systems Insight Manager
- HP Insight Diagnostics
- Integrated Management Log
- Lights-Out 100i Remote Management
- Array Diagnostic Utility
- Drivers
- Updating firmware
- Troubleshooting
- Common problem resolution
- Problem diagnosis
- Hardware problems
- Software tools and solutions
- Battery replacement
- Regulatory compliance notices
- Regulatory compliance identification numbers
- Federal Communications Commission notice
- Declaration of conformity for products marked with the FCC logo, United States only
- Modifications
- Cables
- Canadian notice (Avis Canadien)
- European Union regulatory notice
- Disposal of waste equipment by users in private households in the European Union
- Japanese notice
- BSMI notice
- Korean notice
- Chinese notice
- Laser compliance
- Battery replacement notice
- Taiwan battery recycling notice
- Power cord statement for Japan
- Acoustics statement for Germany (Geräuschemission)
- Electrostatic discharge
- Technical support
- Acronyms and abbreviations
- Index

Troubleshooting 38
o
Connection of the data cable, but not the power cable, of a new device
4. Be sure no memory, I/O, or interrupt conflicts exist.
5. Be sure no loose connections (on page 22) exist.
6. Be sure all cables are connected to the correct locations and are the correct lengths. For more
information, refer to the server documentation.
7. Be sure other components were not unseated accidentally during the installation of the new
hardware component.
8. Be sure all necessary software updates, such as device drivers, ROM updates, and patches, are
installed and current. For example, if you are using a Smart Array controller, you need the latest
Smart Array Controller device driver.
9. Be sure all device drivers are the correct ones for the hardware. Uninstall any incorrect drivers
before installing the correct drivers.
10. Press the F10 key to run the BIOS Setup Utility after boards or other options are installed or replaced
to be sure all system components recognize the changes. If you do not run the utility, you may
receive a POST error message indicating a configuration error. After you check the settings in the
BIOS setup menu, press the F10 key to save and exit the utility, and then restart the server.
11. Be sure all switch settings are set correctly. For additional information about required switch settings,
refer to the labels located on the inside of the server access panel or the server documentation.
12. Be sure all boards are properly installed in the server.
13. Run HP Insight Diagnostics (on page 20) to see if it recognizes and tests the device.
14. Uninstall the new hardware.
Unknown problem
Action:
1. Disconnect power to the server.
2. Following the guidelines and cautionary information in the server documentation, strip the server to
its most basic configuration by removing every card or device that is not necessary to start the
server. Keep the monitor connected to view the server startup process.
3. Reconnect power, and then power the system on.
o If the video does not work, refer to "Video problems (on page 43)."
CAUTION: Only authorized technicians trained by HP should attempt to remove the system
board. If you believe the system board requires replacement, contact HP Technical Support
("
Contacting HP" on page 47, "HP contact information" on page 63) before proceeding.
o If the system fails in this minimum configuration, one of the primary components has failed. If you
have already verified that the processor, PPM, power supply, and memory are working before
getting to this point, replace the system board. If not, be sure each of those components is
working.
o If the system boots and video is working, add each component back to the server one at a time,
restarting the server after each component is added to determine if that component is the cause
of the problem. When adding each component back to the server, be sure to disconnect power
to the server and follow the guidelines and cautionary information in the server documentation.