
User guide
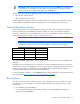

Table Of Contents
- HP ProLiant SL6000/6500 Scalable System User Guide
- Notice
- Contents
- Operations
- Setup
- Hardware options installation
- Introduction
- Processor option
- Memory options
- Hard drive options
- Hard drive backplane options
- Optical drive option
- PCI I/O device option
- Fan option
- Power supply options
- SAS or SATA power cabling options
- HP Trusted Platform Module option
- Cable management options
- Rack Control Manager option
- Switch options
- PDU rack-mounting hardware options
- Software and configuration utilities
- SmartStart Scripting Toolkit
- HP ROM-Based Setup Utility
- Array Configuration Utility
- Option ROM Configuration for Arrays
- ROMPaq Utility
- StorageWorks library and tape tools
- HP Systems Insight Manager
- HP Insight Diagnostics
- Integrated Management Log
- Lights-Out 100i Remote Management
- Array Diagnostic Utility
- Drivers
- Updating firmware
- Troubleshooting
- Common problem resolution
- Problem diagnosis
- Hardware problems
- Software tools and solutions
- Battery replacement
- Regulatory compliance notices
- Regulatory compliance identification numbers
- Federal Communications Commission notice
- Declaration of conformity for products marked with the FCC logo, United States only
- Modifications
- Cables
- Canadian notice (Avis Canadien)
- European Union regulatory notice
- Disposal of waste equipment by users in private households in the European Union
- Japanese notice
- BSMI notice
- Korean notice
- Chinese notice
- Laser compliance
- Battery replacement notice
- Taiwan battery recycling notice
- Power cord statement for Japan
- Acoustics statement for Germany (Geräuschemission)
- Electrostatic discharge
- Technical support
- Acronyms and abbreviations
- Index

Software and configuration utilities 17
IMPORTANT: RBSU automatically saves settings when you press the Enter key. The utility does
not prompt you for confirmation of settings before you exit the utility. To change a selected
setting, you must select a different setting and press the Enter key.
Default configuration settings are applied to the server at one of the following times:
• Upon the first system power-up
• After defaults have been restored
Default configuration settings are sufficient for proper typical server operation, but configuration settings
can be modified using RBSU. The system will prompt you for access to RBSU with each power-up.
Auto-configuration process
The auto-configuration process automatically runs when you boot the server for the first time. During the
power-up sequence, the system ROM automatically configures the entire system without needing any
intervention. During this process, the ORCA utility, in most cases, automatically configures the array to a
default setting based on the number of drives connected to the server.
NOTE: The server may not support all the following examples.
NOTE: If the boot drive is not empty or has been written to in the past, ORCA does not
automatically configure the array. You must run ORCA to configure the array settings.
Drives installed Drives used RAID level
1 1 RAID 0
2 2 RAID 1
3, 4, 5, or 6 3, 4, 5, or 6 RAID 5
More than 6 0 None
To change any ORCA default settings and override the auto-configuration process, press the F8 key when
prompted.
By default, the auto-configuration process configures the system for the English language. To change any
default settings in the auto-configuration process (such as the settings for language, operating system, and
primary boot controller), execute RBSU by pressing the F9 key when prompted. After the settings are
selected, exit RBSU and allow the server to reboot automatically.
For more information on RBSU, see the HP ROM-Based Setup Utility User Guide on the Documentation CD
or the HP website (
http://www.hp.com/support/smartstart/documentation).
Boot options
Near the end of the boot process, the boot options screen is displayed. This screen is visible for several
seconds before the system attempts to boot from a supported boot device. During this time, you can do
the following:
• Access RBSU by pressing the F9 key.
• Access the System Maintenance Menu (which enables you to launch ROM-based Diagnostics or
Inspect) by pressing the F10 key.