
Instruction Manual


Hardware options installation 28
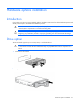
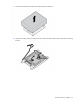
3.
Install the drive.
4. Determine the status of the drive from the drive LED definitions ("Hot-plug drive LED definitions" on page
7).
Processor option
WARNING: To reduce the risk of personal injury from hot surfaces, allow the drives and the
internal system components to cool before touching them.
CAUTION: To prevent possible server blade malfunction and damage to the equipment,
multiprocessor configurations must contain processors with the same part number.
CAUTION: The heatsink thermal interface media is not reusable and must be replaced if the
heatsink is removed from the processor after it has been installed.
CAUTION: To prevent possible server blade overheating, always populate processor sockets
with a processor and a heatsink or a heatsink blank.
IMPORTANT: Processor sockets 1 and 2 must always be populated. If either processor socket is
empty, the server blade does not power up.
To install a processor:
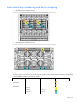
1. Update the system ROM.
Locate and download the latest ROM version from the HP website (http://www.hp.com/support).
Follow the instructions on the website to update the system ROM.
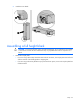
2. Power down the server blade (on page 12).
3. Remove the server blade (on page 13).
4. Remove the access panel (on page 14).
5. Remove all drives ("Remove a drive" on page 14).
6. Remove all DIMM baffles ("Removing DIMM baffles" on page 14).
7. Remove all FBWC capacitor packs ("FBWC capacitor pack options" on page 39).
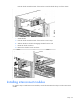
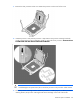
8. Remove the front panel/drive cage assembly (on page 16).