
User's Manual
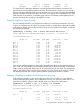

Table Of Contents
- HP Process Resource Manager User Guide
- Contents
- Preface
- 1 Overview
- 2 Understanding how PRM manages resources
- 3 PRM configuration planning
- 4 Setting up PRM
- 5 Using PRM with HP System Management Homepage (SMH)
- 6 Using PRM with HP Systems Insight Manager (SIM)
- 7 Configuring and enabling PRM on the command line
- Quick start to using PRM’s command-line interface
- Configuring PRM
- The PRM configuration file
- Configuration tips and requirements
- Specifying PRM groups/controlling CPU resource use
- Controlling memory use
- Controlling applications
- Specifying PRM users
- Assigning secure compartments to PRM groups
- Assigning Unix groups to PRM groups
- Checking the configuration file
- Loading the PRM configuration
- Enabling resource managers
- Updating the configuration
- 8 Fine-tuning your PRM configuration
- 9 Administering PRM
- Moving processes between PRM groups
- Displaying application filename matches
- Displaying netgroup expansions
- Displaying accessible PRM groups
- Displaying state and configuration information
- Displaying application and configuration information
- Setting the memory manager’s polling interval
- Setting the application manager’s polling interval
- Disabling PRM
- Resetting PRM
- Monitoring PRM groups
- Logging PRM memory messages
- Logging PRM application messages
- Displaying groups’ allocated and used resources
- Displaying user information
- Displaying available memory to determine number of shares
- Displaying number of cores to determine number of shares
- Displaying past process information
- Displaying current process information
- Monitoring PRM with GlancePlus
- Monitoring PRM with OpenView Performance Agent (OVPA) / OpenView Performance Manager (OVPM)
- Automating PRM administration with scripts
- Protecting the PRM configuration from reboots
- Reconstructing a configuration file
- Special case of interest: Client/server connections
- Online cell operations
- Backing up PRM files
- A Command reference
- B HP-UX command/system call support
- C Monitoring PRM through SNMP
- D Creating Secure Resource Partitions
- E Using PRM with Serviceguard
- F Using PRM with HP Integrity Virtual Machines
- G PRM error messages
- Glossary
- Index

NOTE: Before or after enabling PRM, you can fine-tune your configuration. See the chapter
“Fine-tuning your PRM configuration ” (page 83) for details.
Enabling resource managers with prmconfig
To start all PRM resource managers (CPU, memory, and application), enter the following command:
#prmconfig -e
If there are no memory records, the memory manager is not started. However, even if there are
no application records, the application manager does start.
The prmconfig -e command controls only whether the PRM resource management is being used
and does not change the configuration. However, PRM must be configured (have a configuration
loaded) for this option to be valid.
When PRM is enabled, it takes precedence over standard HP-UX resource management when the
system is at peak load.
If you wish to enable PRM for one type of resource only, specify the appropriate keyword as shown
in Table 15.
Table 15 Enabling specific resource management on the command line
EnterTo enable PRM for
#prmconfig -e CPUCPU management only
#prmconfig -e MEMMemory management only
#prmconfig -e APPLApplication management only
#prmconfig -e CPU -M CPUCAPONCPU capping for all FSS PRM groups (For information on
per-group capping, see “Group/CPU record syntax” (page
55).)
NOTE: You must enable the application manager to enforce application records, user records,
compartment records, and Unix group records.
Updating the configuration
To update your configuration, simply change your configuration file and load it. You do not need
to disable or reset PRM to make changes to your PRM configuration.
For small changes you can bring the configuration file into a text editor or a GUI, make the changes,
save the file, and then load the configuration with prmconfig or a GUI.
If you are adding a large number of new users to the configuration file, you can use prmloadconf
to add the users for you. For each user in the password file not already specified in the configuration
file, prmloadconf appends a PRM user record to the configuration file. The added record specifies
the user’s login name from the password file and the placeholder (NONE) instead of a PRM group.
After using prmloadconf, you may want to modify the user’s initial group and add alternate
groups. After changing the configuration file, you must still load the configuration using either
prmconfig or a GUI.
When using prmloadconf, if the configuration file already exists, elements of the existing file
are checked for suitability (such as the presence of the user default group). Use the -f option to
specify a configuration file other than /etc/prmconf.
If the new configuration deletes a group, then all currently running processes that were associated
with that group are moved to the owner’s initial group, and to the assigned groups for configured
applications. If a process owner does not have an initial group or its group does not exist in the
new configuration, the process is moved to the user default group OTHERS (PRMID 1). If the owner
of a process running in a group that is deleted is a root user, the process is moved to the system
Updating the configuration 81