
User's Manual
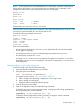
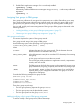
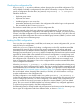

Table Of Contents
- HP Process Resource Manager User Guide
- Contents
- Preface
- 1 Overview
- 2 Understanding how PRM manages resources
- 3 PRM configuration planning
- 4 Setting up PRM
- 5 Using PRM with HP System Management Homepage (SMH)
- 6 Using PRM with HP Systems Insight Manager (SIM)
- 7 Configuring and enabling PRM on the command line
- Quick start to using PRM’s command-line interface
- Configuring PRM
- The PRM configuration file
- Configuration tips and requirements
- Specifying PRM groups/controlling CPU resource use
- Controlling memory use
- Controlling applications
- Specifying PRM users
- Assigning secure compartments to PRM groups
- Assigning Unix groups to PRM groups
- Checking the configuration file
- Loading the PRM configuration
- Enabling resource managers
- Updating the configuration
- 8 Fine-tuning your PRM configuration
- 9 Administering PRM
- Moving processes between PRM groups
- Displaying application filename matches
- Displaying netgroup expansions
- Displaying accessible PRM groups
- Displaying state and configuration information
- Displaying application and configuration information
- Setting the memory manager’s polling interval
- Setting the application manager’s polling interval
- Disabling PRM
- Resetting PRM
- Monitoring PRM groups
- Logging PRM memory messages
- Logging PRM application messages
- Displaying groups’ allocated and used resources
- Displaying user information
- Displaying available memory to determine number of shares
- Displaying number of cores to determine number of shares
- Displaying past process information
- Displaying current process information
- Monitoring PRM with GlancePlus
- Monitoring PRM with OpenView Performance Agent (OVPA) / OpenView Performance Manager (OVPM)
- Automating PRM administration with scripts
- Protecting the PRM configuration from reboots
- Reconstructing a configuration file
- Special case of interest: Client/server connections
- Online cell operations
- Backing up PRM files
- A Command reference
- B HP-UX command/system call support
- C Monitoring PRM through SNMP
- D Creating Secure Resource Partitions
- E Using PRM with Serviceguard
- F Using PRM with HP Integrity Virtual Machines
- G PRM error messages
- Glossary
- Index

NOTE: The full path of the shell/interpreter used in the script must appear in either the file
/etc/shells or the file /opt/prm/shells.
Because the full pathname is not required for the script, a rogue user can get access to PRM
groups—that otherwise would not be accessible— by using the name of the script for new scripts
or wrappers.
If the script is not regularly used or is under development, you can use prmrun or prmmove to
place it in a PRM group. To have the script place itself in a PRM group, add the following line to
the script:
prmmove -p $$group_name
Launching a Java program under PRM
To always run a Java program in a specific PRM group, use an application record. In this record,
specify the full path of the Java binary as the application. Also, give the classname as an alternate
name. (Specifically, the alternate name you specify should match the first argument to the Java
binary that is not preceded by a dash ( - ) in the COMMAND column of the ps -ef output.)
For example, consider a Java program run with classname TrainDemo. In this scenario, an
application record might look like this:
Figure 11 Application record for a Java program
/opt/java1.4/bin/IA64N/java::::GroupA,TrainDemo
Name of PRM group that
Java program should run in
Classname
Full path of the
being used,
Java binary
according to the
ps -ef output
NOTE: The full path of the Java binary used must appear in either the file /etc/shells or the file
/opt/prm/shells.
For more information on specifying Java programs in application records, see “Application record
syntax” (page 65).
Specifying PRM users
You can add, modify, and remove users’ PRM group assignments as discussed in the following
sections:
• “Adding/modifying a user’s group assignment ” (page 73)
• “Removing a user’s group assignment ” (page 74)
PRM integrates with NIS by allowing you to specify netgroups in user records. For more information
on NIS, see the ypfiles(4) manpage.
NOTE: The processes of any nonroot user who does not have a user record are placed in the
default user group OTHERS (PRMID 1). If this placement is acceptable for a given user, do not
create a user record for that user name. If there is no user record for root, the record is automatically
created, placing root processes in the group PRM_SYS (PRMID 0).
User record syntax
This section explains the syntax of user records.
Configuring PRM 71