
User's Manual
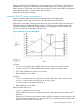
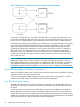
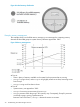
Table Of Contents
- HP Process Resource Manager User Guide
- Contents
- Preface
- 1 Overview
- 2 Understanding how PRM manages resources
- 3 PRM configuration planning
- 4 Setting up PRM
- 5 Using PRM with HP System Management Homepage (SMH)
- 6 Using PRM with HP Systems Insight Manager (SIM)
- 7 Configuring and enabling PRM on the command line
- Quick start to using PRM’s command-line interface
- Configuring PRM
- The PRM configuration file
- Configuration tips and requirements
- Specifying PRM groups/controlling CPU resource use
- Controlling memory use
- Controlling applications
- Specifying PRM users
- Assigning secure compartments to PRM groups
- Assigning Unix groups to PRM groups
- Checking the configuration file
- Loading the PRM configuration
- Enabling resource managers
- Updating the configuration
- 8 Fine-tuning your PRM configuration
- 9 Administering PRM
- Moving processes between PRM groups
- Displaying application filename matches
- Displaying netgroup expansions
- Displaying accessible PRM groups
- Displaying state and configuration information
- Displaying application and configuration information
- Setting the memory manager’s polling interval
- Setting the application manager’s polling interval
- Disabling PRM
- Resetting PRM
- Monitoring PRM groups
- Logging PRM memory messages
- Logging PRM application messages
- Displaying groups’ allocated and used resources
- Displaying user information
- Displaying available memory to determine number of shares
- Displaying number of cores to determine number of shares
- Displaying past process information
- Displaying current process information
- Monitoring PRM with GlancePlus
- Monitoring PRM with OpenView Performance Agent (OVPA) / OpenView Performance Manager (OVPM)
- Automating PRM administration with scripts
- Protecting the PRM configuration from reboots
- Reconstructing a configuration file
- Special case of interest: Client/server connections
- Online cell operations
- Backing up PRM files
- A Command reference
- B HP-UX command/system call support
- C Monitoring PRM through SNMP
- D Creating Secure Resource Partitions
- E Using PRM with Serviceguard
- F Using PRM with HP Integrity Virtual Machines
- G PRM error messages
- Glossary
- Index
Isolating a group’s private memory resources
In addition to specifying private memory shares, the prm2d memory manager allows you to
optionally specify a group’s private memory resources to be restricted from use by other groups
and processes on the system. This type of restriction is called memory isolation.
When a group’s memory shares are isolated, those memory shares cannot be loaned out to other
groups. Memory isolation also means that memory cannot be borrowed from other groups.
PRM allows groups that do not have memory isolation enabled to freely borrow memory from other
groups as needed. The lending groups are restricted in their giving by their physical entitlement
size. A group cannot lend its memory resources if memory isolation is enabled.
Memory isolation can be useful for applications that need dedicated memory resources, or that
tune their own memory needs based on their fixed allocation of resources.
How PRM manages shared memory
By default, all shared memory is allocated in the PRM_SYS group.
Starting with HP-UX 11i v2 Update 2 and PRM C.03.01, PRM can control shared memory allocations
on a PRM group basis. You only control shared memory for the groups that need it—you can omit
control for groups where shared memory control would not be helpful.
PRM does not allow borrowing or lending of shared memory as it is not beneficial. Similarly,
capping is not available for shared memory. You set a minimum size in megabytes for a group’s
shared memory allocation. (This allocation size is usually available from the configuration settings
for the consuming application, as is the case with the Oracle SGA size.)
How PRM manages locked memory
Real memory that can be locked (that is, its pages kept in memory for the lifetime of a process) by
the kernel, by the plock() system call, or by the mlock() system call, is known as lockable
memory.
Locked memory cannot be paged or swapped out. Typically, locked real memory holds frequently
accessed programs or data structures, such as critical sections of application code. Keeping them
memory-resident improves system performance. Lockable memory is extensively used in real-time
environments, like hospitals, where some processes require immediate response and must be
constantly available.
Locked memory is distributed based on the assigned memory shares. For example, assume a system
has 200 Mbytes of available memory, 170 Mbytes of which is lockable. Lockable memory divided
by available memory is 85%. If GroupA has a 50% memory share, it gets 100 Mbytes of real
memory. Of that amount, 85% (or 85 Mbytes) is lockable. Notice that 85 Mbytes/170 Mbytes is
50%, which is the group’s memory share. Figure 8 (page 30) illustrates this idea.
How PRM manages real memory resources 29