
User's Manual
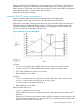
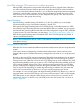
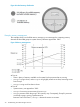
Table Of Contents
- HP Process Resource Manager User Guide
- Contents
- Preface
- 1 Overview
- 2 Understanding how PRM manages resources
- 3 PRM configuration planning
- 4 Setting up PRM
- 5 Using PRM with HP System Management Homepage (SMH)
- 6 Using PRM with HP Systems Insight Manager (SIM)
- 7 Configuring and enabling PRM on the command line
- Quick start to using PRM’s command-line interface
- Configuring PRM
- The PRM configuration file
- Configuration tips and requirements
- Specifying PRM groups/controlling CPU resource use
- Controlling memory use
- Controlling applications
- Specifying PRM users
- Assigning secure compartments to PRM groups
- Assigning Unix groups to PRM groups
- Checking the configuration file
- Loading the PRM configuration
- Enabling resource managers
- Updating the configuration
- 8 Fine-tuning your PRM configuration
- 9 Administering PRM
- Moving processes between PRM groups
- Displaying application filename matches
- Displaying netgroup expansions
- Displaying accessible PRM groups
- Displaying state and configuration information
- Displaying application and configuration information
- Setting the memory manager’s polling interval
- Setting the application manager’s polling interval
- Disabling PRM
- Resetting PRM
- Monitoring PRM groups
- Logging PRM memory messages
- Logging PRM application messages
- Displaying groups’ allocated and used resources
- Displaying user information
- Displaying available memory to determine number of shares
- Displaying number of cores to determine number of shares
- Displaying past process information
- Displaying current process information
- Monitoring PRM with GlancePlus
- Monitoring PRM with OpenView Performance Agent (OVPA) / OpenView Performance Manager (OVPM)
- Automating PRM administration with scripts
- Protecting the PRM configuration from reboots
- Reconstructing a configuration file
- Special case of interest: Client/server connections
- Online cell operations
- Backing up PRM files
- A Command reference
- B HP-UX command/system call support
- C Monitoring PRM through SNMP
- D Creating Secure Resource Partitions
- E Using PRM with Serviceguard
- F Using PRM with HP Integrity Virtual Machines
- G PRM error messages
- Glossary
- Index

How PRM manages CPU resources for real-time processes
Although PRM is designed to treat processes fairly based upon their assigned shares, PRM does
not restrict real-time processes. Real-time processes using either the POSIX.4 real-time scheduler
(rtsched) or the HP-UX real-time scheduler (rtprio) keep their assigned priorities because timely
scheduling is crucial to their operation. Hence, they are permitted to exceed their group’s CPU
share and cap. The CPU resources they use are charged to their groups. Thus, they can prevent
other processes in their groups from running.
Hyper-Threading
Hyper-Threading, available starting with HP-UX 11i v3 (B.11.31), enables you to use multiple
execution threads per core. Each execution thread is a logical CPU.
PRM supports the Hyper-Threading feature for PSET PRM groups. When PRM creates new PSETs,
they inherit the Hyper-Threading state the system had before PRM was enabled. You can override
the inherited state, specifying the desired state in the PRM configuration using the PSET_ATTR field
in group records. For more information, see the section “Group/CPU record syntax” (page 55).
PRM sets the Hyper-Threading state for the default PSET, where FSS PRM groups are created, to
optimize workload performance.
NOTE: Do not change the value of a PSET’s LCPU attribute, using either psrset or kctune,
while PRM is running.
Multiprocessors and PRM
PRM takes into account architectural differences between multiprocessor (MP) and single-processor
systems.
In the case of memory management, Hewlett-Packard multiprocessor systems share the same
physical address space. Therefore PRM memory management is the same as on a single-processor
system.
However, in the case of CPU resource management, PRM makes accommodations for MP systems.
The normal HP-UX scheduling scheme for MP systems keeps the CPU load average at a uniform
level across the cores. PRM tries to even the mix of FSS PRM groups on each available CPU. (With
Hyper-Threading disabled, each core is seen as a CPU. With Hyper-Threading enabled, each core
can be seen as multiple, logical CPUs.) This is done by assigning each process in an FSS PRM
group to a different CPU, stepping round-robin through the available CPUs, with the CPUs being
cores or logical CPUs depending on whether Hyper-Threading is enabled. Only processes that
can be run or processes that are likely to run soon are actually assigned in this manner.
For example, on a two-way MP system with Hyper-Threading disabled, FSS PRM Group1 has two
active processes A and B, and FSS PRM Group2 has two active processes C and D. In this example,
PSET PRM groups are not configured. PRM assigns process A to the first core, process B to the
second core, process C to the first core, and finally process D to the second core—as shown in
Figure 7 (page 26).
How PRM manages CPU resources 25