
User's Manual
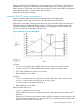
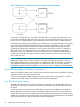
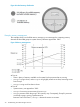
Table Of Contents
- HP Process Resource Manager User Guide
- Contents
- Preface
- 1 Overview
- 2 Understanding how PRM manages resources
- 3 PRM configuration planning
- 4 Setting up PRM
- 5 Using PRM with HP System Management Homepage (SMH)
- 6 Using PRM with HP Systems Insight Manager (SIM)
- 7 Configuring and enabling PRM on the command line
- Quick start to using PRM’s command-line interface
- Configuring PRM
- The PRM configuration file
- Configuration tips and requirements
- Specifying PRM groups/controlling CPU resource use
- Controlling memory use
- Controlling applications
- Specifying PRM users
- Assigning secure compartments to PRM groups
- Assigning Unix groups to PRM groups
- Checking the configuration file
- Loading the PRM configuration
- Enabling resource managers
- Updating the configuration
- 8 Fine-tuning your PRM configuration
- 9 Administering PRM
- Moving processes between PRM groups
- Displaying application filename matches
- Displaying netgroup expansions
- Displaying accessible PRM groups
- Displaying state and configuration information
- Displaying application and configuration information
- Setting the memory manager’s polling interval
- Setting the application manager’s polling interval
- Disabling PRM
- Resetting PRM
- Monitoring PRM groups
- Logging PRM memory messages
- Logging PRM application messages
- Displaying groups’ allocated and used resources
- Displaying user information
- Displaying available memory to determine number of shares
- Displaying number of cores to determine number of shares
- Displaying past process information
- Displaying current process information
- Monitoring PRM with GlancePlus
- Monitoring PRM with OpenView Performance Agent (OVPA) / OpenView Performance Manager (OVPM)
- Automating PRM administration with scripts
- Protecting the PRM configuration from reboots
- Reconstructing a configuration file
- Special case of interest: Client/server connections
- Online cell operations
- Backing up PRM files
- A Command reference
- B HP-UX command/system call support
- C Monitoring PRM through SNMP
- D Creating Secure Resource Partitions
- E Using PRM with Serviceguard
- F Using PRM with HP Integrity Virtual Machines
- G PRM error messages
- Glossary
- Index

At Time C:
• CPU resource use for Group1 and Group2 is limited to the assigned shares.
After Time C:
• PRM holds each group to its assigned available CPU resource percentage until total available
CPU resource demand is less than 100%. This gives Group2 a priority for CPU resources
over Group1. In contrast, in the standard HP-UX scheduler, CPU time is allocated based upon
the assumption that all processes are of equal importance. Assuming there is one process
associated with each PRM group, the standard HP-UX scheduler would allocate each process
50% of the available CPU resources after Time C.
CPU allocation and number of shares assigned
When managing FSS PRM groups, PRM favors processes in groups with a larger number of CPU
shares over processes in groups with fewer CPU shares. Processes in FSS PRM groups with a larger
number of CPU shares are scheduled to run more often and are given more opportunities to consume
CPU time than processes in other FSS PRM groups. This preference implies that the process in an
FSS PRM group with a larger number of shares may have better response times with PRM than
with the standard HP-UX scheduler.
An FSS PRM group can use more than its configured CPU allocation when the system is at nonpeak
load—unless CPUCAPON mode is enabled or a per-group cap equal to its allocation has been
assigned. (For more information on capping options, see the next section, “Capping CPU resource
use” (page 24).)
Capping CPU resource use
PRM gives you two options for capping CPU resource use by FSS PRM groups:
• On a per-group basis
(Available for HP-UX 11i v3 and later.) For per-group capping, use the MAX field in the FSS
PRM group record (discussed in the section “Group/CPU record syntax” (page 55) ) for only
those groups you want to cap.
• For all FSS PRM groups in the configuration
The CPUCAPON mode, enabled through the prmconfig -M option discussed below, treats
the FSS PRM group’s minimum allocation as its maximum allocation.
When CPUCAPON mode is enabled, CPU capping is in effect for all user-configured FSS PRM
groups on a system—regardless of CPU load. Each FSS PRM group takes its entire CPU
allocation. Thus, no group can obtain more CPU resources.
The PRM_SYS group, however, is exempt from capping. If it gets CPU time and has no work,
the PRM scheduler immediately goes to the next FSS PRM group.
NOTE: Capping based on the CPUCAPON mode overrides per-group capping; however, using
both forms of capping at the same time is not recommended.
For PSET PRM groups, capping is a result of the number of cores assigned to the group.
Capping CPU usage can be a good idea when migrating users and applications to a new system.
When the system is first introduced, the few users on the system may become accustomed to having
all of the machine’s resources. However, by setting CPU caps early after the system’s introduction,
you can simulate the performance of the system under heavier use. Consequently, when the system
becomes more heavily used, performance is not noticeably less. For information on capping CPU
resource use, see “Specifying PRM groups/controlling CPU resource use” (page 54).
24 Understanding how PRM manages resources