
User's Manual
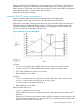
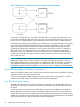
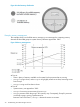
Table Of Contents
- HP Process Resource Manager User Guide
- Contents
- Preface
- 1 Overview
- 2 Understanding how PRM manages resources
- 3 PRM configuration planning
- 4 Setting up PRM
- 5 Using PRM with HP System Management Homepage (SMH)
- 6 Using PRM with HP Systems Insight Manager (SIM)
- 7 Configuring and enabling PRM on the command line
- Quick start to using PRM’s command-line interface
- Configuring PRM
- The PRM configuration file
- Configuration tips and requirements
- Specifying PRM groups/controlling CPU resource use
- Controlling memory use
- Controlling applications
- Specifying PRM users
- Assigning secure compartments to PRM groups
- Assigning Unix groups to PRM groups
- Checking the configuration file
- Loading the PRM configuration
- Enabling resource managers
- Updating the configuration
- 8 Fine-tuning your PRM configuration
- 9 Administering PRM
- Moving processes between PRM groups
- Displaying application filename matches
- Displaying netgroup expansions
- Displaying accessible PRM groups
- Displaying state and configuration information
- Displaying application and configuration information
- Setting the memory manager’s polling interval
- Setting the application manager’s polling interval
- Disabling PRM
- Resetting PRM
- Monitoring PRM groups
- Logging PRM memory messages
- Logging PRM application messages
- Displaying groups’ allocated and used resources
- Displaying user information
- Displaying available memory to determine number of shares
- Displaying number of cores to determine number of shares
- Displaying past process information
- Displaying current process information
- Monitoring PRM with GlancePlus
- Monitoring PRM with OpenView Performance Agent (OVPA) / OpenView Performance Manager (OVPM)
- Automating PRM administration with scripts
- Protecting the PRM configuration from reboots
- Reconstructing a configuration file
- Special case of interest: Client/server connections
- Online cell operations
- Backing up PRM files
- A Command reference
- B HP-UX command/system call support
- C Monitoring PRM through SNMP
- D Creating Secure Resource Partitions
- E Using PRM with Serviceguard
- F Using PRM with HP Integrity Virtual Machines
- G PRM error messages
- Glossary
- Index
• Allows continued use of percentages – If you prefer using percentages instead of shares, you
can assign each level in the hierarchy only 100 resource shares.
• Facilitates giving equal access – If you want each PRM group to have equal access to a
resource, simply assign each group the same number of shares. When you add a group, you
do not have to recalculate resources and divide by the new number of groups; just assign the
new group the same number of shares as the other groups. Similarly, removing a group does
not require a recalculation of resources; just remove the group.
• Allows for more intuitive groups – Hierarchies enable you to place similar items together, such
as all databases or a business entity/goal, and assign them resources as a single item.
• Enables making higher-level policy decisions – By placing groups in a hierarchy, you can
implement changes in policy or funding at a higher level in a configuration without affecting
all elements of the configuration.
• Facilitates system upgrades, capacity planning, and partitioning – If you are moving from a
two-core system to a four-core system, you can reserve the two additional cores by adding a
place-holder group at the top level in the hierarchy, assigning it shares equal to 50% of the
CPU resources, and enabling capping. This place-holder prevents users from getting a boost
in performance from the new cores, then being frustrated by poor performance when more
applications are added to the system.
The syntax for hierarchical groups is explained in “Group/CPU record syntax” (page 55).
By default, PRM utilities (prmconfig, prmlist, prmmonitor) include only leaf groups in their
output. Use the -h option to display information for parent groups as well.
How PRM manages CPU resources
This section describes how PRM manages CPU resources. To understand PRM’s CPU management,
it is useful to know how the standard HP-UX scheduler works.
The HP-UX scheduler chooses which process to run based on priority. Except for real-time processes,
the system dynamically adjusts the priority of a process based on resource requirements and
resources used. In general, when processes are not running, the HP-UX scheduler raises their
priorities; and while they are running, their priorities are lowered. The rate at which priority declines
during execution is linear. The rate at which priority increases while waiting is exponential, with
the rate of increase fastest when the CPU load is low and slowest when the CPU load is high.
When a process other than the current process attains a higher priority, the scheduler suspends
the current process and starts running the higher priority process.
Because the rate at which the priority increases is slowest when CPU load is high, the result is that
a process with a heavy demand for CPU time is penalized by the standard HP-UX scheduler as its
CPU resource use increases.
With PRM, you can reverse the effects of the standard scheduler. By placing users with greater
demands for CPU resources in an FSS PRM group with a higher relative number of CPU shares
than other groups, you give them a higher priority for CPU time. In a similar manner, you can
assign an application to an FSS PRM group with a higher relative number of shares. The application
will run in its assigned FSS PRM group, regardless of which user invokes it. This way you can
ensure that critical applications have enough CPU resources. You can also isolate applications
and users with greater demands for CPU resources by placing them in a PSET PRM group and
assigning the desired number of cores to the group. The applications and users will have dedicated
access to the cores in the PSET PRM group, ensuring CPU cycles when needed. This method of
isolating applications and users effectively creates a partition on your system.
PRM manages CPU resources by using the fair share scheduler (FSS) for FSS PRM groups. When
the PRM CPU manager is enabled, FSS runs for FSS PRM groups instead of the HP-UX standard
scheduler. When PSET PRM groups are configured, FSS still runs for FSS PRM groups, but the
standard HP-UX scheduler is used within PSET PRM groups.
22 Understanding how PRM manages resources