
User's Manual
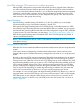
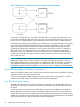
Table Of Contents
- HP Process Resource Manager User Guide
- Contents
- Preface
- 1 Overview
- 2 Understanding how PRM manages resources
- 3 PRM configuration planning
- 4 Setting up PRM
- 5 Using PRM with HP System Management Homepage (SMH)
- 6 Using PRM with HP Systems Insight Manager (SIM)
- 7 Configuring and enabling PRM on the command line
- Quick start to using PRM’s command-line interface
- Configuring PRM
- The PRM configuration file
- Configuration tips and requirements
- Specifying PRM groups/controlling CPU resource use
- Controlling memory use
- Controlling applications
- Specifying PRM users
- Assigning secure compartments to PRM groups
- Assigning Unix groups to PRM groups
- Checking the configuration file
- Loading the PRM configuration
- Enabling resource managers
- Updating the configuration
- 8 Fine-tuning your PRM configuration
- 9 Administering PRM
- Moving processes between PRM groups
- Displaying application filename matches
- Displaying netgroup expansions
- Displaying accessible PRM groups
- Displaying state and configuration information
- Displaying application and configuration information
- Setting the memory manager’s polling interval
- Setting the application manager’s polling interval
- Disabling PRM
- Resetting PRM
- Monitoring PRM groups
- Logging PRM memory messages
- Logging PRM application messages
- Displaying groups’ allocated and used resources
- Displaying user information
- Displaying available memory to determine number of shares
- Displaying number of cores to determine number of shares
- Displaying past process information
- Displaying current process information
- Monitoring PRM with GlancePlus
- Monitoring PRM with OpenView Performance Agent (OVPA) / OpenView Performance Manager (OVPM)
- Automating PRM administration with scripts
- Protecting the PRM configuration from reboots
- Reconstructing a configuration file
- Special case of interest: Client/server connections
- Online cell operations
- Backing up PRM files
- A Command reference
- B HP-UX command/system call support
- C Monitoring PRM through SNMP
- D Creating Secure Resource Partitions
- E Using PRM with Serviceguard
- F Using PRM with HP Integrity Virtual Machines
- G PRM error messages
- Glossary
- Index

4. If the sibling group has no child groups, it uses the CPU resources itself.
5. If the sibling group does have child groups, the CPU resource are distributed further based
on the shares assigned to the child groups. Calculate the percentages of the resource they
receive by repeating items 2 through 5.
Consider the example in Table 5 (page 21), which shows the PRM groups at the top-level.
Table 5 Hierarchical PRM groups—top level
Percent of system’s available CPU resourcesCPU sharesGroup
30.00%3Finance
50.00%5Development
20.00%2OTHERS
Table 6 (page 21) shows how the CPU resource percentages for the child groups of the Development
group are determined from their shares. It also shows how the child groups for the
Development/Compilers group further divide the CPU resources.
Table 6 Hierarchical PRM groups—Development’s child groups
Percent of system’s available CPU resourcesCPU sharesGroup
5/10 = 50.00% passed to child groups5Development
1/4 of its parent’s CPU (50.00%) = 12.50%
of system CPU
1Development/Debuggers
1/4 of its parent’s CPU (50.00%) = 12.50%
of system CPU
1Development/Profilers
2/4 of its parent’s CPU (50.00%) = 25.00%
passed to child groups
2Development/Compilers
4/8 of its parent’s CPU (25.00%) = 12.50%
of system CPU
4Development/Compilers/C
4/8 of its parent’s CPU (25.00%) = 12.50%
of system CPU
4Development/Compilers/Fortran
There is no requirement that the sum of the shares for a set of sibling groups be less than their
parent’s shares. For example, Table 6 (page 21)shows the Development/Compilers group has 2
shares, while the sum of the shares for its child groups is 8. You can assign any group any number
of shares between one and MAXINT (the system’s maximum integer value), setting the proportions
between groups as you consider appropriate.
The maximum number of leaf nodes is same as the maximum number of PRM groups you can have,
which is 64 or 256 (starting with HP-UX 11i v2 Update 2).
NOTE: Application records must assign applications only to leaf groups – not parent groups.
Similarly, user records must assign users only to leaf groups. For more information on these record
types, see “Controlling applications” (page 65) and “Specifying PRM users ” (page 71).
In group/CPU records, each PRM group—regardless of where it is in the hierarchy—must be
assigned resource shares.
Hierarchies offer a number of advantages, as explained below:
• Facilitates less intrusive changes – Similar to how shares in a flat configuration allow you to
alter one record while leaving all the others alone, hierarchies enable you to alter the hierarchy
in one area, leaving the rest unchanged.
• Enables you to use a configuration template – Create a configuration file that provides each
department access to the system, then distribute the configuration and assign resources giving
preference to certain departments on different machines.
How PRM controls resources 21