
User's Manual

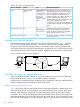

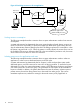
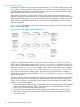
Table Of Contents
- HP Process Resource Manager User Guide
- Contents
- Preface
- 1 Overview
- 2 Understanding how PRM manages resources
- 3 PRM configuration planning
- 4 Setting up PRM
- 5 Using PRM with HP System Management Homepage (SMH)
- 6 Using PRM with HP Systems Insight Manager (SIM)
- 7 Configuring and enabling PRM on the command line
- Quick start to using PRM’s command-line interface
- Configuring PRM
- The PRM configuration file
- Configuration tips and requirements
- Specifying PRM groups/controlling CPU resource use
- Controlling memory use
- Controlling applications
- Specifying PRM users
- Assigning secure compartments to PRM groups
- Assigning Unix groups to PRM groups
- Checking the configuration file
- Loading the PRM configuration
- Enabling resource managers
- Updating the configuration
- 8 Fine-tuning your PRM configuration
- 9 Administering PRM
- Moving processes between PRM groups
- Displaying application filename matches
- Displaying netgroup expansions
- Displaying accessible PRM groups
- Displaying state and configuration information
- Displaying application and configuration information
- Setting the memory manager’s polling interval
- Setting the application manager’s polling interval
- Disabling PRM
- Resetting PRM
- Monitoring PRM groups
- Logging PRM memory messages
- Logging PRM application messages
- Displaying groups’ allocated and used resources
- Displaying user information
- Displaying available memory to determine number of shares
- Displaying number of cores to determine number of shares
- Displaying past process information
- Displaying current process information
- Monitoring PRM with GlancePlus
- Monitoring PRM with OpenView Performance Agent (OVPA) / OpenView Performance Manager (OVPM)
- Automating PRM administration with scripts
- Protecting the PRM configuration from reboots
- Reconstructing a configuration file
- Special case of interest: Client/server connections
- Online cell operations
- Backing up PRM files
- A Command reference
- B HP-UX command/system call support
- C Monitoring PRM through SNMP
- D Creating Secure Resource Partitions
- E Using PRM with Serviceguard
- F Using PRM with HP Integrity Virtual Machines
- G PRM error messages
- Glossary
- Index

Resource allocation
Resources are allocated to PRM groups differently depending on the resource and the type of PRM
group. For FSS PRM groups, resources are typically allocated in shares. For PSET PRM groups,
you allocate CPU resources using processor sets. Real memory resources are allocated in shares
(private memory) or megabytes (shared memory).
What are processor sets?
Processor sets allow cores on your system to be grouped together in a set by the system administrator
and assigned to a PSET PRM group. Once these cores are assigned to a PSET PRM group, they
are reserved for use by the applications and users assigned to that group. Using processor sets
allows the system administrator to isolate applications and users that are CPU-intensive, or that
need dedicated on-demand CPU resources.
How processor sets work?
Processor sets are a way of allocating dedicated CPU resources to designated applications and
users. At system initialization time, a default PSET is created. This default PSET initially consists of
all of your system’s cores. All FSS PRM group CPU allocation occurs in the default PSET. The system
administrator can create additional PSET PRM groups and assign cores, applications, and users
to those groups. Once cores are assigned to a PSET PRM group, they cannot be used by another
group until a new configuration is loaded.
NOTE: When you have PRM groups based on PSETs enabled:
• Do not modify the PSETs manually using the psrset command
• Do not adjust CPU counts in virtual partitions using the vparmodify command
• Do not adjust Instant Capacity (iCAP), Temporary Instant Capacity (TiCAP), or Pay Per Use
resources using the icapmodify or ppuconfig commands
• Do not perform online cell operations, using parolrad or any other interface, while PRM is
managing the system (For more information, see the WARNINGS section in the prmconfig(1)
manpage.)
Applications and users that are assigned to a PSET PRM group have dedicated CPU cycles from
the cores assigned to the group. Competition for CPU cycles within the processor set are handled
using the HP-UX time-share scheduler.
Table 2 (page 18) shows a 16-core system that has four FSS PRM groups defined within the default
PSET, and two additional system-administrator-defined PSET PRM groups. The default PSET contains
eight cores, one of which is core 0. This is the only core that is required to be in the default PSET.
The remaining cores in the default PSET are used by the PRM_SYS, OTHERS, Dev, Appl FSS PRM
groups. There are two databases on this system that each have four cores assigned to them. Unlike
the cores in the default PSET, the cores in the database PSET PRM groups are dedicated cores
using the HP-UX time-share scheduler. This creates isolated areas for the databases.
Table 2 Processor sets example
UseCore IDGroup NamePRM Group Type
System processes, general
users, and developers
0, 1, 4, 5, 8, 9 12, 13PRM_SYS, OTHERS,
Dev, Appl
FSS PRM groups (Default
PSET)
Sales database2, 3, 6, 7SalesDBPSET PRM group
Financial database10, 11, 14, 15FinanceDBPSET PRM group
18 Understanding how PRM manages resources