
User's Manual
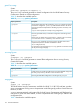

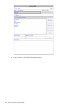
Table Of Contents
- HP Process Resource Manager User Guide
- Contents
- Preface
- 1 Overview
- 2 Understanding how PRM manages resources
- 3 PRM configuration planning
- 4 Setting up PRM
- 5 Using PRM with HP System Management Homepage (SMH)
- 6 Using PRM with HP Systems Insight Manager (SIM)
- 7 Configuring and enabling PRM on the command line
- Quick start to using PRM’s command-line interface
- Configuring PRM
- The PRM configuration file
- Configuration tips and requirements
- Specifying PRM groups/controlling CPU resource use
- Controlling memory use
- Controlling applications
- Specifying PRM users
- Assigning secure compartments to PRM groups
- Assigning Unix groups to PRM groups
- Checking the configuration file
- Loading the PRM configuration
- Enabling resource managers
- Updating the configuration
- 8 Fine-tuning your PRM configuration
- 9 Administering PRM
- Moving processes between PRM groups
- Displaying application filename matches
- Displaying netgroup expansions
- Displaying accessible PRM groups
- Displaying state and configuration information
- Displaying application and configuration information
- Setting the memory manager’s polling interval
- Setting the application manager’s polling interval
- Disabling PRM
- Resetting PRM
- Monitoring PRM groups
- Logging PRM memory messages
- Logging PRM application messages
- Displaying groups’ allocated and used resources
- Displaying user information
- Displaying available memory to determine number of shares
- Displaying number of cores to determine number of shares
- Displaying past process information
- Displaying current process information
- Monitoring PRM with GlancePlus
- Monitoring PRM with OpenView Performance Agent (OVPA) / OpenView Performance Manager (OVPM)
- Automating PRM administration with scripts
- Protecting the PRM configuration from reboots
- Reconstructing a configuration file
- Special case of interest: Client/server connections
- Online cell operations
- Backing up PRM files
- A Command reference
- B HP-UX command/system call support
- C Monitoring PRM through SNMP
- D Creating Secure Resource Partitions
- E Using PRM with Serviceguard
- F Using PRM with HP Integrity Virtual Machines
- G PRM error messages
- Glossary
- Index

1. If PRM’s SNMP agent is not already running, start it on each system from which you want to
view data:
#/opt/prm/bin/prmagt
If you need to stop the agent, use its -stop option.
You can have the agent automatically start at boot by setting the PRM_SNMPAGT variable in
the file /etc/rc.config.d/prm to 1:
PRM_SNMPAGT=1
2. Run snmpwalk, giving an argument to indicate the desired information. All information from
that level and below is reported. Thus, the following command displays all the data listed in
Table 34.
#/opt/OV/bin/snmpwalk \
hostname hp.hpSysMgt.hpUXSysMgt.hpPRM.prmReadOnly
You can limit the data displayed by choosing a lower level item. For example, to display only
information on application records, enter the following command:
#/opt/OV/bin/snmpwalk \
hostname hp.hpSysMgt.hpUXSysMgt.hpPRM.prmReadOnly.applResource
Using OpenView’s xnmbrowser
NOTE: Secure sites may want to disable prmagt to avoid unwanted information exchange. If
prmagt is to be used, it is strongly recommended that it be used only on a trusted internal network
protected by firewalls and access controls, due to known issues with the SNMP protocol.
To use xnmbrowser to view the PRM data:
1. If PRM’s SNMP agent is not already running, start it on each system from which you want to
view data:
#/opt/prm/bin/prmagt
If you need to stop the agent, use its -stop option.
You can have the agent automatically start at boot by setting the PRM_SNMPAGT variable in
the file /etc/rc.config.d/prm to 1:
PRM_SNMPAGT=1
2. Start xnmbrowsesr:
#/opt/OV/bin/xnmbrowser
3. Enter the name of the system to monitor in the field Name or IP Address. In the following
graphic, the system name is ungava.
Accessing PRM’s SNMP data 119