
User's Manual
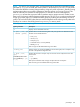
Table Of Contents
- HP Process Resource Manager User Guide
- Contents
- Preface
- 1 Overview
- 2 Understanding how PRM manages resources
- 3 PRM configuration planning
- 4 Setting up PRM
- 5 Using PRM with HP System Management Homepage (SMH)
- 6 Using PRM with HP Systems Insight Manager (SIM)
- 7 Configuring and enabling PRM on the command line
- Quick start to using PRM’s command-line interface
- Configuring PRM
- The PRM configuration file
- Configuration tips and requirements
- Specifying PRM groups/controlling CPU resource use
- Controlling memory use
- Controlling applications
- Specifying PRM users
- Assigning secure compartments to PRM groups
- Assigning Unix groups to PRM groups
- Checking the configuration file
- Loading the PRM configuration
- Enabling resource managers
- Updating the configuration
- 8 Fine-tuning your PRM configuration
- 9 Administering PRM
- Moving processes between PRM groups
- Displaying application filename matches
- Displaying netgroup expansions
- Displaying accessible PRM groups
- Displaying state and configuration information
- Displaying application and configuration information
- Setting the memory manager’s polling interval
- Setting the application manager’s polling interval
- Disabling PRM
- Resetting PRM
- Monitoring PRM groups
- Logging PRM memory messages
- Logging PRM application messages
- Displaying groups’ allocated and used resources
- Displaying user information
- Displaying available memory to determine number of shares
- Displaying number of cores to determine number of shares
- Displaying past process information
- Displaying current process information
- Monitoring PRM with GlancePlus
- Monitoring PRM with OpenView Performance Agent (OVPA) / OpenView Performance Manager (OVPM)
- Automating PRM administration with scripts
- Protecting the PRM configuration from reboots
- Reconstructing a configuration file
- Special case of interest: Client/server connections
- Online cell operations
- Backing up PRM files
- A Command reference
- B HP-UX command/system call support
- C Monitoring PRM through SNMP
- D Creating Secure Resource Partitions
- E Using PRM with Serviceguard
- F Using PRM with HP Integrity Virtual Machines
- G PRM error messages
- Glossary
- Index

NOTE: For memory, the average, peak, and percent KB values should be comparable to those
presented by acctcom. However, the memory totals (in KB minutes) for prmanalyze may differ.
This is because HP-UX accounting charges memory usage only when a process is actually running
and presumes it takes up no memory whatsoever when the process is not using CPU time. This
leads to artificially low numbers for PRM purposes. For the sake of resource management,
prmanalyze assumes that a process holds its resident memory pages reserved, whether it uses
them or not, for the entire wallclock existence of the process. The prmanalyze reports are designed
to help you prevent paging in well-behaved PRM groups by isolating and eliminating sources of
conflict. This can lead to total values that are somewhat higher than the values given by other tools.
Therefore, be cautious when billing based on prmanalyze memory totals.
Table 18 prmanalyze options/parameters
DescriptionOption/parameter
Displays version information and exits.-V
Specifies how to sort the accounting data. Only one type of sort is allowed at a time.
The data can be sorted based on:
• Auto (auto)
• User ID (uid)
• Group ID (gid)
• Command name (command) (default)
• PRMID (prmid)
Each sort type can be abbreviated using its first letter.
-s {auto | uid | gid
| command | prmid}
Tells the analysis not to take the PRMID from the accounting file, but to compute it using
the rules in the specified configuration file.
-fconfig_file
Specifies the resource to analyze. Only one resource can be analyzed at a time. The
resources are:
• mem
• cpu (default)
Each report summarizes total, average, and peak resource consumption.
Each resource type can be abbreviated using its first letter.
-r {disk | mem |
cpu}
[LINEBREAK]Abbreviated
form:[LINEBREAK]-r {d |
m | c}
prmanalyze 103