
User Manual
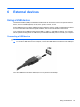
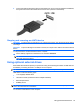
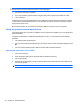
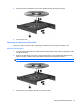

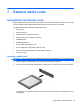
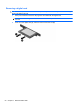
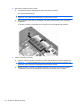
Table Of Contents
- Features
- Pointing devices and keyboard
- Using pointing devices
- Using the keyboard
- Using hotkeys
- Initiating Suspend
- Opening the Print Options window
- Displaying battery status
- Switching the screen image
- Opening the default e-mail application
- Opening the default Web browser
- Decreasing screen brightness
- Increasing screen brightness
- Turning wireless features on and off
- Muting and restoring speaker sound
- Decreasing speaker volume
- Increasing speaker volume
- Using hotkeys
- Using keypads
- Cleaning the TouchPad and keyboard
- Multimedia
- Power management
- Setting power options
- Using external AC power
- Using battery power
- Testing an AC adapter
- Shutting down the computer
- Drives
- External devices
- External media cards
- Memory modules
- Security
- Computer Setup
- Index

CAUTION: To reduce the risk of damage to the equipment when connecting a powered drive, be sure
that the drive is turned off and the AC power cord is unplugged.
1. Connect the drive to the computer.
2. If you are connecting a powered drive, plug the drive power cord into a grounded AC outlet.
3. Turn on the drive.
To disconnect an nonpowered external drive, turn off the drive, and then disconnect it from the computer.
To disconnect a powered external drive, turn off the drive, disconnect it from the computer, and then
unplug the AC power cord.
When a powered drive is connected to the powered USB port, its power cord is not required.
Using an optional external optical drive
An external optical drive connects to a USB port on the computer and enables you to use optical discs
(CDs and DVDs).
If Suspend or Hibernation is initiated during playback of a disc, you may experience the following
behaviors:
●
Your playback may be interrupted.
●
You may see a warning message asking if you want to continue. If this message is displayed, click
No.
●
You may need to restart the CD or DVD to resume audio and video playback.
Inserting an optical disc (CD or DVD)
1. Turn on the computer.
2. Press the release button (1) on the drive bezel to release the disc tray.
3. Pull out the tray (2).
4. Hold the disc by the edges to avoid touching the flat surfaces and position the disc label-side up
over the tray spindle.
NOTE: If the tray is not fully accessible, tilt the disc carefully to position it over the spindle.
46 Chapter 6 External devices