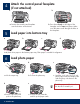
Start Here 1 Important setup information Wireless or wired network users: you must follow the instructions in this setup guide to be successful adding the HP All-in-One to your network. USB cable users: Do not connect the USB cable until step A2. 2 Remove all tape and lift display a 3 b a Remove all tape and protective film from the lid and from the front, back, and both sides of the device. b Lift the color graphics display and remove the protective film.
Attach the control panel faceplate (if not attached) 4 a b a Position the control panel faceplate over the buttons on the device. 5 b Press down firmly on all edges of the faceplate until it snaps into place. Make sure all buttons come through the holes in the faceplate. Load paper into bottom tray a b c d Load plain white paper in the bottom paper tray. Plain paper is needed for alignment. 6 Load photo paper a b c a Lift the output tray. b Pull out the photo tray.
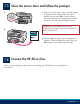
7 Connect the supplied phone cord Connect one end of the supplied phone cord to the port labelled 1-LINE and the other to a wall jack. See the Basics Guide if you want to use your own phone cord or for help with other fax setup options. 8 Connect the power cord and adapter USB cable users: Do not connect the USB cable until instructed later in this guide. 9 Press the On button After you press the On button, wait for the prompt on the color graphics display before continuing.
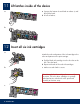
11 Lift latches inside of the device a a Squeeze the bottom of each latch to release it, and then lift the latch. b Lift all six latches. b 12 Insert all six ink cartridges a Match the color and pattern of the ink cartridge to the color and pattern on the print carriage. b a Push the black ink cartridge in to the first slot on the left. Close the latch. b Repeat with each of the color ink cartridges. c Make sure each latch is secure. Note: Use only the ink cartridges that came with the printer.
13 a b Close the access door and follow the prompts a After you close the access door, a prompt appears to load plain white paper. Make sure paper is loaded, and then press OK to start the process. The device initializes the ink cartridges and aligns the printer. This takes approximately 5 minutes. CAUTION: Do not disconnect or turn off the HP All-in-One during this time. You may hear the device making noises. b After the alignment page is printed, alignment is complete.
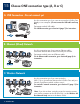
15 Choose ONE connection type (A, B or C) A: USB Connection - Do not connect yet Use this connection type if you want to connect the HP All-in-One directly to one computer. (Do not connect the USB cable until step A2). Equipment needed: USB cable. For a USB connection, go to Section A (page 7) for instructions. B: Ethernet (Wired) Network Use this connection type if you want an Ethernet cable connection between the HP All-in-One and your network. Equipment needed: router and Ethernet cable.
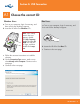
Section A: USB Connection A1 Choose the correct CD Windows Users: Mac Users: a Turn on your computer, login if necessary, and then wait for the desktop to appear b Insert the HP All-in-One Windows CD.. Note: If the startup screen does not appear, doubleclick My Computer, double-click the CDROM icon with the HP logo, and then double-click setup. exe. a Turn on your computer, login if necessary, and then wait for the desktop to appear. b Locate the HP All-in-One Mac CD. c Continue to the next page.
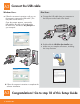
A2 Connect the USB cable Windows Users: Mac Users: a Follow the onscreen instructions until you see the prompt to connect the USB cable. (This may take several minutes.) Once the prompt appears, connect the USB cable to the port on the back of the HP All-in-One, and then to any USB port on your computer. a Connect the USB cable from your computer to the USB port on the back of the device. b Double-click the HP All-in-One Installer icon.
Section B: Ethernet (wired) network B1 b c Connect the Ethernet cable a Locate the Ethernet cable that you may have purchased separately. b Remove the yellow plug from the back of the device. c Connect one end of the Ethernet cable to the Ethernet port on the back of the device. d Connect the other end of the Ethernet cable to the router. Important: Your computer and the HP All-in-One must be on the same active, working network.
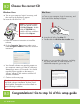
B2 Choose the correct CD Windows Users: Mac Users: a Turn on your computer, login if necessary, and then wait for the desktop to appear. b Insert the HP All-in-One CD a Turn on your computer, login if necessary, and then wait for the desktop to appear. Note: If the startup screen does not appear, doubleclick My Computer, doubleclick the CD-ROM icon with the HP logo, and then double-click setup.exe. c Follow the onscreen instructions to install the software.
Section C: Wireless Network C1 Choose ONE wireless network option (A or B) You have two options for connecting the HP All-in-One to your wireless network. You must choose one or the other: • If you are certain that your network was originally set up using SecureEasySetup, go to Option A: SecureEasySetup in Section C2, below. • If you are not certain, then go to Option B: Typical Wireless Setup (Recommended) in section C2, which is on the next page.
Option B: Typical Wireless Setup (Recommended) a Locate and write down your wireless router settings. Network Name (also called SSID):______________________________________________________ WEP key/WPA Passphrase (if needed):__________________________________________________ IMPORTANT: If you do not know this information, you cannot continue with your wireless setup.
C3 Insert the correct CD Windows Users: Mac Users: a Turn on your computer, login if necessary, and then wait for the desktop to appear. b Insert the HP All-in-One Windows CD Note: If the startup screen does not appear, doubleclick My Computer, doubleclick the CD-ROM icon with the HP logo, and then double-click setup.exe. a Turn on your computer, login if necessary, and then wait for the desktop to appear. b Insert the HP All-in-One Mac CD. c Double-click the HP All-in-One installer icon.
16 Install software on additional computers If you have additional computers on your network, install the HP All-in-One software on each computer. Choose the correct HP All-in-One CD for each installation. Follow the onscreen instructions. Make sure that you choose the connection types between the network and your HP All-in-One (not between your computer and the network). 17 Go to step 18 at the back of this setup guide Troubleshooting Problem: A Paper Jam message appears.
Network Troubleshooting ? Problem: You are not sure if your network is set up properly. Action: For information on how to set up a network, go to www.hp.com/support. Enter Photosmart C6100, and then search for Network Setup. Problem: You are trying to set up a wireless connection through the control panel, and the HP All-in-One does not connect to the network. Action: • On the wireless router, turn on broadcast network name options, and turn off silent broadcast name.
18 Print a 4 x 6 inch photo a a Insert the memory card from your camera into the appropriate memory card slot and press the Photosmart Express button. The Photosmart Express menu appears on the color graphics display. b Press OK to select View & Print. The most recent photo on your memory card appears on the display. c c Press the arrow buttons to view the desired photo. d d Keep pressing OK to print your photo.