
User's Manual

4. In the Add Device dialog box's Product Number Label drop-down list, select the PPU WBEM
Partition/Server item.
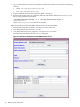
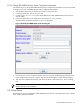
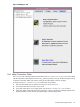
5. In the Add Device dialog box, enter values into the following fields:
• Device IP Address – Enter the IP address of the PPU WBEM Partition/Server.
• Device Description – (Optional) Enter a description for the PPU WBEM Partition/Server.
• Device Contact Email – (Optional) Enter the email address of the person who can be contacted
by HP for any Utility Meter related issues. Only the meter email is currently being used. Other
email addresses loaded into the meter tied to devices or partitions being monitored by the meter,
are NOT currently being used and can be ignored. After you have completed entering the email
contact, make sure you press the Enter key before you click the Add button.
NOTE: HP recommends the use of an email alias, which is controlled outside of the Utility Meter,
as a list of Utility Meter contacts. Use an email alias with a small number of contacts.
• Login – Enter the username of the PPU WBEM Partition/Server.
• Passwd – Enter the password of the PPU WBEM Partition/Server.
• Require server certificate – Select Yes (default) if you want to require a server certificate
when the server is accessed or No if you don't want to require a server certificate. See Add a PPU
WBEM Partition/Server for information about adding the certificate to the servers.pem file.
Note that this should be done before the PPU WBEM Partition/Server is added to the Utility Meter.
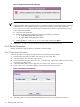
6. Click the Add Device button. An information message appears. If no errors occur, such as duplicate
device ID, the PPU WBEM Partition/Server is added and listed in the Status field. If an error occurs,
the Status field displays the error message.
7. To add another PPU WBEM Partition/Server, repeat this procedure starting with Step 5; otherwise, click
the Done button to close the Add Device dialog box.
IMPORTANT: If you are attempting to add a Red Hat Enterprise Linux (RHEL) device and receive a Failed
to add device error, make sure that the user account belongs to the pegasus group. On RHEL, by
default, only user accounts that belong to the pegasus group have remote WBEM access permission. To
add the user account to the pegasus group, run the following command:
/usr/sbin/usermod -a -G pegasus my_account where my_account is the user account.
If the /etc/Pegasus/access.conf has been modified from its original state, the above step may not
be sufficient, and it's assumed that the user has enough knowledge to ensure that my_account has remote
WBEM access.
On HP-UX and SUSE Linux, this step is not necessary. By default, any valid user account will be allowed
remote WBEM access. As with RHEL, if the default settings have been changed, you need to ensure that the
account configured in the meter has remote WBEM access permissions.
3.5.2 Modify Device
3.5.2.1 Change a non-URS Disk Array to URS
This task allows you to change a non-URS disk array to a URS disk array, or a URS disk array to a non-URS
disk array, in the Managed Devices Tree. Only URS disk arrays, which are labeled as a URS Device
in the Managed Devices Tree, are metered by the Utility Meter.
NOTE: You can also modify other device fields in the Modify Device dialog box, such as the Device
Contact Email and the Device Description. For EVA (SIM) devices, you can also change the
Device Folder.
Follow this procedure to change a non-URS disk array to a URS disk array. Note that this example is for
modifying an EVA disk array:
1. Start the Utility Meter GUI. For details, see Starting the Utility Meter GUI.
2. In the Utility Meter GUI, click the Devices tab.
3.5 Utility Meter Devices Tasks 63