hp pavilion mx703/m703 monitor guide
The information in this document is subject to change without notice. ® Hewlett-Packard Company makes no warranty of any kind with regard to this material, including, but not limited to, the implied warranties of merchantability and fitness for a particular purpose. Hewlett-Packard Company P.O. Box 4010 Cupertino, CA 95015-4010 USA © 2003 Hewlett-Packard Company. All rights reserved.
Contents Introduction..........................................1 Inventory .............................................2 For Your Safety ................................................. 2 Additional Safety Information ............................. 3 AC Power Safety Warning ................................. 3 Working in Comfort........................................... 3 Installation ...........................................4 Placing the Monitor ...........................................
Pin Assignments................................. 33 DPMS Power-Management Features............................................. 34 Regulatory Information ...................... 35 Federal Communications Commission (FCC) Notice .................................................. 35 Modifications ................................................. 36 Cables........................................................... 36 Declaration of Conformity for Products Marked with FCC Logo, United States Only .......
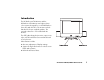
Introduction The HP Pavilion mx703 Monitor and the HP Pavilion m703 Monitor are high-resolution color monitors designed for use with HP Pavilion home PCs and other PCs. The monitors include brackets for the two supplied speakers. The optional subwoofer is not included with the monitor. The CRT (cathode-ray tube) monitor comes in two styles, mx703 with a flat screen and m703 with a curved screen. Other features include: ■ Onscreen adjustment of display settings.
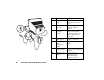
Inventory Warning: To completely disconnect Check your monitor box for the following items: power from the monitor, you must remove the power cable from the power socket.
If any of the following conditions occur, unplug the monitor and contact a qualified service technician: ■ The power cord or plug is frayed or damaged. ■ You have spilled liquid into the monitor. ■ The monitor has been exposed to rain or water. ■ The monitor does not operate correctly when the operating instructions are followed. ■ The monitor has been dropped or the cabinet has been damaged. ■ The performance of the monitor changes abruptly.
Installation Follow the instructions in this chapter to install your monitor. Warning: The monitor is a heavy object. Exercise caution, or get help when lifting it, to prevent back injury. Note: Before installing the monitor, refer to your PC and video adapter documentation. You may need to make changes to accommodate the monitor. Placing the Monitor Place the monitor on a flat, sturdy surface. Choose an area that is free from excessive heat, moisture, and sunlight.
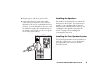
2 Plug the power cord into a power outlet. Installing the Speakers 3 Connect the blue plug on the video cable to the video port of your PC. If you have an HP Pavilion, this port is usually marked in blue. However, on some HP Pavilions, the port could be marked in orange. (The illustration below is for reference only. Check your PC user’s guide for the video port location.) The speakers are designed for use with the PC and mount on the monitor.
Item Right speaker Purpose A On/Volume knob Turns on and adjusts right/left speaker sound level B Headphones connector Accepts headphones plug and mutes right/left speakers C Control cable connector (purple) Accepts subwoofer control cable, mutes right/left speakers and subwoofer when headphones are connected D Speaker audio cable (green) Carries audio signal, plugs into PC or subwoofer E Left speaker audio (hardwired) cable Carries left speaker audio signal F Power adapter cable connecto
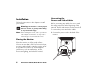
To place the two-speaker system If you are not using the brackets for the speakers, position the speakers and continue with “To connect the two-speaker system.” 1 Locate the left and the right speaker brackets (see H).
3 Note the correct orientation of the brackets shown in the figure.
4 Insert the bracket into the slots on the monitor and slide the bracket toward the front of the monitor. If you need to remove the bracket, press the tab J beneath the bracket and slide the bracket back. 5 Align the bottom of the speaker with the bracket L, and then slide the speaker onto the bracket. To connect the two-speaker system 1 Plug the power adapter G cable into the back of the right speaker F. Connect the power adapter in a wall receptacle.
Installing the Two-Speaker and Subwoofer System This configuration uses an optional subwoofer (not provided) and the two speakers included with the monitor.
Item Subwoofer Purpose M On button Turns on subwoofer N Volume knob Adjusts subwoofer sound level O Subwoofer audio cable (green) Carries audio signal, plugs into PC P Control cable (purple) Carries subwoofer control signal to right speaker, mutes speakers and subwoofer when headphones are connected Q R S Subwoofer audio connector (green) Accepts right speaker audio cable (green) Power adapter cable connector Accepts adapter cable and carries power for subwoofer Power adapter Provides
5 Turn on the PC, the monitor, the subwoofer power button M, and then the right speaker On/Volume knob A. To turn on the monitor, see “Turning the Monitor On and Off” on page 12. Using the Monitor This chapter contains information about using the monitor. Turning the Monitor On and Off Use the Power button on the front panel to turn the monitor on and off. When the monitor is on, the Power button is illuminated.
Because of the monitor’s power-management features, you don’t normally need to turn off the monitor when it’s not in use. When turned off, the monitor uses the same amount of power that it uses in Sleep mode (less than 4 watts). If your PC doesn’t support DPMS powermanagement, you can reduce power consumption by turning off the monitor when it won’t be used for an extended period. You can turn the monitor off even if you leave the PC running.
Setting the Screen Resolution To set the screen resolution The screen resolution determines the amount of information shown in the display. Screen resolution refers to the number of dots, or pixels, used to make up an image. A low screen resolution means that the display uses a relatively small number of relatively large dots. A higher resolution means that more dots of a smaller size make up the image.
Selecting Refresh Rate To select the screen refresh rate To minimize eyestrain and maximize the performance of your monitor, use the highest possible image refresh rate or vertical frequency for which you don’t perceive flicker (generally at or above 75 Hz for most users). The image refresh rate is the number of times per second that the image is refreshed. The “Pre-Set Video Modes” table shows the image refresh rates supported by the monitors at different screen resolutions.
The monitor supports three different power-saving modes — Standby, Suspend, and Sleep. See “DPMS Power-Management Features” on page 34 for a description of the characteristics of each mode. When the monitor is in one of its power-saving modes, the screen is blanked out and the front panel power indicator is yellow/amber. Consult your PC user’s guide for information about setting the power-saving modes. Cleaning the Screen To clean the screen: 1 Turn off and unplug the monitor.
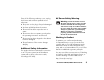
Changing Display Settings menu Use the On Screen Display (OSD) features of the monitor to change settings. The buttons on the front panel control onscreen icons and windows. menu select Using the Front Panel Use the four buttons on the front of the monitor to control OSD functions: select Menu button opens the OSD Main Menu window or closes the OSD window. Minus button decreases a setting if an adjustment window is open. In a window, the button moves the pointer downward through the icon menu.
Using the OSD Main Menu window The OSD Main Menu window enables you to make changes to a variety of display settings. You open the Main Menu window by pressing the Menu button when no other OSD windows are displayed on the screen. In the OSD Main Menu window, the following functions are available: Brightness/Contrast Opens the Brightness/Contrast window. Size/Position Opens the Size/Position window. Advanced Opens the Advanced window for setting Color, Rotation, and other image settings.
Some settings use an adjustment bar. You lengthen or shorten the adjustment bar with the Plus (+) or Minus (–) button. A number next to the bar shows the percentage of the current setting relative to its maximum value. 82 4 To close the OSD Main Menu window, select the Exit icon, or press the Menu button. Note: Only a highlighted icon and the Exit icon display a descriptive text.
In the Brightness/Contrast window, the following functions are available: Brightness Adjusts the luminance level in the image. Contrast Adjusts the difference in luminance between light and dark areas of the image. Default settings Adjusts the Brightness and Contrast settings to the factory default values. Exit sub-menu Closes the window, saves any changes you have made, and opens the OSD Main Menu window.
Zoom Opens the Zoom window. Exit sub-menu Closes the window, saves any changes you have made, and opens the OSD Main Menu window. To open a window, select the icon in the Size/Position window. The example shown below is the V Adjustment window. In the Size/Position window, the following functions are available: H Adjustment Opens the Horizontal Adjustment window. V Adjustment Opens the Vertical Adjustment window.
In the H Adjustment window, the following functions are available: In the V Adjustment window, the following functions are available: H Size Adjusts the horizontal size of the image. V Size Adjusts the vertical size of the image. H Position Adjusts the horizontal position of the image. V Position Adjusts the vertical position of the image. Default settings Adjusts the H Size and H Position settings to the factory default values.
Using the Advanced Window The Advanced window allows you to select windows to correct the shape and position of an image beyond the basic vertical and horizontal sizing and positioning that you can do in the Size/Position window. To open the Advanced window, select the Advanced icon in the OSD Main Menu window. In the Advanced window, the following functions are available: Color Adjusts the color temperature of the image. Image rotation Adjusts the angle of the image.
To open a window, select the icon in the Advanced window. The example that follows is the Image shape window. 24 HP Pavilion MX703/M703 Monitor Guide To open the Color window, select the Color icon in the Advanced window.
In the Color window, the following functions are available: 9300 K the image 6500 K the image 5500 K the image Adjusts the color temperature of to a pre-set value. Adjusts the color temperature of to a pre-set value. Adjusts the color temperature of to a pre-set value. User Color (R, B, G) Adjusts the color temperature of the image for the specific value. Cancel/Save and return Cancels or saves the changes you made.
When you want to make very precise adjustments to the screen color, you can individually adjust the red, green, and blue (RGB) values that make up the screen image. For example, under unique ambient lighting conditions, you may need to adjust the screen color so that it more closely matches the ambient lighting conditions. You make these adjustments by individually setting red, green, and blue (RGB) values. Make sure to let the monitor warm up fully before trying to match colors precisely.
In the Image shape window, the following functions are available: To open the Moiré correction window, select the icon in the Advanced window. Trapezoid Makes the vertical sides of the image parallel to each other. Parallelogram Squares the image. Pincushion Adjusts any tapering or bowing of both sides of the image. Pincushion Balance Straightens the left or right side of the image when only one side of the image is bowed. Default settings Adjusts the Image shape settings to the factory default values.
In the Moiré correction window, the following functions are available: Moiré correction (yes, no) Shows the current setting and allows you to lock or unlock the Moiré settings. V Moiré Reduces vertical wavy colored lines or patterns in the background of your image. H Moiré Reduces horizontal wavy colored lines or patterns in the background of your image. Exit sub-menu Closes the window, saves any changes you have made, and opens the Advanced window.
In the OSD settings window, the following functions are available: Lock OSD settings (yes, no) Shows the current setting and allows you to lock or unlock the OSD settings. Timeout Sets the maximum idle time in seconds that the monitor displays an OSD menu. The monitor closes the OSD window when the maximum is reached. V Position Adjusts the vertical position of the OSD window. H Position Adjusts the horizontal position of the OSD window.
Using the Language Window To open the Language window, select the Language icon in the OSD Main Menu window. In the Factory settings window, the following functions are available: Factory settings (yes, no) Shows the current mode. Select yes to restore the factory settings for all values. Exit sub-menu Closes the window, saves any changes you have made, and opens the OSD Main Menu window.
Using the Information Window To open the Information window, select the Information icon in the OSD Main Menu window. The Information window lists information about the current resolution and refresh rate (scan frequency), the serial number of the monitor, and the monitor working time as Power On hours and Power Saving hours. The resolution and the refresh rate are set in the Windows Control Panel. See “To set the screen resolution” on page 14 or “To select the screen refresh rate” on page 15.
Technical Information This chapter contains technical information about the monitors. The mx703 monitor and m703 monitor are compatible with IBM PC, PC-compatible, and PS/2 PCs. Each monitor is also compatible with VESA power-management standards. (See “DPMS Power-Management Features” on page 34.) Monitor Information mx703 Picture tube m703 Picture tube Maximum viewable area 32 17 in (43.1 cm) flat, 90° deflection, black matrix, phosphor P22 medium short, 0.25 mm dot pitch 17 in (43.
Pre-Set Video Modes Pin Assignments The monitor supports the following industrystandard combinations of screen resolution and refresh rates. Other combinations are possible, but may require adjustments to the image size and position. (See “Using the OSD Main Menu window” on page 18 for information about making these adjustments.) The following figure illustrates the 15-pin D-sub male video connector used by the monitor. The table shows the pin assignments. The asterisk (*) denotes primary mode.
Pin Number Assignment 1 Red video input 2 Green video input 3 Blue video input 4 Ground 5 Ground (self test) 6 Red video return 7 Green video return 8 Blue video return 9 5V 10 Floating or Ground (Sync ground) 11 Ground 12 DDC Data (SDA) 13 Horizontal synchronization 14 Vertical synchronization 15 DDC Data clock (SCC) 34 HP Pavilion MX703/M703 Monitor Guide DPMS Power-Management Features To maximize screen life, take advantage of your PC’s power-management system to control
■ Standby and Suspend modes offer low power consumption with rapid recovery, while Sleep mode offers the lowest power consumption and a somewhat slower recovery. The following table shows the characteristics of the normal operating mode and the three power-saving modes. VESA Display Power Management Signaling (DPMS) Mode Video Hor. Sync. Vert. Sync.
Modifications The FCC requires the user to be notified that any changes or modifications made to the device that are not expressly approved by Hewlett-Packard Company may void the user’s authority to operate the equipment. Cables Connections to this device must be made with shielded cables with metallic RFI/EMI connector hoods to maintain compliance with FCC Rules and Regulations. For questions regarding this FCC declaration, contact: Hewlett-Packard Company P.O.
Canadian Notice X-Ray Radiation Notice This Class B digital apparatus meets all requirements of the Canadian Interference-Causing Equipment Regulations. During operation, this product emits X-rays; however, it is well shielded and meets the safety and health requirements of various countries/regions, such as the Radiation Act of Germany and the Radiation Control for Health and Safety Act of the United States.
ENERGY STAR Compliance Hewlett-Packard Pavilion PCs and Monitors marked with the ENERGY STAR® logo on the packaging box qualify with the U.S. Environmental Protection Agency’s ENERGY STAR guidelines for energy efficiency. Products with the ENERGY STAR label are designed to use less energy, help you save money on utility bills, and help protect the environment. ENERGY STAR® is a registered trademark owned by the U.S. government.
Index A adjusting brightness, 18 color, 13 position, 18 size, 18 adjustment windows, 17 Advanced icon, 18, 23 window, 23 B brackets for speakers, 7 Brightness button, 17 icon, 20 brightness, adjusting, 18 Brightness/Contrast, 19 buttons Brightness, 17 Contrast, 17 Menu, 17 Minus, 17 Plus, 17 Power, 12 Select, 17 C cables, connecting, 4 cleaning the screen, 16 Color icon, 23 menu, 24 color settings, 25 color, adjusting, 13 Contrast button, 17 icon, 20 D default settings Brightness/Contrast, 20 H Size and
H M horizontal (H) H adjustment window, 22 H Moiré icon, 28 H Position icon, 22 H Position icon, OSD window, 29 H Size icon, 22 hours, power-on, 31 Menu button, 17 Minus button, 17 modes power-saving, 16 Sleep, 16 Standby, 16 Suspend, 16 Moiré correction menu, 27 icon, 23 settings, 28 monitor avoiding damage to, 2, 4 cleaning, 16 degaussing, 13 features, 1 information, 32 installing, 4 inventory, 2 placing, 4 power-management features, 13, 34 safety procedures, 2 I image refresh rates, 15, 33 Image rota
power-saving modes, 16 problems, 3 R refresh rates, 15 resolution, screen, 14, 33 Rotation icon, 26 S safety procedures, 2 screen cleaning, 16 refresh rates, 15 resolution, 14, 33 Select button, 17 serial number, monitor, 31 settings, changing, 17 size, adjusting, 18 Size/Position icon, 20 window, 20 Sleep mode, 13, 16, 35 speakers installing, 5 installing brackets, 7 installing two speakers and subwoofer, 10 placing two speakers, 7 right speaker connections, 5 specifications, 35 Standby mode, 16, 35 sub
42 HP Pavilion MX703/M703 Monitor Guide