
Specifications


PC MAGAZINE SEPTEMBER 16, 2003 www.pcmag.com
96
1
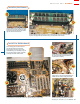
UNLOCK THE
SCANNER HEAD
On the bottom or side
of many scanners is a dial or
slide for locking and unlocking
the scanner head—the imaging
sensor arm you see tracking
with a light that does the actual
scanning. To avoid damaging
the scanner head, make sure
you unlock it immediately
when you set up your scan-
ner—before you plug the scan-
ner in or turn it on. If you don’t,
you’ll hear a grating sound
when scanning as the rack-and-
pinion gears of the head get
chewed up. Similarly, be sure to
lock the head before you move
your scanner and then unlock it
once it’s at the new location.
2
WARM UP
THE LAMP
Just as athletes warm
up before a game, you should
warm up your scanner lamp
for at least 5 minutes before
you begin scanning, even if
your scanner indicates that it’s
ready in a couple of minutes. A
proper warm-up is particularly
important for scanning graph-
ics, because the quality (as
reflected in the color tempera-
ture) and consistency (seen in
the absence of flicker) of the
light affects the accuracy of
your colors and exposure.
3
CLEAN THE
PLATEN
The glass platen on
which you place documents for
scanning is inevitably a magnet
for dust. And every speck
shows up in your scans. Al-
though several manufacturers
now offer dust removal firm-
ware or software, even the best
of these products can diminish
image quality and may not get
all the dirt. As a simple, com-
mon-sense solution, always
clean the platen thoroughly
with antistatic canned air, an
antistatic cloth, or a camel’s
hair brush. By the way, dust on
the platen may be on the under-
side where you can’t clean it,
because many scanners are
sealed units. In that case, you
should use the scanner’s dust
removal tools. If it doesn’t have
any or if you want more preci-
sion, control, and quality, use an
image-editing program’s (time-
consuming) clone tool.
4
PERSONALIZE
THE SETTINGS
Using a scanner right out
of the box is now so easy that
many people never bother to
read the documentation or
explore their options. Take the
time to analyze your scanning
habits, then set up the one-
touch buttons and default set-
tings to fit the way you work.
This means setting the proper
parameters for the type of
scans (text, photo, or illustra-
tion), the appropriate file for-
mats (
DOC, TIFF, XLS, and so
on), and the desired applica-
tions or destinations (Micro-
soft Word, printer, e-mail, and
others). In the long run, the
time you spend configuring
buttons and options properly
will pay off in terms of speed,
convenience, and efficiency.
5
SELECT
THE RIGHT
RESOLUTION
Scan at the size and resolution
appropriate to the image’s
destination. Scan the image at
too large a size and the file will
be bloated with unnecessary
data. This results in overly long
downloads and uploads, bog-
ging down your system and
e-mail and wasting storage
space. Scan it too small and the
file won’t provide enough data.
Both extremes can degrade
image quality. Set the image’s
physical dimensions (width and
height) to exactly what you
need (such as a 1.5- by 2.5-inch
photo for a newsletter), then
set the resolution according to
the chart “Size Matters.”
6
ORIENT
YOUR IMAGES
Always position the
original in the correct orienta-
tion on the glass platen, even if
your scanner has an easy-to-
use auto-orientation command.
While not all auto-rotation
algorithms degrade image
quality, just about all of them
add extra time to your scan-
ning. Similarly, make certain
that an original sheet with text
to be scanned with
OCR is not
skewed or inserted at a slight
angle, because that makes the
OCR engine work harder and
can produce inaccuracies.
7
USE PRESCAN
TOOLS
It’s always better to do
things right initially than to fix
them later; this is especially
true with scanning. Although
many of your scanner’s image
adjustment and color correc-
tion tools look very similar to
those in your image-editing
program, the scanner tools
affect your pictures differently.
While the prescan settings
define and create data (the
scanned image), editing an
image that has been already
captured removes and rewrites
data. Hence you’ll want to get
the exposure, color, and image
size right bef ore you scan to
ensure the highest-quality data.
Of course, if your monitor
isn’t color calibrated, you can’t
judge color and exposure
accurately by just viewing a
picture on your screen. When
accurate color is absolutely
vital, consider a monitor-
calibration tool from
X-Rite or
others. To match your monitor’s
colors to those of your printer,
adopt a full-blown color man-
agement system that includes
[By Sally Wiener Grotta]
Create Better
Scanned Images
SIZE MATTERS. Today’s scanners
support resolutions as high as 2,800
dots per inch. But you’ll waste time
and space creating scans that are
hundreds of megabytes in size.
Instead, set the height and width of
your scan to get the size output file
you want, and check this chart to
figure out what resolution to use.
The Right Scan Resolution
FOR: SCAN AT:
E-mail 72 dpi
Web pages 72–100 dpi
Desktop printers 72–100 dpi
OCR 300 dpi
Prepress 2
the screen’s
lines per inch*
* F
or a screen with 133 lines per inch, for
example, scan at 266 dpi.