
Specifications
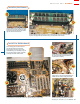


Attach drive rails to the side of the optical drive with the supplied
screws. Attach the CD audio cable now to save yourself a difficult
reach later. Feed the cable through and slide the optical drive into the
case from the front.
Install the Optical Drive
Attach the power and IDE cables, then connect the IDE cable
to the secondary IDE connector.
Install the drive bay into the case.
Ensure that the master/slave jumper on the hard drive is set correctly for your configuration.
Remove the drive bay from the chassis and
slide the hard drive in so that the connectors
face the inside of the case. Align the side-
mount holes with the holes in the drive bay.
Screw in the hard drive, using the screws
supplied with the case.
Connect the power and IDE cables to the
hard drive. Connect the black end (not the
colored end) of an 80-conductor ribbon cable
to the hard drive.
Connect the colored (usually blue) end
of the IDE hard drive cable to the
primary IDE port on the motherboard.
Install the Hard Drive
4
2
5
2
1
3
1
BUILD OR BUY: BUDGET
PC MAGAZINE SEPTEMBER 16, 2003 www.pcmag.com
90