
Specifications


Attach the front-panel connectors, including
the power and reset switches. Follow the
documentation carefully.
The mounting points in the chassis are
typically threaded brass standoffs.
If you’re using a new case, some of the
standoffs may not be installed, and you’ll
have to add enough to match up with the
mounting holes in the motherboard.
Gently fasten the motherboard to the mount points using the correct screws.
Attach the power connectors. The small
square one is for the CPU; the rectangular one
handles the rest of the board’s power needs.
Attach the front-panel USB port connectors.
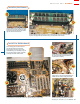
Align the DDR memory module so that the
notch at the connector edge lines up with
the key in the socket. Flip out the retainer
clips on the sides of the socket.
Push the DIMM straight down until you see and feel the clips snap into place. Since this
motherboard supports dual-channel memory, we installed a second module.
Installing the Memory
Install the Motherboard
1
1
2
2
3
4
5
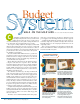
BUILD OR BUY: BUDGET
www.pcmag.com SEPTEMBER 16, 2003 PC MAGAZINE
89