
Specifications


onfiguring a budget machine is easier than creat-
ing a high-end system in some ways and more dif-
ficult in others. You need to factor cost into each de-
cision, but small changes to the system’s overall performance are
not as important, since bragging rights are not at stake.
We set a price ceiling of $799 for our budget system, includ-
ing the monitor and speakers, because we often see commercial
systems advertised at that price, and we felt that we could eas-
ily beat the performance of such systems with judicious com-
ponent selection. Note, however, that many retail systems
also bundle low-end printers.
We started with an
AMD Athlon XP 2500+ to get the most
performance at the lowest price. This processor does more
with less in terms of clock speed, because it’s very efficient
internally. The lower clock speed helps keep down the cost
of other motherboard components.
On the Abit
NFS-7 motherboard, the Athlon XP 2500+
compares well with more expensive
CPUs. This full-
featured motherboard has four
USB 2.0 and two FireWire
connectors. With today’s prices and operating-system de-
mands, 512
MB of memory has become the practical mini-
mum if you care at all about performance, so that’s what we
installed in our budget-beater.
We could have saved money by choosing a motherboard
with on-board graphics, but we invested in video perfor-
mance with an nVidia GeForce4 Ti 4200 equipped with
128
MB of video RAM. Last year’s hot board is this year’s
affordable midlevel board, and that’s exactly what we got—
significantly faster video performance for not a lot more
money. We did go with the on-board nVidia nForce audio
processor, which is more than adequate for most needs. The
Logitech Z-340 speakers won’t blow out candles, but they
sound respectable, and the price is unbeatable.
A single Western Digital
WD400BB hard drive gives us
40
GB for $50; who can argue with that? We went with a
Samsung
DVD
/CD-RW drive (DVD burning isn’t a consider-
ation at this price). And we were able to find a floppy disk
drive for a mere $8.
The Antec case is solid and well built, with no sharp edges,
and it has a convenient snap-out drive bay. With its 350-watt
power supply, it won’t be underpowered if we decide to upgrade.
A surplus dealer’s Dell keyboard and a closeout Logitech op-
tical mouse helped us stay within our budget. The ViewSonic
E70f CRT monitor gave us a bargain-priced 17-inch view of our
computing world.
We’re very pleased with the way our budget system performs,
and we’d recommend a similar configuration to anyone who
doesn’t need an all-out system.
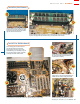
The heat sink has a notch that
corresponds to the ridge on the
CPU socket. Attach the heat
sink, being careful not to break
the mounting tabs on the plastic
socket edge. Make sure you
attach the heat sink fan power
connector to the motherboard.
Apply a tiny amount of heat-
sink paste if needed. (Some
heat sinks already have
thermal tape attached and
don’t need paste.)
PC MAGAZINE
SEPTEMBER 16, 2002 www.pcmag.com
88
Install the CPU
Align the CPU so that the cor-
ners with the angled pins line up
with the corresponding holes on
the CPU socket; then insert the
CPU and lock down the ZIF lever.
3 4
2
WALK ON THE MILD SIDE BY LOYD CASE AND BILL MACHRONE
Budget
C
Lift the ZIF (zero insertion
force) lever so you can install
the CPU.
1