
Installation and Upgrade Guide


server model and version, always refer to the hardware documentation provided for your Integrity
server.
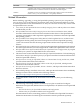
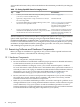
Table 1-2 Getting OpenVMS Started on Integrity Servers
DocumentationActionStep
Section A.2 (page 152)Connect your console cable to the serial port; if MP is present on
your server, connect to the MP serial port.
1
Hardware manualOptionally, configure MP to accept connections over TCP/IP
Services for OpenVMS.
2
Section A.2 (page 152); if you ordered
your server preinstalled, console
selections are already made but you
might need to change them
From the EFI Shell interface or EFI Boot Manager menu, select
the device for the OpenVMS console.
3
For how to power on and recycle power,
see the hardware documentation; for
instructions on booting the DVD, see
Section 3.2.1 (page 50)
Power on your Integrity server, insert the OpenVMS I64
distribution media (DVD) into the drive, cycle power, and then
use the EFI boot menu to boot from the DVD.
4
After the initial boot, you need not use EFI to configure boot options. You can configure EFI boot
options while OpenVMS is running by using the OpenVMS I64 Boot Manager
(SYS$MANAGER:BOOT_OPTIONS.COM), as explained in Section A.5.2 (page 165). This utility
is easier to use than EFI and allows you to configure the most pertinent options for your system.
In addition, the OpenVMS installation (and upgrade) procedure can assist you in establishing
and validating boot options for your system disk.
1.3 Examining Software and Hardware Components
Before you begin an installation or upgrade, be sure you have all the required hardware and
software components, as described in the following sections.
1.3.1 Hardware Components
For hardware components, verify the following::
• Be sure the hardware is installed and verified for proper operation. For detailed information,
see the hardware manuals you received with your computer.
For initial installations on Integrity servers, your console terminal requires a standard
PC-to-PC file transfer cable (also known as a null modem cable; 9-pin female connectors at
each end) to connect a PC, laptop, or similar device that includes terminal emulation software;
alternatively, you can use a VGA monitor and USB keyboard (and USB mouse). For
information about setting up your system console, see Section A.2 (page 152).
• Be sure you know how to turn on and operate the components of your system, including
the system unit, console, monitor, drives, terminals, and printers. If necessary, read the
hardware manuals that came with these components.
• Make sure you record the installation procedure. You need a transcript if a problem occurs
during installation. If you are using terminal emulation software, set the software to log the
session. Otherwise, set up your system to record the installation procedure on either a
hardcopy terminal or a printer attached to the console terminal. (See your hardware manuals
for more details about connecting those components to your system.)
28 Getting Started