
Installation and Upgrade Guide

NOTE: The discussion of InfoServer booting in this manual pertains to environments where
the boot clients and servers are located in the same LAN. For more complex circumstances,
consult HP Customer Support.
B.2 Setting Up Your System as an InfoServer Client
To set up your local OpenVMS I64 system as an InfoServer client for network booting, you must
perform the following steps. Detailed instructions are provided in the subsections that follow.
For OpenVMS Alpha systems, no extra steps are required for setting up an InfoServer client.
1. Determine the LAN I/O card to be used on your local Integrity server for the network boot.
Report the associated OpenVMS device name and its IP address and MAC address to the
network administrator responsible for setting up the BOOTP server.
2. Optionally (and recommended), add the network device as a boot option in the EFI Boot
Manager menu.
3. Verify that the network device is supported by EFI as a bootable device.
NOTE: The ability to boot over the network requires that the nearest switch or router be
configured to autonegotiate.
B.2.1 Determining the Local Network I/O Card to Be Used
Select a LAN I/O card (also referred to as a LAN I/O device or adapter) on your Integrity server.
This device must be supported by your Integrity server’s EFI firmware. At minimum, EFI supports
the core I/O LAN cards installed in the Integrity server. On all Integrity servers, devices supported
by OpenVMS are either EI or EW devices (for example, EIA0 or EWA0). The EFI firmware might
also support variants of the core I/O cards, such as additional network interface cards (NICs) of
the same type. It might also support other NICs that are installed in the system but not classified
as core I/O cards. In any case, you can verify that the device you select is supported by EFI.
If multiple I/O cards are available on your system, you can choose more than one to serve for
network booting.
To list the installed LAN I/O devices known to your OpenVMS I64 system, follow these steps:
1. If your operating system is not running, access the OpenVMS DCL triple dollar sign prompt
($$$) from your OpenVMS I64 OE DVD by selecting option 8 (Execute DCL commands and
procedures) on the OpenVMS operating system main menu. Otherwise, skip to the next
step.
2. At the DCL prompt, enter the following command to start the OpenVMS I64 Boot Manager
utility.
@SYS$MANAGER:BOOT_OPTIONS
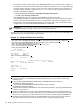
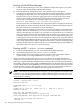
3. Start the LANCP utility and enter the LANCP command SHOW CONFIGURATION at the
LANCP prompt, as in the following example. The resulting display lists four LAN devices,
two of which are available (connected), as indicated by the Link column (Up means the
device is available; Down means it is not). You can use a device that is in use by other
protocols. Decide which available devices you want to use for network booting and record
the device’s name, MAC address, and IP address. (The MAC address should be labeled on
the physical device.) Once the LAN device is verified as bootable by EFI, you provide this
information to the person responsible for maintaining the BOOTP server database (see
Section B.4 (page 196)).
$$$ RUN SYS$SYSTEM:LANCP
LANCP> SHOW CONFIGURATION
LAN Configuration:
Parent or
Device PrefCPU Medium/User Version Link Speed Duplex Auto BufSize MAC Address Type ...
------ ------- ----------- ------- ---- ----- ------ ---- ------- ---------------- ------------ ...
EIA0 0 Ethernet X-21 Up 1000 Full Yes 1500 AA-00-04-00-A5-38 UTP i82546 ...
00-13-21-5B-85-E4 (default) ...
EIB0 1 Ethernet X-21 Up 1000 Full Yes 1500 AA-00-04-00-A5-38 UTP i82546 ...
00-13-21-5B-85-E5 (default) ...
EWA0 0 Ethernet X-59 Down - - Yes 1500 00-11-0A-43-23-D8 UTP AB465A ...
EWB0 1 Ethernet X-59 Down - - Yes 1500 00-11-0A-43-23-D9 UTP AB465A ...
B.2 Setting Up Your System as an InfoServer Client 191