HP OmniBook 800 Docking System User’s Guide 1-1
Notice This manual and any examples contained herein are provided “as is” and are subject to change without notice. Hewlett-Packard Company makes no warranty of any kind with regard to this manual, including, but not limited to, the implied warranties of merchantability and fitness for a particular purpose. Hewlett-Packard Co. shall not be liable for any errors or for incidental or consequential damages in connection with the furnishing, performance, or use of this manual or the examples herein.
Contents 1 Using the Docking System ............................... . Understanding the Basics ................................ To dock the OmniBook ................................ To undock the OmniBook .............................. To manually undock the OmniBook ....................... To attach a security cable .............................. To set a docking password.............................. To understand docking status lights ....................... To turn docking messages off (or on) ........
3 Specifications and Regulatory Information ................. .. Hardware Specifications ................................. Regulatory Information .................................. U.S.A. ............................................ Canada ........................................... Japan ............................................ Europe ...........................................
1 Using the Docking System 1-5
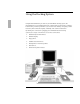
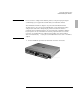
Using the Docking System Congratulations! With the purchase of your OmniBook docking system, the transformation of your OmniBook 800 into a true desktop replacement is complete. It delivers the premium performance you need for true desktop computing—and is backed by HP’s unmatched quality, reliability, and customer satisfaction. By making one connection—plugging your OmniBook into the docking system—you can get convenient access to these connections: ♦ External keyboard and mouse. ♦ External display.
How to Use This Manual The procedures in this manual differ slightly depending on the operating system you’ve installed—Windows 95 or Windows for Workgroups. Read each step carefully to see if it applies to your operating system. What About Other Operating Systems? If you’ve installed another operating system on the OmniBook—Windows NT or OS/2 for example— follow the general procedures under Windows for Workgroups. Instead of exiting Windows (when so instructed), exit the operating system you are using.
Using the Docking System Understanding the Basics Understanding the Basics This section shows you how to get your docking system and OmniBook up and running quickly, including how to ♦ Dock the OmniBook. ♦ Undock the OmniBook—including manual override. ♦ Protect the OmniBook with a security cable. ♦ Understand the docking system’s status lights. To dock the OmniBook You do not need to turn the OmniBook off when docking. 1. If you’re using Windows 95, go to step 2.
Using the Docking System Understanding the Basics CAUTION Do not use the ac adapter from another product. Using an improper adapter could damage your equipment and will make your warranties invalid. The OmniBook’s F1044B ac adapter can power the OmniBook with the docking system only , and not the CD-ROM drive or the Power Clip battery charger at the same time. Attempting to power more than one of these peripheral devices with this adapter can cause data loss or hardware damage to your systems.
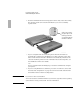
Using the Docking System Understanding the Basics 5. Slide the OmniBook into the docking system until it’s fully seated. Press firmly. The docking system locks onto the OmniBook so you can’t accidentally separate them. After a few moments, the green light on the docking system turns on, indicating that the OmniBook is docked. 6. If you’re using Windows 95 and docking for the first time, Windows 95 automatically configures the OmniBook for use with a docking system. This takes several minutes.
Using the Docking System Understanding the Basics To undock the OmniBook 1. Make sure ac power is connected to the docking system. 2. If you’re using Windows 95, go to step 3. –or– If you’re using Windows for Workgroups, save your work and exit Windows. You’ll be rebooting the OmniBook. 3. Exit any applications that are using SCSI or network devices. 4. If you have a video card installed and are using Windows 95, select Start, Shut Down, Shut Down the Computer. 5.
Using the Docking System Understanding the Basics 6. Slide forward a release latch on the docking system and remove the OmniBook. 7. If you’re using Windows for Workgroups, reboot the OmniBook. Note If you have a video card installed If you have a docking password set, then the screen will become blank and beep repeatedly when you need to enter the password. After undocking, the OmniBook will reboot automatically the next time you turn it on. Refer to “Using a Video Card” for more information.
Using the Docking System Understanding the Basics To manually undock the OmniBook If for some reason you can’t undock the OmniBook using the Undock button, you can manually unlock it. Manual undocking overrides password protection. To secure your OmniBook while docked, keep a Kensington MicroSaver lock attached to the security connector on the docking system. (See the following topic for instructions.) 1. Save your work and, if necessary, exit Windows.
Using the Docking System Understanding the Basics To attach a security cable Your docking system has a built-in security connector that allows you to secure the docking system with a cable. Kensington MicroSaver lock systems work with these connectors and are available at many computer stores. When a security cable is attached to the docking system—and an undock password is set—the OmniBook cannot be undocked without supplying the password.
Using the Docking System Understanding the Basics To set a docking password Password security protects access to your OmniBook. If you use password security, you must enter the password at certain times (defined in Password Options). This is where you specify a docking password. This symbol means a password has locked access to the system. (If you have a video card installed, this symbol does not appear, but the screen goes blank and the computer beeps.) Type the password to gain access.
Using the Docking System Understanding the Basics To understand docking status lights The red and green lights on the docking system indicate the current status of the docking system. The following table explains the status lights: Status red light green light AC adapter has been connected to the docking system. Docking system is powered and ready to go. on off The OmniBook has been inserted into the docking system. OmniBook is in the process of docking.
Using the Docking System Making Connections Making Connections ♦ Power (ac adapter). ♦ External keyboard. ♦ External mouse. ♦ External display. ♦ Floppy disk drive. ♦ Printer or other parallel device (25-pin). ♦ Modem or other serial device (9-pin). ♦ Headphones or external speakers. ♦ External CD-ROM drive or other SCSI-2 device. ♦ Network access and other types of ISA and PCI boards (in the expansionboard slot).
Using the Docking System Making Connections To connect an external keyboard You can use the built-in and external keyboards while docked. 1. Attach the keyboard cable to the docking system. 2. Dock the OmniBook. keyboard connector Hint If you are using a docking system with an external keyboard without an FN key, substitute the keystrokes CTRL+ALT for FN. You must also select the option Enable external FN key: • For Windows 95, click Start, HP User Tools, Settings, OmniBook External Devices.
Using the Docking System Making Connections To connect a serial mouse 1. If you’re using Windows 95, go to step 2. –or– If you’re using Windows for Workgroups, save your work and exit Windows. You’ll be rebooting the OmniBook. 2. Attach the serial cable to the docking system. serial connector 3. Dock the OmniBook. 4. If you’re using Windows 95, go to step 5. –or– If you’re using Windows for Workgroups, reboot the OmniBook. 5. This step sets up the serial mouse for use.
Using the Docking System Making Connections To switch back to the OmniBook pop-out mouse Use this procedure to switch back to the built-in OmniBook mouse from an external mouse. 1. Save your work. 2. Disconnect the mouse cable from the docking system. 3. Reboot the OmniBook. To connect an external display Use this procedure to connect an external display to your OmniBook.
Using the Docking System Making Connections To enable the built-in and external displays simultaneously If you enable the built-in display while running the external display, you may notice a slight dimming while the external display is connected. If the display resolutions for the two displays are not the same, panning may result. The System Configuration Utility provides a setting for turning the built-in display on and off. You must reboot the computer to run the System Configuration Utility. 1.
Using the Docking System Making Connections To connect a serial device The docking system’s 9-pin serial port is a standard serial port, just like those found on many PCs. The most common types of serial connections involve printers, modems, and other computers. You can make such connections using standard serial cables and adapters available at computer dealers and electronic supply stores. Use the following procedure to connect a modem, serial printer, or serial cable. 1.
Using the Docking System Making Connections To connect SCSI devices SCSI devices are disabled whenever you turn off the system or undock. 1. Make sure that each SCSI device is set to a different SCSI ID number, ID 1 through ID 6. Do not use ID 0. See the device’s documentation for instructions for checking and changing the device’s ID. 2. Set the SCSI bus termination for each device.
Using the Docking System Making Connections 5. If you’re using Windows 95, the OmniBook automatically detects the new device and sets it up for you. If necessary, Windows requests information about the device. –or– If you’re using Windows for Workgroups • Exit Windows. • Dock the OmniBook. • Reboot the OmniBook. 6. If you’re using Windows 95, follow the procedure, “To remove a device from the Undocked configuration,” after the next topic.
Using the Docking System Making Connections To install an ISA or PCI expansion board You can install one expansion board in the docking system, such as one network card or one PCI video card. • Note that if you install a network board, a network connection is lost whenever you undock. • If you install a video card, see also “Using a Video Card.” CAUTION Before removing the board from its bag, equalize static electricity by touching the bag and the docking system’s metal back plate at the same time.
Using the Docking System Making Connections 3. Turn the docking system over. Insert a straightened paper clip or other thin object into the security connector and press firmly while sliding a release latch forward. 4. Continue holding the latch forward and insert the paper clip as shown below. This holds the release levers forward, allowing for easier removal of the top case.
Using the Docking System Making Connections 5. Lift off the top of the case gently. Do not dislodge the On/Off and Undock buttons. 6. Important: Do not turn over the docking system while its top is off. Remove the plastic cover from the opening in the side of the case.
Using the Docking System Making Connections 7. Slide the ISA or PCI board into the appropriate slot and position it carefully. Support the docking system at the lower-back edge while you firmly press the board into the connector. The metal plate of the PCI board must be fully visible through the OmniBook’s side expansion opening. PCI board slot ISA board slot Expansion opening 8. Place the top of the case onto the bottom.
Using the Docking System Making Connections To remove a device from the Undocked configuration • When Windows 95 installs a new SCSI device or ISA or PCI expansion board (such as a network card), it might add the device to the Undocked (as well as Docked) configuration. To prevent problems when undocking, remove the device from the Undocked configuration. • You should also remove the internal SCSI controller from the Undocked configuration. 1. Double-click My Computer, Control Panel, System. 2.
Using the Docking System Making Connections 1-30
Using the Docking System Using a Video Card Using a Video Card The docking system supports the use of a PCI video card. You must have a BIOS (System Software) version 1.01 or later. (In Windows for Workgroups, open OmniBook Tools in the Main window, and select the About tab to check this. In Windows 95, select Start, HP User Tools, Information, OmniBook System Information.) To install a video card 1. Follow the instructions under “To install an ISA or PCI expansion board,” earlier. 2.
Using the Docking System Using a Video Card To dock an OmniBook with a video card If you have a video card installed, then you need to reboot the OmniBook whenever you dock into the docking system, regardless of the operating system. The rest of the procedure is as given under “To dock the OmniBook” on page 8. • In Windows 95, reboot after the docking light on the docking system turns green. Select Start, Shut Down, Restart.
2 Troubleshooting 1-33
Troubleshooting If you run into problems using the docking system, you can use the suggestions in this chapter for getting back on track. Hints If you're having a problem—see the online OmniBook User’s Guide. Its troubleshooting chapter contains more troubleshooting information. If you have questions that this manual doesn't answer, you can ♦ See the online OmniBook User’s Guide—it’s your main source of information about using the OmniBook. It includes extensive troubleshooting information.
Troubleshooting Solving Basic Problems Solving Basic Problems If you have a problem using the docking system, find the symptom below that matches your situation. Try the suggestions one at a time. This section separates problems into the following categories: ♦ Operating problems. ♦ Docking problems. To resolve operating problems If a serial or parallel device, external display, or floppy drive doesn’t work • Make sure the OmniBook is fully inserting in the docking system. Connection should be snug.
Troubleshooting Solving Basic Problems If network connections don’t work • Make sure that the LAN cable is connected. • You normally lose connections when you turn off the system or undock. See if your network software has a reconnect feature. • Check your configuration files to make sure that the network drivers are properly installed. • If the green light on the docking system isn’t on, check power to the docking system, then try undocking and docking again.
Troubleshooting Solving Basic Problems If a network-enabled system locks up when rebooting • Make sure to remove any undocked configuration for an ISA or PCI expansion board (such as a network card). See “To remove a device from the undocked configuration,” under “Making Connections.” The following hints apply to Windows for Workgroups only: • Edit AUTOEXEC.BAT to disable Windows for Workgroups network support for all non-network startup options.
Troubleshooting Solving Basic Problems If the OmniBook isn’t released after pressing the Undock button • If you’re using a password, make sure it’s accepted. • If you’re prompted about shutting down devices, and if no applications are using those devices, press ENTER. Otherwise, close those applications and try undocking again. • To override the undocking software, insert a paper clip or other thin object into the security opening in the docking system. Hold it in while sliding one release latch forward.
3 Specifications and Regulatory Information 1-39
Specifications and Regulatory Information Your OmniBook docking system is designed to provide trouble-free operation. The following suggestions can help you while working with your OmniBook: ♦ Observe the temperature limits and other specifications listed in the next section. ♦ If you have problems, see the problem-solving suggestions and references listed in chapter 2.
Specifications and Regulatory Information Hardware Specifications Hardware Specifications Interfaces Serial: one 9-pin 115,200-baud RS-232 port (with hardware handshaking). Parallel: one 25-pin standard (EPP/ECP) parallel port. SCSI: one SCSI-2 port. Audio: one stereo-output port. Mouse: one PS/2 mouse port. Keyboard: one external keyboard port. Floppy disk drive: one floppy disk drive port for removable 3.5-inch disk drive. Expansion boards Electrical: PCI/ISA expansion slot.
Specifications and Regulatory Information Regulatory Information Regulatory Information This section presents information that shows how the docking system complies with regulations in certain regions. Any modifications to the docking system not expressly approved by Hewlett-Packard could void the authority to operate the docking system in these regions. U.S.A. The docking system generates and uses radio frequency energy and may interfere with radio and television reception.
Specifications and Regulatory Information Regulatory Information Canada This digital apparatus does not exceed the Class B limits for radio noise emissions from digital apparatus as set out in the radio interference regulations of the Canadian Department of Communications.
Specifications and Regulatory Information Regulatory Information Europe Products sold in Europe by Hewlett-Packard and its authorized dealers meet the specifications listed below. Declaration of Conformity (according to ISO/IEC Guide 22 and EN 45014) Manufacturer: Hewlett-Packard Company Address: Hewlett-Packard Co. Mobile Computing Division 1000 NE Circle Blvd.