HP OmniBook 5500 User’s Guide (Windows 95) INTRODUCTION ....................................................................................... 5 Using This Online Manual ....................................................................................................5 Finding More Information ....................................................................................................5 Notice ........................................................................................................
To shut down the OmniBook .............................................................................................20 Restarting the OmniBook....................................................................................................21 To reboot from drive C ......................................................................................................21 To reboot from a floppy disk ..............................................................................................
To set up a user password ..................................................................................................45 To delete a password..........................................................................................................47 To set up an administrator password ..................................................................................47 Protecting Your Data...........................................................................................................
Making Parallel Connections ..............................................................................................66 To connect a parallel device...............................................................................................66 To view or change parallel port assignments......................................................................67 Making Infrared Connections.............................................................................................
Introduction Using This Online Manual This online User’s Guide looks similar to a printed manual—and it works like a printed manual in many ways, too. But you can do several handy things you can’t do with a manual. For example, you can make the type larger or smaller. You can click pictures to enlarge them. You can add electronic bookmarks for marking key information. And you can print all or part of the manual on your printer. • Press F1. You’ll quickly see how to use this manual.
The programs that control this product are copyrighted and all rights are reserved. Reproduction, adaptation, or translation of those programs without prior written permission of Hewlett-Packard Co. is also prohibited. Portions of the programs that control this product may also be copyrighted by Microsoft Corporation, Adaptec, Inc., Microcom Systems, Inc., SystemSoft Corp., and Chips & Technologies, Inc. See the individual programs for additional copyright notices.
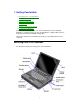
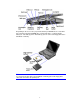
1. Getting Comfortable • Identifying Parts of the OmniBook. • Adjusting the Display. • Using the Pointing Device. • Using Sound. • Using the OmniBook Keyboard. • Learning About Windows. Congratulations! Your OmniBook sets a new standard in personal computing. Although it’s compact and easy to carry, the OmniBook is equipped with a full-size keyboard, and a built-in CD-ROM or floppy drive. This chapter introduces the OmniBook and helps you get familiar with your new computer.
Depending on the accessories you purchased with your OmniBook, the center drive bay can hold an internal CD-ROM drive, a floppy disk drive, or a high-capacity battery for extra battery power. Alternatively, you can connect the floppy drive to the OmniBook externally. Note To connect the floppy drive to the OmniBook externally, pull out the floppy drive cable and connect it to the parallel port.
Adjusting the Display • All OmniBooks are equipped with a brightness control. • Some models also have a contrast control. In this section you’ll learn how to • Locate the display controls. • Adjust the display. To locate the display controls Your OmniBook display controls are located either to the right of the display or under the display. If you have two controls, the upper slider controls the brightness, and the lower slider controls the contrast.
If your controls appear under the screen, slide right to increase brightness or contrast, and slide left to decrease it. Hint Keep in mind that a higher brightness setting gives a shorter battery operating time—because the internal light is using more power. (The contrast setting doesn’t affect the operating time.) Using the Pointing Device The pointing device is positioned in the center of the keyboard and the two click buttons are positioned below the keyboard.
The cap on the end of the pointing device is removable. • To maintain a smooth pointing operation, occasionally remove the cap and clean it with a soft moistened cloth. When the cap wears out, you can replace it with one of the spares shipped with your OmniBook. To customize the pointing device The following changes apply to the built-in pointing device—or an external mouse, if you’ve enabled one. If you connect an external PS/2 mouse, it disables the pointing device. 1. Click Start, then Settings. 2.
The tabs at the top of the Mouse Properties box let you • Swap the left and right buttons. • Change the appearance of the pointing device. • Change the response speed of the pointing device. • Change the type of mouse used. 4. Click the setting you want, then click OK. –or– If you want to select more than one setting, click Apply after each. Using Sound All OmniBook 5500 models support Sound Blaster compatible sound. In this section you’ll learn how to • Adjust the speaker volume.
• Hold down FN and press F8 or F9 as needed to gradually increase or decrease the maximum volume. –or– 1. Click the speaker symbol in the taskbar. 2. Drag the volume control up to increase the volume or down to decrease the volume. To temporarily silence the speaker output without changing the volume setting, click Mute in the Volume window. You can use the other controls in Volume-Mixer Control to control the volumes of individual sound sources—see “To record sound” and “To play sound”.
You can also plug in an external microphone, external speakers or headphones, and a stereo input source—such as a CD player. • Plug the microphone into the microphone jack—the built-in microphone turns off. • Plug the stereo speakers or headphones into the output jack—the built-in speakers turn off. • Plug a stereo input source into the input jack. To record sound The OmniBook contains a built-in microphone for recording sound. You can also connect an external microphone in the built-in microphone jack.
2. Click the Record button and speak into the microphone. 3. When finished, click Stop. To play sound • To play back the sound you recorded, simply press the rewind button, then press the Play button. If you cannot hear the recording, you can increase the volume from the Effects menu. • To play back an existing sound file, open the file, the press the Play button.
Fn combination keys Use the gold FN key in combination with other keys to execute special functions—for example, FN+F8 decreases the speaker volume. You press and hold the FN key, then you press the other key. Embedded numeric keypad Press the NUM LOCK (number lock) key to use the numeric keypad. With the keypad active, keys change to the designations shown on their slanted faces.
• See the Windows online Help. Click Start, then Help. • See the Introducing Microsoft Windows 95 manual shipped with your OmniBook. • Many bookstores have books about Windows for people with different levels of experience.
2. Operating the OmniBook • Checking the Status of the OmniBook. • Turning the OmniBook On and Off. • Restarting the OmniBook. • Using Storage Devices. • Upgrading the OmniBook. • Restoring OmniBook Files. Your OmniBook has been specifically designed for ease-of-use on the road. It features “instant-on” power that immediately restores your last screen. Advanced Power Management (APM) helps to minimize the amount of power you need to run your programs.
Floppy disk This icon appears when the OmniBook is reading or writing to the floppy disk drive. Hard disk This icon appears when the OmniBook is reading or writing to drive C. PC card This icon appears when you insert PC cards into the card slots. The two cards identify when one or two of the slots are occupied. Power off This icon appears when the OmniBook is turned off; the “bookmark” icon reminds you that the state of the computer has been saved.
In this section you’ll learn how to: • Turn off the OmniBook (Instant On mode). • Turn off the OmniBook (Save-To-Disk mode). • Shut down the OmniBook. To turn off the OmniBook (Instant On mode) Use Instant On to temporarily turn off the OmniBook when you’re away from it for short periods. In this mode, the OmniBook display turns off, but the computer saves the state of the computer in memory, exactly where you were working. • Press the blue On/Off button.
Restarting the OmniBook If an application has trouble starting or seems slow, you may need to close some documents or even exit some applications to make more memory available. If this doesn’t fix the problem, you may need to reboot or reset the OmniBook. In this section you’ll learn how to • Reboot from the hard drive (drive C). • Reboot from the floppy drive. • Reset the OmniBook.
To reset the OmniBook If the OmniBook unexpectedly hangs up in a state where nothing seems to work, you may need to reset it. When you reset the system, the OmniBook • Discards your current work session. • Resets and checks the hardware. • Rereads the system files. 1. If the floppy drive is installed, make sure there’s no disk in the drive. 2. Insert a ball-point pen tip or other slender object into the small opening on the left side of the computer below the ac adapter socket.
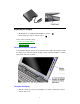
In this section you’ll learn how to • Install a floppy disk drive. • Remove the CD-ROM or floppy drive. • Insert and remove a floppy disk. • Install a CD-ROM drive. • Insert and remove a CD. • Insert a PC card. • Remove a PC card. To install the floppy drive You can install the floppy drive or attach it externally to the parallel port. 1. If necessary, remove the CD-ROM drive (or super battery) from the OmniBook. 2. Slide the floppy drive into the OmniBook until it clicks into place.
–or– • To connect the floppy drive to the OmniBook externally, pull out the floppy drive cable and connect it to the parallel port on the left side of the OmniBook. To remove the CD-ROM or floppy drive 1. Slide the switch to the right. A pull-tab pops out. 2. Pull the pull-tab firmly to remove the CD-ROM or floppy drive from the OmniBook. 3. Push the pull-tab back into the drive after you remove the drive from the OmniBook.
1. Hold the disk with its face up, then slide it into the floppy drive slot until it clicks into place. 2. To remove the floppy disk, press the eject button. To install the CD-ROM drive 1. If necessary, remove the floppy drive or super battery from the OmniBook. 2. Slide the CD-ROM drive into the OmniBook until it clicks into place. To insert and remove a CD When the OmniBook is reading data from the CD-ROM drive, the CD disk icon appears on the Status panel.
2. Place the CD in the drive and gently press down to seat it on the spindle. 3. Close the door to the drive. 4. To remove the CD, press the open button on the front of the CD-ROM drive. To insert a PC card The OmniBook PC card slots are available for devices that store data and expand the communication capabilities of the OmniBook. The OmniBook supports the following two kinds of plug-in PC cards: • Data storage cards—cards that function as disks for storing data.
2. Inserting a card causes the slot’s eject button to protrude from the case. You can rotate the button towards the front to make it flush with the case. About RAM Cards If you’re using a RAM card with the OmniBook, keep these suggestions in mind: • For a new RAM card, install its battery before you insert the card. • Replace the RAM card battery yearly.
Upgrading the OmniBook You can upgrade or add to the OmniBook system by changing or installing certain components. In this section you’ll learn how to • Find your system software version and amount of memory. • Add memory to the OmniBook. • Remove the hard drive. • Install a new hard drive. To find the system software version and memory size • Click Start, HP User Tools, Information 2, OmniBook System Information. The software version and amount of memory are displayed.
memory-expansion board from its packaging until you’ve removed the slot cover from the OmniBook. When you remove the board from its packaging, hold it only by its edges. Don’t touch the electronic components or gold traces. Also, turn off the unit, unplug the ac adapter, and remove the battery. Otherwise, the OmniBook or memory-expansion board may be damaged. 1. Exit Windows—your current session and any data not saved will be lost. • If you’re using Windows 95, use the shutdown option from the Start menu.
7. Replace the slot cover. 8. Insert the battery, then press the blue ON/OFF button. 9. When you see the following message: WARNING - UNEXPECTED AMOUNT OF MEMORY - RUN SCU press F2 to go to the System Configuration Utility. 10. Press ALT+X to open the SCU Exit menu. 11. Click Save and Exit to update the system configuration. To remove the hard drive 1. Important Back up all the files on your current drive C. You can back up the files to a tape drive, a network drive, a PC card, or a flexible disk. 2.
To install the hard drive After following the instructions for removing drive C, use the next procedure to install the new hard drive. 1. Gently press downwards on the hard drive while you slide it into the drive bay. 2. Make sure the drive is fully inserted. 3. Replace the screw and security cover. 4. Replace the battery or attach ac power. 5. Press the reset button. Restoring Files Your OmniBook package includes a Recovery CD ROM and a Support Utilities floppy disk.
The entire recovery process takes approximately 1 hour. To recover your Windows 95 operating system, you’ll need a CD-ROM drive, floppy disk drive, the Recovery CD, and the Support Utility disk. 1. If you have an internal CD-ROM drive, connect the floppy disk drive to the OmniBook’s parallel port and install the CD-ROM drive in the OmniBook. –or– If you have a SCSI CD-ROM drive and a docking system, connect the SCSI CD-ROM drive to the docking system and install the floppy disk drive in the OmniBook.
3. Statements that the CD-ROM drive that may require to be added to the AUTOEXEC.BAT file. Hint Both the CONFIG.SYS and AUTOEXEC.BAT files contain comments that should help your CD-ROM manufacturer advise you in editing the files to meet the particular requirements for your device. To recover Windows for Workgroups The following procedure describes how to restore Windows for Workgroups and your original OmniBook software. The entire recovery process takes approximately 1 hour.
• Select all defaults for this installation. Do not install any printers or networks. Install them after the rest of this installation is complete. 11. Insert the Recovery CD in the CD-ROM drive. 12. Insert the Support Utility disk in the floppy disk drive. 13. Press the reset button. The DOS 6.22 Startup menu appears. 14. Choose option 3: Recover Windows for Workgroups drivers and HP Application Software 15.
4. Click the HP applications you’d like to install. –or– Click Select All to install all of the HP applications. 5. Choose Install Now. To read the online User’s Guide If you want to save OmniBook disk space, you have the option of reading the online User’s Guide directly from the Recovery CD. 1. If you have an internal CD-ROM drive, install it in the OmniBook. –or– If you have a SCSI CD-ROM drive and a docking system, connect the SCSI CD-ROM drive to the docking system.
If you’ve installed a commercial version of Windows 95, Windows for Workgroups, or an alternate operating system, you’ll need to manually install the required drivers. The CD-ROM contains drivers for the following operating systems: • Window for Workgroups. • Windows 95. • Windows NT. • OS/2. • Novell. The drivers are located on the CD in the \omnibook\drivers directory. HP publishes application notes that give current information about installing operating systems and special device drivers.
Identifier Subject bpi01107 Installing Windows 95 bpi01102 Power management drivers bpi01108 CD-ROM drivers bpi01109 Infrared drivers bpi01110 PC card drivers bpi01111 Sound drivers bpi01112 Using Windows 95 bpi01113 Video drivers Window NT Driver Installation In the Support area of the Web page, search for these OmniBook 5500 application note identifiers: Identifier Subject bpi01093 Installing Windows NT bpi01094 PC card drivers bpi01095 Sound drivers bpi01096 Using Windows NT b
The primary source of power for the OmniBook is its rechargeable battery. The OmniBook provides several safeguards so that you won’t be surprised by a deadbattery condition—the status panel shows the remaining battery charge and built-in warnings are displayed for low-battery conditions. To preserve your current work session, the OmniBook automatically turns off when the battery charge gets too low—your session continues when you plug in the ac adapter or insert a fresh battery.
adapter plug has negative polarity—the inner contact is negative, and the outer is positive. The ac adapter is normally warm to the touch whenever it’s plugged into an ac outlet. The OmniBook is normally warm while it’s charging—don’t charge it in a briefcase or other small space. It’s a good idea to use the ac adapter during operations that take more power—for example, those involving external connections, such as using a floppy drive or serial port.
Caution Do not mutilate, puncture, or dispose of the battery in fire. The battery can burst or explode, releasing hazardous chemicals. A rechargeable battery pack must be recycled or disposed of properly. To install a second battery To increase the time you can work on a battery, you can install a second, high-capacity battery in the floppy or CD-ROM drive bay. 1. Important Save your work. 2. If necessary, remove the floppy drive or CD-ROM drive from the OmniBook. 3.
• Adjust the battery charging order. • Change how power is managed. To get the battery status • Move the mouse pointer onto the battery indicator at the right end of the taskbar—the approximate battery time remaining is displayed in a pop-up window. To save battery power To preserve your current work session, the OmniBook automatically turns off when the battery charge gets too low—your session continues when you plug in the ac adapter or insert a fresh battery.
6. Select OK in the Save And Reboot dialog box. To change how power is managed You can change power-management settings that affect power usage and performance. For ideas about how to save battery power, see “To save battery power.” 1. Click Start, HP User Tools, Setup, OmniBook, Power. 2. Select the power-management option that matches the balance you want between battery life and response time.
4. Protecting Your OmniBook • Attaching a Security Cable. • Setting Up Password Protection. • Protecting Your Data. Your OmniBook provides several ways for you to identify and protect your computer. Attaching a Security Cable Your OmniBook has three built-in connectors that allow you to secure the OmniBook with a cable—two on the back of the computer and one on the right side. The Kensington lock systems work with these connectors and are available at many computer stores. To attach a security cable 1.
a backup for the user password—or your system administrator might set up this password. In this section you’ll learn how to • Record your name for identification purposes. • Set up a user password. • Delete a password. • Set up an administrator password. To record your name or other PC identification By recording your name and other information, you identify your OmniBook and make a record of purchase information that will be handy if you have to contact Hewlett-Packard for support or service.
3. Type your new password—it can contain up to eight characters—then press TAB. The display shows * for each character in your password. Hint Before you type a password, check the status of Num Lock—normally, you’d want it off so you can type letters. 4. Type the new password again (in the Verify box), then click OK. 5. Select or clear the following password options you want.
Caution Be sure you record your password in a safe place. To restore operation if you forget your password, call Hewlett-Packard at the number in the Support and Service booklet. To delete a password 1. Click Start, HP User Tools, Setup, OmniBook, Password. 2. Click Set User Password or Set Admin Password—depending on which password you are deleting. 3. Type your old password. 4. Leave the New Password box empty, then click OK.
it any time the user password is requested—or you can use the administrator password to keep your PC identification and configuration secure. 1. Click Start, HP User Tools, Setup, OmniBook, Password. 2. Click the Set Admin Password button. 3. Type your new password—it can contain up to eight characters—then press TAB. The display shows * for each character in your password. Hint Before you type a password, check the status of Num Lock—normally, you’d want it off so you can type letters. 4.
• Set the password of the new OmniBook to match the current password on your hard disk. Protecting Your Data As you create or add information on your OmniBook, the need to make backup copies of that information becomes more important. By making backup copies of key files, you can reduce the chance of accidentally losing that data. You can back up individual files to floppy disks using the Windows File Manager.
5. The Personal Information Applications • Managing Your Time with Appointment Book. • Finding People with the Phone Book. • Getting Answers from HP Financial Calculator. This chapter introduces three applications to help you manage your day—meetings and appointments, addresses and telephone numbers, personal records and finances—to mention just a few.
To add a new appointment 1. If necessary, click the day in the Calendar to display the day of your new appointment. 2. Double-click the line next to the desired time in the Appointment area. The Add Appointment/Event box appears. 3. Type a description of the appointment. 4. Click OK to add the appointment and close the box. –or– If you want to add several appointments, click Save after each.
When the OmniBook signals an appointment, it displays a dialog box to signal the alarm, even if you have exited Appointment Book or are working in another application. If the OmniBook is off, it turns on to display the box and signal your alarm. To add a new event Events (like holidays and anniversaries) are special days you don’t want to forget. 1. If necessary, click the Day button to display and change to the day of your new event. 2. Double-click a blank line in the Event area.
To delete an appointment or event 1. Click the appointment or event to move the highlight there. 2. Press DEL to delete the appointment or event. Appointment Book saves every change to your schedule for you as you make it. So when you exit the Appointment Book application, you don’t need to worry about saving changes first. To exit Appointment Book Exit Appointment Book when you’re not using it—or before you turn off your OmniBook.
• Click Start, Programs, OmniBook, and Phone Book. To add a name to the Phone Book 1. Double-click a blank line in the display area. –or– Press F2. 2. In the Name box, type a person’s name—for example, “Martin, Jean-Claude.” Remember to type the last name first, because when you sort or search the list of items, the operation begins by looking at the leftmost character. Putting last names first will make it easier to find people later. 3. Type information in the rest of the Add New Item box.
To search for a name When you start typing a name, Phone Book’s Fast Goto dialog box pops up and searches as you type. The highlight moves to the name as you type it. 1. Type the first letters of the name you want to find. 2. When the highlight is on the name you want, press ENTER to close the Fast Goto dialog box. To exit Phone Book Exit the Phone Book when you’re not using it—or before you turn off your OmniBook.
2. Click the button for the desired math function. –or– Press the key on the OmniBook keyboard corresponding to the desired math function. HP Calculator “takes over” part of your OmniBook’s keyboard and reassigns functions to it. You can see these functions and the applicable keys on the display of the calculator buttons—for example, pressing the Q key takes the square root of the number in the Calc line. Hints Use BACKSPACE to correct a single keystroke on the Calc line.
If you are entering a multi-step problem, intermediate results are calculated when you type the next arithmetic operator. You can also type parentheses to group different parts of a calculation.
6. Making Connections • Connecting a Printer. • Connecting an External Display. • Connect an External Mouse and Keyboard. • Making Serial Connections. • Making Parallel Connections. • Making Infrared Connections. Your OmniBook is a powerful computer in its own right—but you’ll greatly expand its capabilities by connecting other devices. For information about connecting audio devices, see “To connect a microphone, speakers, or headphones.
1. Click Start, then HP User Tools. 2. From the Setup tab, click Printers. If your printer isn’t listed, double-click Add Printer to start the Add Printer wizard. Follow the Add Printer wizard's instructions. • A parallel printer is normally at the LPT1 port. • An infrared printer is normally at the LPT3 port (a “virtual” port). • A serial printer is normally at the COM1 port. For information about connecting the printer and the OmniBook: • For a parallel printer, see “Making Parallel Connections.
You can connect an external display device to your OmniBook. For example, you can connect a VGA projection panel, a VGA display, a television, or an SVHS VCR. The OmniBook supports either PAL or NTSC video modes when connected to a television. In this section you’ll learn how to • Connect to a VGA, SVGA, or XGA monitor. • Change the display type. • Switch between the internal and an external display. • Connect to a television or VCR. • Change the television type. • Connect to an SVHS device.
4. Change the type of monitor to match the model you’re using. If the external display has higher resolution than the OmniBook display, you’ll have to turn off the OmniBook display to see the higher resolution. To switch between external and built-in displays • Press FN+F5 to switch between the external and built-in display. To connect a television or VCR You can use your television as an external monitor. You can also videotape procedures by connecting your OmniBook to your VCR.
4. In the Television Type box, select NTSC or PAL, then click OK. 5. From the Exit menu, click Save and Reboot. Click OK in the Save and Reboot dialog box. To connect an SVHS device 1. Make sure the device has an SVHS connector. Plug an SVHS video cable into the connector. 2. Set the OmniBook's display resolution to 640x480 (other resolutions will not work). See “To change the display type” for more information. 3.
2. Turn the OmniBook off and on again with the blue On/Off button. See also “To connect an external mouse and keyboard.” To enable external FN keys If you’ve connected an external keyboard, you need to enable the external FN keys. 1. Press Fn+F2. 2. From the Input/Output menu, select External Devices. 3. Check Enable External FN Key. To access the FN key on your external keyboard, use CTRL+ALT. For example, to access Fn+F2, press CTRL+ALT+F2. To connect an external mouse and keyboard 1.
Making Serial Connections The OmniBook serial port is a standard 9-pin serial port. It supports hardware handshaking, a method of data-flow control that uses signals sent over reserved wires in the serial cable. This section shows how to • Connect a serial device. • View or change the serial port assignments. • Specify serial port settings. To connect a serial device The OmniBook 9-pin serial port is a standard serial port, just like those found on many PCs.
1. Press FN+F2 to start the System Configuration utility. 2. Use the Input/Output menu COM Ports command to change the COM names for the serial port and the physical infrared port (normally COM1 and COM2). PCMCIA serial-type cards use the remaining COM names. 3. Exit the utility without rebooting—then click Start and Shut Down to restart the OmniBook. You must restart to make the new assignments active.
You can use Direct Cable Connection to link two PCs and share files, drives, and printers between them. You can make a parallel connection with a parallel cable (using the LPT1 port). To start the Direct Cable Connection wizard, click Start, Programs, Accessories, Direct Cable Connection on each computer. One computer must be the “host,” and the other computer must be the “guest.
OmniBook. Keep the distance within about 3 feet (1 meter) for optimum performance. For example, to establish a connection to another OmniBook 1. Align the two infrared devices to communicate. 2. Click Start, Programs, Accessories, Direct Cable Connection on each computer. One computer must be the “host,” and the other computer must be the “guest.” To print on an infrared printer To connect to an infrared (IrDA-compatible) printer, set the OmniBook printer port to be the infrared printer port, LPT3.
7. Using the Docking System • Setting up the docking system. • Docking the OmniBook. • Undocking the OmniBook. • Installing an ISA card. • Installing a PCI card. With the HP Docking System, you can significantly increase the capabilities of your OmniBook. Your docking system helps you connect your OmniBook quickly and easily to your office equipment and software.
To set up the docking system 1. Optional To adjust the typing angle of keyboard, you can connect the tilt legs to the docking system. Gently press inward on the tilt feet and snap on at one of the three height settings shown below. 2. Unplug the OmniBook’s ac adapter and cables, then close the cable door. 3. Open the OmniBook’s docking port door and slide the door under the port. 4. Plug the power cord into the ac adapter, then into a grounded ac outlet.
Caution Use only an HP F1140A ac adapter (the type shipped with the docking system)—do not use the ac adapter from the OmniBook or another product. Using an improper adapter could damage your equipment and will make your warranties invalid. 5. Place the cable cover on the docking system. To dock the OmniBook 1. Collapse the OmniBook tilt feet. The OmniBook will not align correctly with the docking port if the tilt feet are extended.
2. Place the OmniBook on the docking system and firmly push toward the docking pins until the docking system’s motor pulls the computer into the dock. To undock your OmniBook • Turn the OmniBook on and press the Undock button. The OmniBook closes down any connections to the docking system and ejects the computer.
You can protect against unauthorized undocking using your OmniBook password. See “To set up a user password.” If for some reason you can’t undock the OmniBook using the Undock button, you can manually undock it. Insert a long thin object—such as an auto key—into the security opening and press firmly. Continue holding, and slide the OmniBook forward. Since manual undocking overrides any password, you need to keep a Kensington lock in the security slot to absolutely enforce password protection.
Before removing the card from its bag, equalize static electricity by touching the bag and the port replicator’s metal back plate at the same time. Handle the card by its edges. Avoid touching electronic components. 1. Undock the OmniBook and unplug the ac adapter from the docking system. 2. Remove the cable cover. 3. Slide the metal shield from the base. If the shield is difficult to slide, you can insert a pen or small screwdriver into the gap between the shield and base and gently work the shield loose.
6. Replace the shield. 7. Replace the cable cover. 8. Plug in the ac adapter and dock the OmniBook. 9. If the card isn’t detected, contact the card manufacturer. To install a PCI card You can add one PCI card to the docking system. If you install a PCI card, you can only install one ISA card—and it must be in the lower ISA slot. Caution Before removing the card from its bag, equalize static electricity by touching the bag and the port replicator’s metal back plate at the same time.
4. Unscrew and remove the slot cover next to the card slot you want to use. 5. Slide the ISA card firmly into the connector and replace the slot cover screw. 6. Replace the shield. 7. Replace the cable cover. 8. Plug in the ac adapter and dock the OmniBook. 9. Install the software for the card. 10. If the card isn’t detected, in Control Panel double-click Add New Hardware.
8. Troubleshooting • Solving Problems. If you run into problems using your OmniBook, you can use the suggestions in this chapter for getting back on track. Also check the contents and index for pointers to related information. If you have questions that this manual doesn’t answer, you can • Look at the online Help for Windows and other applications. • Check with your computer system administrator, if you have one.
• If you’re printing to an infrared printer, make sure its port is set to LPT3 (not COM2 or LPT1). Check the printer’s property sheet. • Start Infrared Monitor before you print. Click Start, Infrared. • For infrared printing from an MS-DOS program, run the program in an MS-DOS window instead of in MS-DOS mode. • In Windows Help, use the Print Troubleshooter. • Make sure the infrared light path is not blocked. See “To make an infrared connection.
You can adjust the cursor movement in the Mouse Properties box. 1. Click Start, Settings, Control Panel. 2. Double-click the Mouse icon to open the Mouse Properties box. 3. Click Motion to adjust the cursor speed. If the pointing device doesn’t work • Make sure you don’t have an external mouse connected to the OmniBook. • If you just disconnected an external mouse, try exiting and restarting Windows to make the OmniBook pointing device active again. • Try cleaning the pointing device cap.
If a PC card doesn’t work properly in a card slot • Try removing and reinserting the card. • Try inserting the card in the other card slot to check the connector. • Try removing a PC card from the other card slot, if another card is present. • For a data storage card, check that you’re using the correct drive letter. • If a data storage card doesn’t work properly, check if it has a write-protect switch and that it is set properly.
• Select a lower baud rate in the application. • Use OmniBook Tools to temporarily disable Power Management. (In OmniBook Tools, click Power, click Custom, and clear the Power Management option.) If this fixes the problem, check to see if your communications software may have an update to avoid power-management problems. Remember to enable Power Management when you’re done. If an I/O card stops communicating properly • It may have been reset if the OmniBook turned off.
If the OmniBook doesn’t reboot successfully • If drive C (the hard disk) isn’t working properly, insert the Support Utility floppy disk in the floppy drive, then press CTRL+ALT+DEL to reboot from drive A— then choose the Minimum Startup option. At the MS-DOS prompt, type scandisk c: to fix certain problems with drive C. You can use other commands on drive A to try to repair drive C. Then remove the floppy disk and try rebooting again.
If the battery runs down too fast • Try conserving power using any of the suggestions listed under “To save battery power” • If you have custom Power settings, check the Power Management option. See “To change how power is managed.” If Custom is selected, make sure the Power Management option is enabled. • If the operating time has gotten shorter and the battery pack is more than a year or two old, you may need a new battery pack.
• Advanced power management (APM) is probably disabled—in OmniBook Tools click Power, then select one of the options. If you select Custom, make sure the Power Management option is enabled. If the battery pack doesn’t charge or stops charging • Check that the battery is fully installed and locked in place. • Turn off the OmniBook, then check that the battery contacts are clean and that the ac adapter cables are fully plugged in. • Move the OmniBook away from any nearby heat source.
Index charging light, 39 charging order, 42 installing a second battery, 41 location, 7 power management, 43 RAM card, 27 recharging, 38 replacing, 39 safeguards, 37 saving power, 42 status, 42 warning, 39 battery (high-capacity) installing, 41 removing, 24 boot disks, 21 brightness adjustment, 9 buttons docking system, 73 —A— ac adapter connecting, 38 recharges battery, 38 socket for, 7 adapter external mouse and keyboard, 64 adding appointments, 52 events, 53 external keyboard, 63 external keyboard and m
drive C defragmenting, 49 installing, 31 location, 22 removing, 30 removing files, 49 repairing, 49 drives CD-ROM, 8 connecting floppy, 23 drive C, location, 22 drive D, location, 22 drive E, location, 22 drive F, location, 22 floppy, 8 installing drive C, 31 not affected by low battery, 38 removing CD-ROM drive, 24 removing drive C, 30 removing floppy drive, 24 troubleshooting, 79 click buttons, 10 connecting external keyboard and mouse, 64 infrared device, 67 microphone, 13 parallel device, 66 printer, 5
input line, 13 inserting CD, 25 PC cards, 26 installing CD-ROM drive, 25 drive C, 31 ISA card, 73 PCI card, 75 printers, 59 second battery, 41 Instant On, 20 interrupts serial ports, 66 ISA card installing, 73 drive A, 22 removing, 24 saving power, 42 FN keys combination, 16 enabling external, 64 functions (Calculator), 56 —G— getting help about Windows, 16 finding more information, 5 online manual, 5 —H— hard disk conserving power, 42 installing, 31 location, 7 removing, 30 hardware handshaking, 65 head
options, 46 user, 45 PC cards data storage, 26 I/O, 26 inserting, 26 removing, 27 slots for, 7 troubleshooting, 79 PCI card installing, 75 Personalize (OmniBook Tools), 45 Phone Book adding a name, 55 exiting, 56 introduction to, 54 starting application, 54 playing sound, 15 pointing device, 10 cleaning cap, 11 customizing, 11 troubleshooting, 78 using, 10 ports conflicts, 80 locations, 7 power cord, 38 managing, 43 OmniBook Tools, 43 problems, 81 power management, 18 adjusting, 43 checking power status, 19
docking system, 70 printer, 59 software version, 28 sound external jacks, 13 playing, 15 problems, 81 recording, 14 turning off, 13 speaker, 13 startup problems, 81 status lights docking system, 73 status panel description of icons, 18 stereo input, 13 super VGA, 61 SVHS device connecting, 63 system disks, 21 Windows for Workgroups, 32, 33 removing appointments and events, 54 battery, 39 CD-ROM drive, 24 drive C, 30 drive C files, 49 files, 49 floppy drive, 24 I/O cards, 27 memory-expansion board, 28 PC ca
—W— —V— warning low battery, 39 Window for Workgroups creating backup disks, 34 Windows learning about, 16 Windows 95 recovering, 31 Windows for Workgroups recovering, 32, 33 VCR connecting, 62 VGA display, 61 VGA output connecting, 61 location, 7 resolutions, 61 viewing appointments, 51 volume adjusting, 12 muting, 13 —Y— Y adapter, 64 90