h h Hh HP OmniBook 5000 User’s Guide
OmniBook User’s Guide Operating the OmniBook.......................................................................................... 7 Starting to Use Your OmniBook............................................................................ 7 To use the trackball............................................................................................ 8 To adjust the display.......................................................................................... 8 To learn about Windows................
To view card information................................................................................. 37 To prepare a data storage card......................................................................... 38 To set up an I/O card....................................................................................... 39 To use less memory for plug-in cards............................................................... 40 Connecting an External Display...................................................
Choosing Power Cords........................................................................................ 74 Troubleshooting...................................................................................................... 76 Solving Problems................................................................................................. 76 Troubleshooting Tips for Windows95 ............................................................. 77 Printing Problems.............................................
Introduction Using This Online Manual This online User’s Guide looks similar to a printed manual—and it works like a printed manual in many ways, too. But you can do several handy things you can’t do with a manual. For example, you can make the type larger or smaller. You can click pictures to enlarge them. You can add electronic bookmarks for marking key information. And you can print all or part of the manual on your printer. • Press F1. You’ll quickly see how to use this manual.
• The online Quick Start Guide gives you a fun, visual introduction to the OmniBook—double-click the Quick Start icon in the Program Manager (OmniBook Library group). • The online Windows Quick Startmanual contains information about Windows for Workgroups—double-click the Windows Quick Start icon in Program Manager (OmniBook Library group). • The online MS-DOS Quick Startmanual contains information about MS-DOS— double-click the MS-DOS Quick Start icon in Program Manager (OmniBook Library group).
Edition 1 ................................ ..........
1 Operating the OmniBook Congratulations! Your OmniBook sets a new standard in personal computing. Although it’s compact and easy to carry, the OmniBook is equipped with a touch-type keyboard, its own built-in trackball, and standard Microsoft Windows—all loaded and ready to go. What’s more, your OmniBook has been specifically designed for ease of use on the road. It features “instant-on” power that immediately restores your last screen.
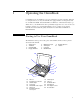
13 19 18 17 16 15 14 12 24 23 22 20 21 This section shows how to ♦ Use the trackball. ♦ Adjust the display. ♦ Learn about Windows. ♦ Use the special features of the OmniBook keyboard. ♦ Turn off the OmniBook—without exiting applications. To use the trackball The OmniBook’s trackball works like an upside-down mouse—you rotate the ball in the direction you want the pointer to move.
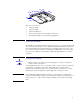
To learn about Windows Microsoft Windows for Workgroups is basically Microsoft Windows 3.1 with added features designed to support networked interactions. Learning About Windows 95 Learning About Windows 95 • Start the 10-minute tour of Windows—click Start, Programs, OmniBook Library, Tour. –or– • See the Introducing Microsoft Windowsmanual shipped with your OmniBook. –or– • See the Windows online Help—click Start and Help. For an introduction, open the Introducing Windows topic on the Contents tab.
number keys. HoldFN if you want to type letters. (PressNUM LOCK again to return these keys to their original functions, so they again type the normal alphabet.) Setting Up Shortcut Keys You can set up shortcuts for documents and programs—see the Windows online Help. If you set up a shortcut, you can also set up a shortcut key for it—in the shortcut property sheet, use the Shortcut Key option on the Shortcut tab.
Your OmniBook has several features that save battery power when the ac adapter isn’t connected. The most obvious of these is automatic shutdown—when your OmniBook has been idle for 3 minutes with no ac power, it turns itself off automatically. (Other power-saving features are described throughout this manual.) To resume operation, just press the On/Off button.
Ac power Battery charging Battery status Hard disk drive Floppy disk drive Power off Num Lock PCMCIA cards Caps Lock Scroll Lock Ac power This icon appears when the ac adapter is plugged in. Battery status and Battery charging These icons appear when a battery is inserted in the corresponding battery slot—Battery 1 is on the left side of the OmniBook, and Battery 2 is on the right. The shading of the battery symbol shows the approximate charge level of the battery relative to a full charge.
completely while writing data to the drive, or if the battery in a PCMCIA RAM card is also low. This section shows how to ♦ Get detailed battery status. ♦ Save battery power. ♦ Recharge the battery or run on ac power. ♦ Respond to a low-battery warning. ♦ Replace the battery. ♦ Install a second battery. To get the battery status Getting Battery Status The Battery Status indicator on the LCD Status Panel shows the approximate charge level of the battery graphically.
• If you have a PCMCIA I/O card—that is, a card having an external connection, such as a modem or network card—remove it when you’re not using it. Some I/O cards use significant power, even while they’re inactive. To recharge the battery or run on ac power • Plug the power cord into the adapter, then into a grounded ac outlet. • Insert the adapter plug into the socket on the left side of the OmniBook.
The ac adapter is normally warm to the touch whenever it’s plugged into an ac outlet. The OmniBook is normally warm while it’s charging—don’t charge it in a briefcase or other small space. Hints • To get the longest battery operating time, allow the battery to charge fully—until the battery symbol in the Status Panel fills completely. Continued charging maintains the full charge.
1. Important: Turn off the unit—donot turn it on until you’ve finished replacing the battery. Also, if it’s connected, donot unplug the ac adapter until you’re finished. 2. For easiest access to the battery, close the display and turn your computer over. 3. Squeeze the locking switches inward and slide the battery out of its compartment. 4. Slide the battery module into the empty bay. Carefully press the battery all the way into the compartment.
4. Slide the battery module into the empty bay. Carefully press the battery all the way into the compartment. You will hear a click as the locking switches move outward and the module is locked in place. 5. Restart your computer. A second Battery Status icon appears in the LCD Status Panel, showing the charge level of the new battery. To adjust battery charging order When there is only one battery installed, the OmniBook automatically detects and charges that battery when the ac adapter is plugged in.
Upper card slot (drive E) Lower card slot (drive D) Floppy drive (drive A) About the Card Slot Drives The hard disk drive (C) and the floppy disk drive (A) are provided with the OmniBook. Drive D and/or drive E are available when PCMCIA mass storage devices are plugged into the respective slots. Example: Drive Icons in File Manager Drive C is seldom removed. If you do change or remove and reinsert drive C, push the OmniBook’s reset button afterward.
Disk Type Rotating hard disk Flash disk (ATA-type) RAM card About RAM Cards Characteristics A spinning magnetic medium and read-write head. The medium requires no power to maintain its data, though it requires significant power to operate. Most hard disks are “ATA-type” disks. Typical capacity: 170 MB or more. Electronic chips called “flash memory” inside a plugin card. A flash disk requires no power to maintain its data, and less power to operate than a rotating medium drive.
Using Sound All OmniBook 5000 models support Sound Blaster compatible sound. If you run the OmniBook demo program on these models (Main group in Program Manager), the sound track illustrates the potential of sound on your OmniBook. This section shows how to ♦ Adjust the speaker volume. ♦ Connect a microphone, speakers, or headphones. ♦ Play and record sounds.
To temporarily silence the speaker output without changing the volume setting, click the Mute button in the Master Volume window. The Volume-Mixer Control adjusts the volume up to the maximum volume set in the System Configuration utility. Follow these steps to change the maximum speaker volume: • Hold FN and press F8 or F9 as needed to gradually increase or decrease the maximum volume -or1. Press FN+F2 to enter the System Configuration utility. 2. From the Input/Output menu, choose Audio Port. 3.
Microphone Line input Microphone input Headphone output Stereo speakers To play or record sound You can use Sound Recorder to play and record sound—or you can use Media Player or other Windows compatible sound applications. Playing and Recording Sounds Playing and Recording Sounds To adjust the volume or mix of sounds while recording or playing, double-click the speaker symbol in the taskbar, then drag individual controls or select individual options.
Protecting Your OmniBook Your OmniBook provides several ways for you to identify and protect your computer. This section shows how to ♦ Record your name for identification purposes. ♦ Fasten your OmniBook with a security cable. ♦ Set up a password to prevent others from turning on your OmniBook. ♦ Set up an administrator password.
1. In Program Manager, double-click the OmniBook Tools icon (in the Main group). 2. Click Personalize. 3. Type your name or any other information, then choose OK. To attach a security cable 1. Purchase a Kensington-brand security cable—they’re available at many computer stores. 2. Loop the cable around a stationary object—make sure it can’t slip off. 3. Lock the clamp into the OmniBook security connector (the small hole in the side of the case).
In Windows: 1. In Program Manager, double-click the OmniBook Tools icon (in the Main group). 2. Click Password. If you’re prompted, type your current password and choose OK. 3. Click Set User Password. 4. Type your new password—it can contain up to eight characters—then press TAB. The display shows* for each character in your password. Leave the box empty if you want no password. Hint: Before you type a password, check the status of Num Lock—normally, you’d want it off so you can type letters. 5.
You must enter your password every time you turn on the OmniBook—even if it turned itself off after a period of inactivity. Turn On, after FN-OFF The only time you must enter your password is when you turn on the OmniBook after you deliberately turned it off by pressingFN+On/Off. (If you turned it off with just On/Off, you’re not prompted for your password.) Undock You must enter your password each time you undock the OmniBook from a docking station.
2. Press FN+F2 to start the System Configuration utility. 3. Choose Passwords from the System menu, then choose Set Admin Password. 4. Type your new password—it can contain up to eight characters—then press TAB. The display shows* for each character in your password. Leave the box empty if you want no password. Hint: Before you type a password, check the status of Num Lock—normally, you’d want it off so you can type letters. 5. Type the new password again (in the Verify line), then choose OK. 6.
Expanding Your OmniBook 2 External keyboard/ mouse port Infrared port NTSC/PAL output SCSI-2 port VGA output Serial port Docking connector Parallel port Your OmniBook is a powerful computer in its own right—but you’ll greatly expand its capabilities by connecting other devices. Connecting a Printer Before you can do any printing from your OmniBook, you have to set up the OmniBook so it knows how to communicate with the printer.
To view or change the printer’s settings or port, use the printer’s property sheet (File menu Properties command). For infrared printing, if Infrared Monitor is running, it provides visual status and helps you resolve communications problems. To start Infrared Monitor, in Control Panel doubleclick Infrared. 1. In Program Manager, double-click the OmniBook Tools icon (in the Main group). 2. Click Connections, then click Printers. 3. Check the list of Installed Printers for the type of printer you’re using.
Making Serial Connections Linking Computers The OmniBook serial port is a standard 9-pin serial port. It supports hardware handshaking, a method of data-flow control that uses signals sent over reserved wires in the serial cable. Linking Computers You can use Direct Cable Connection to link two PCs and share files, drives, and printers between them. You can make a connection in these ways: • With a serial or null-modem cable (using the COM1 port). • With a parallel cable (using the LPT1 port).
Press FN+F2 to start the System Configuration utility. You can use the Input/Output menu COM Ports command to change the COM names for the serial port and the physical infrared port (normally COM1 and COM2). PCMCIA serial-type cards use the remaining COM names. Exit the utility without rebooting—then click Start and Shut Down to restart the OmniBook. You must restart to make the new assignments active. 1. In Program Manager, double-click the OmniBook Tools icon (in the Main group). 2.
Viewing Serial Port Settings In System Properties, the Device Manager tab lists serial (COM) ports. To view the settings for a COM port, select the port and click Properties. (The serial port is normally COM1, and the physical infrared port is normally COM2.) • Open Control Panel and double-click the Ports icon. Choose the port you want to set up, then set its parameters. For details, see theWindows Quick Startmanual. To find out the port name for a particular serial connection, see the previous topic.
Making Infrared Connections The infrared port provides a type of serial connection that doesn’t require cables—you just have to line up the device’s infrared port with the right rear of your OmniBook. Keep the distance within about 3 feet (1 meter) for optimum performance. For example, you can establish a connection to an infrared printer by simply aiming the back of the OmniBook at the printer. This section shows how to ♦ Exchange data with another computer using infrared.
To prepare your OmniBook for SCSI devices 1. Save any open files—you will be rebooting your computer. Connecting SCSI Devices 2. In the C:\CONFIG.SYS file, remove therem characters from the INCLUDE=SCSI line. 3. Exit Windows if necessary, then pressCTRL+ALT+DELto reboot your OmniBook. Connecting SCSI Devices To connect a CD-ROM drive or other SCSI device, first turn off your OmniBook, then connect the device. When you turn on your OmniBook, Windows automatically detects the new device and sets it up.
Adding PCMCIA Cards The OmniBook PCMCIA slots are available for devices that store data and expand the “communication” capabilities of the OmniBook. The OmniBook supports two kinds of plug-in PCMCIA cards: • Data storage cards—cards that function as disks for storing data (and are therefore usually called “disks,” rather than “cards”). The lower and upper card slots support data storage cards—they’re normally called drives D and E.
For a data storage card, you normally want to be able to store or change data on the card, so make sure the write-protect switch on the end of the card is in its “read-write” position—usually away from the nearest corner of the card. If you want to protect the data from being changed, slide the write-protect switch to its “write-protect” or “readonly” position before you insert the card. A new data storage card may already be formatted and contain preloaded software— check its instructions.
To view card information You can check key information about a PCMCIA card in the upper or lower card slot. Viewing Card Information Viewing Card Information • Double-click the PCMCIA card indicator in the taskbar. –or– • Click Start and HP User Tools, then on the Setup tab click PC Card. Also, in System Properties, the Device Manager tab lists PCMCIA ports (sockets) and PCMCIA cards. If you need to view or change the settings for a PCMCIA card, select the card and click Properties. 1.
3. From the File menu, choose Exit to exit CardWizard. –or– Click the Minimize button to leave CardWizard running as a minimized card-slot indicator. To see the full CardWizard screen again, double-click the minimized CardWizard window. The OmniBook automatically detects and sets up a PCMCIA card when you insert it in a card slot. If you want to view or change the settings for a modem card or network (LAN) card, you can change them in CardWizard.
• Read and follow the instructions that come with the PCMCIA card. • If you need to format the device, you can use File Manager for many types of disks—otherwise, you can use the appropriate MS-DOS command. For example, to format an ATA-type disk or RAM card in drive D, you can doubleclick the MS-DOS Prompt icon in Program Manager, then typeformat d:. (If a disk is compressed, use the compression software’s format command instead.
For network (LAN) cards, you may need to set up network support in Windows for Workgroups. For hardware support, use the Windows Setup icon (in the Main group). For software support, use the Network Setup icon (in the Network group). See the online Help for those programs. While an I/O card is installed, that slot isn’t available as a disk drive.
3. In the Configurator screen, from the Configure menu select CardLite. 4. Select the level of support, then choose OK. • To support only modem cards, choose CardLite Basic. • To support modem cards and network (LAN) cards, choose CardLite Enhanced and clear the ATA card option. • To support modem cards, network cards, and ATA-type data storage cards, choose CardLite Enhanced and set the ATA card option. • To support all card types, choose CardSoft—the default OmniBook setting.
The OmniBook automatically recognizes and activates the external display. The built-in display normally turns off to conserve power and backlight life—but if you keep it on, you may notice a slight dimming while the external display is connected.
4. In the OmniBook Display box, select the desired action for the built-in display. If you selected a high resolution—super VGA (800×600) or higher—for use with a high-resolution display, you may have to turn off the OmniBook display to see the higher resolution on the external display. 5. Choose OK. 6. If you changed the resolution, you must restart Windows to see the new resolution. To change the television type 1. Important: Save all of your work—you will be rebooting your OmniBook. 2.
Using the Docking System If you purchase a docking system, your OmniBook becomes even more convenient whenever you work at your desk. By making one connection—plugging your OmniBook into the docking system—you can get convenient access to these types of connections: • • • • • • • • • Printer. Modem or other serial device. External SCSI peripherals, such as a CD-ROM drive or disk drive. Network access cards. External keyboard. External mouse. External VGA display. Audio connections. Power.
To set the docked configuration You can specify how the OmniBook responds when it connects to or disconnects from a docking system. Setting Up Docked and Undocked Profiles Setting Up Docked and Undocked Profiles Whenever you dock to a docking system, Windows automatically switches to a “docked” hardware profile. Each docking system automatically gets a different “docked” profile. Each hardware profile defines the hardware that’s available for use.
Audio in Audio out CD audio in Serial port Joystick/ MIDI port Keyboard port Power Mute/Enable notebook speakers Parallel port SCSI port Mouse port VGA out 4. Replace the cable cover. To dock your OmniBook 1. Prepare the OmniBook for docking: a. Open the docking connector door and slide it underneath the docking connector. b. Unplug the ac adapter. c. Unplug all cables and close all doors, except the docking connector door. d. Fold in the tilt feet. 2.
To undock your OmniBook • Press the Undock button on the docking system. After the OmniBook closes down any connections to the docking system, the docking system ejects the computer. You can protect against unauthorized undocking using your OmniBook password. See “To setup a password”. If for some reason you can’t undock the OmniBook using the Undock button, you can manually undock it. Insert a paper clip or other thin object into the security opening and press firmly.
1. Undock your OmniBook. 2. Adjust each tilt foot to a comfortable height by squeezing the edges of the foot and sliding it until it clicks into a secure position. To install an ISA card You can add up to two ISA cards, such as network (LAN) cards, to the docking system. CAUTION Before removing the card from its bag, equalize static electricity by touching the bag and the port replicator’s metal back plate at the same time. Handle the card by its edges. Avoid touching electronic components.
4. Unscrew and remove the slot cover next to the card slot you want to use. 5. Slide the ISA card firmly into the connector and replace the slot cover screw. 6. 7. 8. 9. Replace the shield. Replace the cable cover. Plug in the ac adapter and dock the OmniBook. Install the software for the card.
Adding Memory to the OmniBook The OmniBook memory slots accommodate two memory-expansion boards. You can install a memory-expansion board to increase the total amount of memory. (To find out your OmniBook memory size, see“To find the system software version and memory size”.) CAUTION Take precautions against damage from static electricity: • Gather all the parts you need so you can complete the installation in one sitting.
Preparing the New Memory 5. Remove the new memory-expansion board from its packaging and position it over the connectors. Press in the board until it seats fully. 6. Replace the slot cover. 7. Insert the battery. 8. Press the reset button, in the small opening on the left side of the OmniBook—see “To reset the OmniBook”. When prompted, run the System Configuration utility to save the new memory configuration. 9. In Control Panel, double-click the Enhanced icon, then choose Virtual Memory and Change. 10.
Changing the Configuration 3 Changing the OmniBook Configuration OmniBook Tools gives you a visual way to change the way your OmniBook looks and operates. Whenever you make a change, the changes are stored in a system configuration file, such as WIN.INI. Changing the OmniBook Configuration Use HP User Tools to change configuration settings for special OmniBook features—and to change most other settings. It provides access to all Control Panel functions. • Click Start, then click HP User Tools.
To start the System Configuration Utility, pressFN+F2. Changing the OmniBook Configuration This section shows how to ♦ Change how power is managed. ♦ Customize the trackball or pointer behavior. ♦ Add and use an external mouse. ♦ Use the trackball in MS-DOS. To change how power is managed You can change power-management settings that affect power usage and performance. For ideas about how to save battery power, see “To save battery power”.
The OmniBook automatic turn-off features operate only if the OmniBook is running on battery power. If the ac adapter is powering the unit, the OmniBook and hard disk do not automatically turn off. When you close the lid of your OmniBook, the display automatically turns off to save power, but the computer continues to run until the time set in Idle Time before Turn-Off is reached. You can also change how power is managed in the Software Configuration utility.
1. In Program Manager, double-click the OmniBook Tools icon (in the Main group). 2. Click Input Devices, then Pointing Devices. 3. If you want to change how fast you must double-click, adjust the Double Click Speed slider. 4. If you want to make the right trackball button be the primary button, choose Swap Left/Right Buttons. (The change takes effect immediately.) 5. If you want to change the trackball speed, adjust the Mouse Tracking Speed slider. 6. Choose OK.
To edit system files CAUTION Editing System Files Make a backup copy of any system file you plan to edit. If you accidentally make an improper change, it may prevent your system from working properly. You can use the backup copy to restore the original version. 1. 2. 3. 4. In the Program Manager window, from the File menu choose Run. Type sysedit and choose OK. Activate the window for the file you want to edit and make the changes.
System files normally reside in specific directories on your disk. CONFIG.SYS and AUTOEXEC.BAT are in C:\, and WIN.INI and SYSTEM.INI are in C:\WINDOWS.
4 Maintaining the OmniBook You can clean the OmniBook with a soft cloth dampened either with clean water or with water containing a mild detergent. Do not use an excessively wet cloth nor allow water inside the case. Do not use any abrasive cleaners, especially on the display. You can clean the keyboard with a vacuum cleaner to remove accumulated dust. Cleaning the Trackball Dust and dirt can enter into the trackballhousing and interfere with trackball operation.
To back up your files As you create or add information on your OmniBook, the need to make backup copies of that information becomes more important. By making backup copies of key files, you can reduce the chance of accidentally losing that data. You can back up individual files to floppy disks using the Windows File Manager. For more elaborate back up storage, you will need to obtain one of the many commercially available software packages.
4. Type defrag drive: for the same disk. For example, for drive C, type defrag c: . Follow the displayed instructions to optimize the disk you’re cleaning up. 5. Exit DEFRAG, then typewin to restart Windows. Repairing a Disk • To optimize the use of space on a disk, click Start, Programs, Accessories, System Tools, Disk Defragmenter. • To find or repair errors on a disk, click Start, Programs, Accessories, System Tools, ScanDisk.
To reboot the OmniBook Restarting the OmniBook Rebooting essentially starts up the OmniBook software from scratch—your current work session is discarded, and the operating system rereads the system files to determine the proper configuration. This is similar to rebooting a PC. Restarting the OmniBook Click Start, Shut Down, then click a shut-down option. (If the OmniBook has stopped responding, try pressing CTRL+ALT+DEL.) In certain situations, you may need to press the reset button—see the next topic.
3. Insert a ballpoint pen tip or other slender object into the small opening on the left side of the computer below the ac adapter socket. Push in momentarily—the system resets and reboots. (See the previous topic if the system reboots improperly.) Reset button If the reset button has no effect, remove the battery and ac adapter and press the reset button—then install the battery or plug in the ac adapter and try pressing the reset button again.
To replace drive C CAUTION If you’re replacing drive C, back up your files before replacing the drive. Turn off the unit, unplug the ac adapter, and remove the battery before removing the drive. Otherwise, the OmniBook or the drive may be damaged. Replacing Drive C 1. 2. 3. 4. Backup all the files on your current drive C. Important: Turn off the unit, unplug the adapter, and remove the battery. Close the cover and turn your computer over.
64
5 Using the Personal Information Applications This chapter introduces three applications to help you keep track of things—meetings and appointments, addresses and telephone numbers, personal records and finances—to mention just a few. Appointment Book Appointment Book is a flexible time-management system that lets you quickly schedule and review your daily activities for the most efficient and productive use of your time.
• Print a copy of your schedule for others. This section shows selected features of Appointment Book, and briefly illustrates how to make and delete an appointment. To start Appointment Book Starting Appointment Book • In Program Manager, double-click the Appointment Book icon (in the OmniBook group). Starting Appointment Book Click Start, Programs, OmniBook, Appointment Book. To view your appointments • Click the Day button on the Toolbar.
To add a new appointment 1. If necessary, click the day in the Calendar to display the day of your new appointment. 2. Double-click the trackball on the line next to the desired time in the Appointment area. The Add Appointment/Event box appears. 3. Type a description of the appointment. 4. Press ENTER or click OK to create the appointment. When the OmniBook signals an appointment, it displays a dialog box to signal the alarm, even if you have exited Appointment Book or are working in another application.
To delete an appointment or event 1. Click the appointment or event to move the highlight there. 2. Press CTRL+D to delete the appointment or event. Appointment Book saves every change to your schedule for you as you make it. So if for some reason you decide to exit the Appointment Book application, you don’t need to worry about saving changes first. Finding People with Phone Book Phone Book is another valuable part of your portable OmniBook.
2. In the Name box, type a person’s name—for example, “Martin, Jean-Claude.” Remember to type the last name first, because when you sort or search the list of items, the operation begins by looking at the leftmost character. Putting last names first will make it easier to find people later. 3. Type information in the rest of the Add New Item box. Here are a few hints: Hints • For ease of typing, you can use theTAB key to tab between fields. SHIFT+TAB ( tabs backwards.
Getting Answers from HP Financial Calculator HP Financial Calculator gives you all the power and convenience of a full-fledged Hewlett-Packard handheld calculator. It lets you quickly perform mathematical operations, as well as sophisticated financial and scientific calculations. Here’s a sample of what you can do with this handy OmniBook application: • Perform general arithmetic problems involving addition, subtraction, multiplication, and division.
HP Calculator “takes over” part of your OmniBook’s keyboard and reassigns functions to it. You can see these functions and the applicable keys on the display of calculator buttons—for example, pressing theQ key takes the square root of the number in the Calc line. Hints • Use BACKSPACEto correct a single keystroke on the Calc line. • Use DEL to erase the entire Calc line and reset it to zero. To do simple arithmetic 1. Type the calculation in the Calc line. 2. Press ENTER (or the = key).
If you are entering a multi-step problem, intermediate results are calculated when you type the next arithmetic operator. You can also type parentheses to group different parts of a calculation.
6 Safety Information Working Efficiently and Safely Ergonomics is the science that fits products to people. Its goal is to make products easy, enjoyable, safe, and efficient to use. However, with even the best designed equipment, how you use the product is very important. The OmniBook is optimized for portability and battery life, while maintaining full PC compatibility and functionality. As a result, it may not meet all ergonomic standards for desktop workstations.
16" 20° 10° 10° 10° 10° Choosing Power Cords The power cord supplied with the OmniBook ac adapter should match the plug and voltage requirements for your local area. Regulatory approval for the ac adapter has been obtained using the power cord for the local area. However, if you travel to a different area and need to connect to a different outlet or voltage, you should use one of the power cords listed below.
New Zealand People’s Republic of China Switzerland Denmark Japan India South Africa CAUTION –or– 8120-6346 (1.0 m) 250 Vac (6 A) 250 Vac (6 A) 125 Vac (12 A) 250 Vac (10 A) SEV 1011 DHCK-107 MITI 41-9682 BS 546 8120-2104 (2.5 m) 8120-2956 (2.5 m) 8120-5342 (2.5 m) 8120-4211 (2.0 m) Use only the ac adapter shipped with the OmniBook (HP part number F1044B). Using any other adapter could damage the OmniBook and void your warranty. Always plug the ac adapter into a grounded outlet.
Troubleshooting 7 If you run into problems using your OmniBook, you can use the suggestions in this chapter for getting back on track. Also check the contents and index for pointers to related information. Hints If you’re having a problem within one particular application, check the manual for that application, too. If you suspect the OmniBook requires service, contact Hewlett-Packard—see the Support and Service booklet or OmniBook Support in the online OmniBook Library.
♦ Sound problems. ♦ General operating problems. ♦ Display problems. ♦ Power and startup problems. ♦ Lockup problems. Troubleshooting Tips for Windows95 If you’re using Windows95, consider the troubleshooting suggestions in this section. The troubleshooting suggestions in other parts of this chapter assume you’re using Windows for Workgroups—and the software-related suggestions may not help if you’re using Windows95. Windows provides “troubleshooters” for several types of common problems.
• If a data storage card doesn’t work properly, check if it has a write-protect switch and that it’s set properly. • If a modem card doesn’t work properly, in Windows Help use the modem troubleshooter. • In Windows Help, use the PC card (PCMCIA) troubleshooter. For file and drive problems (Windows95) • If the floppy drive doesn’t work, check that it’s set up as a 1.44-MB drive. Press FN+F2 to view or change this setting.
• If no text is displayed during reboot, or if things stop before you see “Starting Windows 95...”, the unit probably requires service. • If you see “Starting Windows95...” during startup followed by error messages, reboot again—but when you see “Starting Windows 95...”, press F8 to get the startup menu. Choose a startup option that might help you discover or fix the problem. Use the “safe mode” option to start Windows with a basic configuration. Run ScanDisk (in System Tools) to fix problems with drive C.
If the left edge of printed output is missing • If the printer you’re using is a 600-dpi (dots per inch) printer, try selecting a compatible printer driver for a 300-dpi printer. For example, for a 600-dpi HP LaserJet printer, try using the HPLaserJet IIIsi driver (300-dpi). Certain applications may not work properly with 600-dpi printers.
• If you installed a new mouse driver, disable it. Only the OmniBook mouse driver supports the built-in trackball. Use SysEdit or a text editor to open the C:\WINDOWS\SYSTEM.INI file, then in the[boot] section change the mouse.drv line to be mouse.drv=c:\mouse\gui.drv . • Try cleaning the trackball. See“To clean the trackball”. If the trackball doesn’t work in MS-DOS • See “To enable the trackball in MS-DOS”. • Use SysEdit or a text editor to open the AUTOEXEC.BAT file, then delete rem from the GMOUSE line.
ATA-type flash disk RAM card Modem card Network card –or– obss, csalloc, atadrv, cardlite obss, cs, cs_apm, csalloc, mtddrv, mtsram, cardid obss, cs, cs_apm, csalloc, cardid –or– obss, csalloc, cardlite obss, cs, cs_apm, csalloc, cardid –or– obss, csalloc, cardlite • See the following table for additional suggestions for a specific type of card. Troubleshooting a PCMCIA Card Type of Card Suggestions ATA-type hard disk or • Try reformatting the card using ATAINIT, then FORMAT.
for interrupt conflicts with serial ports. Or you can try restoring full PCMCIA support—see “To use less memory for plug-in cards”. • See the Windows Quick Startmanual for other network information. • The card may be defective, or it may not be supported—contact the card manufacturer or Hewlett-Packard.* * To contact Hewlett-Packard, see the Service and Supportbooklet or the OmniBook Support icon in Program Manager (OmniBook Library group).
reliable operation. In Control Panel, use the Enhanced icon, then choose Virtual Memory and Change. (Drive C compression, removable-disk compression, and 32bit file access should not be active at the same time.) • If you want to use Microsoft DriveSpace compression on removable disks without compressing drive C, use the following steps: To turn on DriveSpace for only removable drives: 1. Exit Windows. 2. Type dscopy and press ENTER. 3. Press CTRL+ALT+DEL. To turn off DriveSpace: 1. Exit Windows. 2.
If an application can’t access a serial port • Check that the COM name you’re using is actually assigned to the port you’re using—in OmniBook Tools click Connections and COM Ports. • If an application doesn’t support the COM port number you’re using, change the port names—in OmniBook Tools click Connections and COM Ports. • Check whether another application is preventing access to the port—even if it’s not actively using it.
If you’re prompted to insert a Windows disk • If you’re adding a driver or other standard Windows component—or if you’re running Windows Setup—and Windows prompts for a certain Windows disk, type c:\windows\optionsand choose OK. The C:\WINDOWS\OPTIONS directory contains standard “uninstalled” Windows files normally found on the Windows installation disks.
If the battery runs down too fast • Try conserving power using any of the suggestions listed under “To save battery power”. • If you have custom Power settings, check the Power Management option—in OmniBook Tools click Power. If Custom is selected, make sure the Power Management option is enabled. • If the operating time has gotten shorter and the battery pack is more than a year or two old, you may need a new battery pack.
If the OmniBook reboots every time you turn it on • Advanced power management (APM) is probably disabled—in OmniBook Tools click Power, then select one of the options. If you select Custom, make sure the Power Management option is enabled. If the OmniBook beeps instead of turning off • If Microsoft at Work Fax is running, exit the program. (Any similar program that doesn’t allow the OmniBook to suspend operation prevents turnoff.
You can use the Windows startup menu to help find startup problems. See “Troubleshooting Tips for Windows 95”. If the screen is difficult to read • Try adjusting the display— slide the controls just below the display. • If the OmniBook is cold, allow it to warm up. Lockup Problems If an application stops responding • See the Windows Quick Startmanual for general information about applications. • Press CTRL+ALT+DELto reboot. If nothing happens, see“To reset the OmniBook”.
alarms, 20, 67 ALT GR key, 10 APM, 12, 85 Appointment Book, 20, 65 appointments, 66, 67 ATAINIT command, 39 ATA-type disks.See also disks drivers for, 81 flash, 19 formatting, 39 maintaining, 59 not FDISK, 39 support for, 40 types, 19 audio. See sound AUTOEXEC.BAT, 56, 57 automatic shutdown, 11, 15 B backing up files, 59 backlight, 8, 13, 42 BallPoint mouse.
Caps Lock mode, 12 Card Services, 35, 39 card slots.
Connections (OmniBook Tools), 28, 30, 32, 44 contrast adjustment, 7, 8 Control Panel. See also Windows Quick Start Enhanced, 51, 83, 86 Ports, 32 Critical battery level, 15 CTRL+ALT+DEL, 61 Customer Support. See Support and Service booklet D D drive. See drive D data compression. See compressed disks data storage cards. See cards, disks DEFRAG command, 60 defragmenting disks, 59 deleting. See removing disk drives.
removing files, 60 repairing, 59 replacing, 63 drive D formatting, 38 location, 17 options, 19 drive E formatting, 38 location, 17 not available, 19 options, 19 drivers (PCMCIA), 81 drives. See also disks, floppy drive floppy. See floppy drive floppy disk, 12 hard disk, 12 not affected by low battery, 13 troubleshooting, 77, 78, 81 Drives indicator removing disks, 36 DriveSpace, 83 E E drive. See drive E editing system files, 56 EEPROM cards.
Flash File System, 19, 81 flash-memory cards, 19, 81 floppy disks. See disks, floppy drive floppy drive booting from, 61, 78, 88 drive A, 17 saving power, 13 FN key, 9 formatting disks, 38 G green light, 14 H hard disk. See also disks ATA-type, 19 conserving power, 13 hard disk drive location, 7 hardcards. See cards, disks hardware handshaking, 30 hardware profiles, 44 headphones, 21 Hewlett-Packard.
initializing disks, 39 I/O cards, 40, 85 inserting. See installing installing battery, 15 drive C files, 59 memory, 50 plug-in cards, 35 printers, 28 Intel flash-memory cards, 19, 81 interrupts serial ports, 32 IRQ. See interrupts K Kensington security, 24 keyboard docking station, 44 FN key, 9 HP Calculator, 71 numeric keypad, 10 response times, 55 shifted keys, 10 L LAN cards. See I/O cards, networks LANs.
external, 30 PCMCIA cards, 38, 39, 40 troubleshooting, 81 mouse adding external, 55 docking station, 44 drivers, 81 scrolls display, 86 serial. See serial mouse mouse pointer scrolls display, 86 MS-DOS. See also MS-DOS Quick Start enabling trackball, 55 Startup menu, 61 MS-DOS Prompt.See MS-DOS MS-DOS Quick Start manual, 4 mute button, 21 N network cards. See I/O cards, networks Network group.
Trackball & Keyboard, 54 On/Off button location, 7 operation, 10 secure turn-off, 25, 26 operating time on battery, 14 orange light, 14 P PAL output connecting, 41 location, 7 panel. See Status Panel parallel cables connecting, 32 printer, 32, 79 types, 32 parallel devices, 32 parallel port location, 7 names, 32 parallel ports connections, 32 for printer, 28 name assignments, 32 renaming, 32 Password (OmniBook Tools), 24 passwords at turn-on, 24 at undock, 45 PC cards. See PCMCIA cards PCMCIA cards.
troubleshooting, 77, 79 problems. See troubleshooting profiles (hardware), 44 Program Manager.See Windows Quick Start R RAM cards. See also cards, disks battery, 19 capacities, 19 formatting, 39 inserting, 35 maintaining, 59 power source, 19 removable disks, 19 removing, 36 troubleshooting, 81 RAM disk, 18 read-only switch, 36, 83 rebooting, 61 rechargeable battery. See battery recharging battery, 14 recharging time, 14 Recovery CD-ROM, 59 remarking commands, 57 removable disks.
serial adapters, 30 serial cables, 30 serial devices, 30 serial mouse troubleshooting, 80 serial port location, 7 serial ports addresses, 32 advanced settings, 32 basic settings, 31 conflicts, 85 connections, 30 conserving power, 13 hardware handshaking, 30 interrupts, 32 name assignments, 30 renaming, 30 troubleshooting, 78, 84 service (repair).
recovering, 57 system slot. See also cards location, 7 system version, 62 SYSTEM.INI, 56, 57 T temperature limits.
V version (system), 62 VGA display, 41, 42, 44, 86 VGA output connecting, 41 location, 7 resolutions, 42, 44 video. See display, VGA output viewing appointments, 66 volume (speaker), 20 Volume window, 20, 22 W warranty. See Support and Service booklet WIN.INI, 56, 57 Windows. See also Windows Quick Start disks for, 52, 86 Setup, 86 trackball options, 54 troubleshooting, 78, 85 tutorial, 9 Windows for Workgroups.