HP OmniBook Docking Products User’s Guide 1-1
Notice This manual and any examples contained herein are provided “as is” and are subject to change without notice. Hewlett-Packard Company makes no warranty of any kind with regard to this manual, including, but not limited to, the implied warranties of merchantability and fitness for a particular purpose. Hewlett-Packard Co. shall not be liable for any errors or for incidental or consequential damages in connection with the furnishing, performance, or use of this manual or the examples herein.
HP Software Product License Agreement Your HP OmniBook PC contains factory-installed software programs. Please read the Software License Agreement before proceeding.
software by Microsoft contained in any such product recovery CD-ROM shall be governed by the Microsoft End User License Agreement (EULA). 8VERWJIV SJ 6MKLXW MR 7SJX[EVI Customer may transfer rights in the software to a third party only as part of the transfer of all rights and only if Customer obtains the prior agreement of the third party to be bound by the terms of this License Agreement.
Contents 9WMRK XLI (SGO ............................................ Mini Dock and Port Replicator Features ........................... 1-9 Understanding the Basics .....................................1-11 To set up the dock ........................................1-12 To dock the OmniBook.....................................1-14 To undock the OmniBook ...................................1-16 To manually undock the OmniBook............................1-18 To set a docking password ..................
1 Using the Dock 1-7
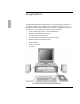
Using the Dock Congratulations! With the OmniBook mini dock or port replicator (referred to as dock in this manual), you can significantly increase the convenience of your OmniBook for desktop use. By making one connection—plugging your OmniBook into the dock—you can get easy access to these types of devices: ♦ Printer, external floppy drive, or other parallel device. ♦ Modem or other standard serial device. ♦ Universal serial bus (USB) devices.
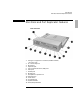
Using the Dock 1MRM (SGO ERH 4SVX 6ITPMGEXSV *IEXYVIW Mini Dock and Port Replicator Features Dock rear-view 1. 2. 3. 4. 5. 6. 7. 8. 9. 10. 11. 12. 13. 14.
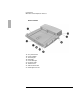
Using the Dock 1MRM (SGO ERH 4SVX 6ITPMGEXSV *IEXYVIW Dock front-view 15. 16. 17. 18. 19. 20. 21. 22. 23.
Using the Dock 9RHIVWXERHMRK XLI &EWMGW Understanding the Basics Docking the OmniBook to the dock is just like simultaneously adding several devices to the OmniBook. Docking causes Windows 95 to create a new hardware profile. The default hardware profile shipped with the OmniBook is an undocked profile. 2SXI If you are using Windows NT on your system and your system does not have a docked hardware profile, you need to create a docked profile for your OnmiBook.
Using the Dock 9RHIVWXERHMRK XLI &EWMGW To set up the dock '%98-32 9WI SRP] ER ,4 * % EG EHETXIV [MXL XLMW HSGOMRK TVSHYGX XLI X]TI WLMTTIH [MXL XLMW HSGO ERH 3QRM&SSOW GSQTEXMFPI [MXL XLMW HSGO 9WMRK ER] SXLIV EG EHETXIV GSYPH HEQEKI XLI HSGO ERH 3QRM&SSO ERH QE] ZSMH ]SYV [EVVERX] MRZEPMH 6IJIV XS XLI [EVVERX] WXEXIQIRX JSV ]SYV TVSHYGX 1. Plug the power cord into the ac adapter, then into an ac outlet. Plug the ac adapter into the dock. 2. Select the appropriate dock tray for your OmniBook.
Using the Dock 9RHIVWXERHMRK XLI &EWMGW 3. Attach the security post to the tray (optional). The security post blocks access to the OmniBook CardBus/PCMCIA cards. The security post on your tray may be in a different location from that shown below. 4. Insert the tabs on the back of the tray into the slots in the dock and press down on the front edge of the tray to lock it in place. 5. Connect your external devices to the dock. See “Making Connections” on page 1-24.
Using the Dock 9RHIVWXERHMRK XLI &EWMGW To remove a tray To remove a tray, slide the tray release latch forward until the tray pops up. Tray release latch To dock the OmniBook 1. Place the dock on a flat surface. 2. Slide the OmniBook’s rear port door to the left. The OmniBook 4100 laptop PC rear port door opens automatically when you install it in the port replicator.
Using the Dock 9RHIVWXERHMRK XLI &EWMGW 3. Place the OmniBook on the dock tray, with the back of the computer facing the dock’s connector. 4. Position your fingers on the platform grips as shown below. Use your thumbs to push the computer firmly toward the dock until the OmniBook slides into place. You should hear a click, indicating that the OmniBook is locked to the dock. When the OmniBook is properly inserted, the amber wait light turns on.
Using the Dock 9RHIVWXERHMRK XLI &EWMGW To undock the OmniBook 2SXI If you have installed the tray security post, make sure that nothing is protruding from the OmniBook PC card slots. 1. If there is no ac power connected to the dock, turn on the OmniBook to power the dock. 2. Exit any applications that are using devices that are connected througth the dock (network, USB, and PCMCIA devices.) 3. Press the undock button on the dock. — or — If you are using Windows 95, Click ,Eject PC.
Using the Dock 9RHIVWXERHMRK XLI &EWMGW 5. When you hear two beeps and the undock light flashes, pull the release lever on the right side of the dock toward the front to eject the OmniBook. You have 30 seconds to pull the release lever. After 30 seconds, the dock relocks the OmniBook.
Using the Dock 9RHIVWXERHMRK XLI &EWMGW To manually undock the OmniBook If you cannot undock the OmniBook using the undock button (for example, you have no ac power or battery power), you can manually undock the OmniBook. Manual undocking overrides password protection. 1. Save your work and turn off your OmniBook. If you are using Windows 95, be sure to use the shut down option from the Start menu. 2. If you are using a Kensington MicroSaver lock to secure your dock, remove the lock. 3.
Using the Dock 9RHIVWXERHMRK XLI &EWMGW To set a docking password 2SXI An administrative password must be set before you can set a user password. Refer to the reference guide provided with your OmniBook for detailed information about setting administrative passwords. Password security protects access to your OmniBook. If you use password security, you must enter the password at certain times (defined in Password Options). This is how to specify a docking password. 1.
Using the Dock 9RHIVWXERHMRK XLI &EWMGW To turn the OmniBook on and off To turn on the OmniBook: • Press the power button on the left side of the dock. To turn off the OmniBook without undocking. • Close open applications and save your work. • Properly shutdown your operating system. • Press the system-off button on the left side of the dock. .
Using the Dock 9RHIVWXERHMRK XLI &EWMGW To attach a security cable Your dock has a built-in security port that allows you to secure the dock with a cable. A Kensington MicroSaver lock system or compatible lock system works with this port and is available at many computer stores. Without a Kensington lock system., the other physical security features of your docking station, such as the PC Card lock, will not work 238) To prevent unauthorized undocking, set a docking password.
Using the Dock 9RHIVWXERHMRK XLI &EWMGW 4. Insert the lock into the dock’s security port and release the key. Store the key in a safe place away from the OmniBook.
Using the Dock 9RHIVWXERHMRK XLI &EWMGW To create a docked hardware profile When Windows NT 4.0 was installed on your system, a hardware profile was created. If you do not already have a docked profile, you can copy this original profile and customize it for your docked hardware profile. 1. Double-click the System option in the Control Panel. 2. Click the Hardware Profiles tab. 3. Click the original configuration profile, then click Copy, and enter a name for your docked configuration. 4.
Using the Dock 1EOMRK 'SRRIGXMSRW Making Connections When making connections, notice that the orientation of the ports on the dock are the reverse of the OmniBook. Turn the connector cables over when switching from the OmniBook to the dock. This section describes how to connect devices to the dock, including the following: • External keyboard. • External PS/2 or serial mouse. • Standard serial device (9-pin). • Two universal serial bus (USB) devices. • External display.
Using the Dock 1EOMRK 'SRRIGXMSRW If you connect a keyboard after docking the OmniBook with power on , the keyboard may not be recognized. If this happens, suspend and then resume your OmniBook to enable the system to recognize the keyboard. To enable an external Fn key If you are using a dock with an external keyboard, substitute the keystrokes CTRL+ALT for Fn. If necessary, enable the external Fn key from the BIOS Setup utility. This is enabled by default.
Using the Dock 1EOMRK 'SRRIGXMSRW To connect a PS/2 mouse The OmniBook has a PS/2 mouse driver installed. When you dock, the OmniBook automatically detects and sets up the mouse 1. Attach the mouse cable to the mouse port. 2. Dock the OmniBook in the dock. Mouse Port To connect a serial mouse 1. Attach the serial mouse cable to the serial port. Serial Port 2. Dock the OmniBook in the dock. 3. Using the touch pad or pointing stick, click Start, Settings, Control Panel, Mouse, General.
Using the Dock 1EOMRK 'SRRIGXMSRW 4. Click Change, then select Standard Mouse Types. 5. Click OK, Close, then click Yes when prompted to restart. To connect a serial device Use standard serial cables and adapters available at computer dealers and electronic supply stores to connect serial devices. 1. Attach the serial cable to the serial port. 2. Dock the OmniBook in the dock. 3. If necessary, install your serial device driver. See your Windows or device manual for instructions.
Using the Dock 1EOMRK 'SRRIGXMSRW To connect a universal serial bus (USB) device Universal serial bus (USB) provides a bidirectional serial interface for adding peripheral devices such as game controllers, serial and parallel ports, and scanners on a single bus. The OmniBook’s dock provides two USB ports. • Attach the USB cable to either the upper or lower USB port. USB Ports To connect an external monitor Use this procedure to connect a standard VGA, SVGA, or XGA external monitor to your OmniBook. 1.
Using the Dock 1EOMRK 'SRRIGXMSRW Display Port To use the monitor stand with an external display The optional monitor stand (HP F1453A), can support a weight of 36 kg (80 lb.). When setting up the monitor stand, be sure that the wide edge faces forward, as shown below.
Using the Dock 1EOMRK 'SRRIGXMSRW To enable the built-in and external displays • Press Fn+F5 (Ctrl + Alt + F5 if using an external keyboard) to cycle through the external and built-in display options (Internal, External, Both). —or— 1. Close all applications, then shut down Windows and reboot the OmniBook.. 2. When you see the HP OmniBook logo displayed, 4VIWW * " XS IRXIV 7IXYT 3. From the Main menu, use the down arrow to highlight Video Display Device. 4. Press Enter to view choices. 5. Select Both. 6.
Using the Dock 1EOMRK 'SRRIGXMSRW Parallel Port The dock’s 25-pin parallel port is a standard enhanced (EPP/ECP) parallel port.
Using the Dock 1EOMRK 'SRRIGXMSRW To insert a PC card (mini dock only) '%98-32 (S RSX MRWXEPP 'EVH 7IVZMGIW SV 7SGOIX 7IVZMGIW WSJX[EVI MJ MX GSQIW [MXL ]SYV 4' GEVH 8LI 3QRM&SSO EPVIEH] MRGPYHIW 'EVH 7IVZMGIW ERH 7SGOIX 7IVZMGIW [LMGL EYXSQEXMGEPP] HIXIGX ERH WIX YT 4' 'EVHW ]SY MRWXEPP MR XLI X[S GEVH WPSXW MR XLI HSGO (MJJIVIRX ZIVWMSRW SJ XLMW WSJX[EVI [MPP HMWVYTX XLMW WIVZMGI 2IZIV VIQSZI E TPYK MR GEVH [LMPI ER 3QRM&SSO 4' GEVH HVMZI MW EGXMZIP] VIEHMRK SV [VMXMRK HEXE ;EMX YRXMP XLI 4' GEVH H
Using the Dock 1EOMRK 'SRRIGXMSRW 2SXI You can lock the cards in the dock using a Kensington lock.
Using the Dock 1EOMRK 'SRRIGXMSRW 3. Press the ejector button until the PC card pops out, then pull out the card.
Using the Dock 1EOMRK 'SRRIGXMSRW To connect your audio equipment 2SXI If you connect external speakers, the internal OmniBook speakers are automatically turned off. If you connect and external microphone, The internal microphone is automatically turned off. The dock provides the following audio ports: Amplified speakerout connector for headphones or speakers Line-in connector for an external audio source (such as a CD player). Microphone-in for and external microphone 1.
Using the Dock 1EOMRK 'SRRIGXMSRW Speaker-out Microphone-in Line-in 1-36
2 Troubleshooting 1-37
Troubleshooting If you have any problems with your dock, you can use the suggestions in this chapter for getting the problem resolved. If you run into problems with your OmniBook, you can use the suggestions in this chapter for getting back on track. -J ]SY LEZI UYIWXMSRW XLEX XLMW QERYEP HSIW RSX ERW[IV ]SY GER • Look at the online Help for Windows and other applications. • Find technical information about the OmniBook on the Internet—visit the Support website at http://www.hp.com/omnibook.
Troubleshooting 7SPZMRK 4VSFPIQW Solving Problems If you have a problem using the dock, find the symptom that matches your situation. Try the suggestions one at a time. If the OmniBook does not undock after you press the undock button • If no ac power is connected to the dock, make sure the OmniBook is turned on. • If you are using a password, make sure it is accepted. • If you are prompted about shutting down devices, and if no applications are using those devices, press ENTER.
Troubleshooting 7SPZMRK 4VSFPIQW OmniBook battery discharges while docked. • Made sure that the ac adapter is plugged is connected to the dock and into an ac outlet. If an external PS/2 mouse or keyboard does not work • Make sure the mouse or keyboard is plugged into the correct port. The mouse and keyboard ports look the same. See page 1-26. • Check that the PS/2 mouse is enabled in the BIOS Setup utility. If you cannot hear audio devices or files • Fn+F7 mutes the audio system.
3 Specifications and Regulatory Information 1-41
Specifications and Regulatory Information Your OmniBook dock is designed to provide trouble-free operation. The following suggestions can help you while working with your OmniBook: • If you have problems, see the problem-solving suggestions and references listed in chapter 2. • Observe the temperature limits and other specifications listed in the next section. • If you think your dock might need repair service, see the warranty and service information in the Support and Service booklet.
Specifications and Regulatory Information 7TIGMJMGEXMSRW Specifications 4SVXW 240-pin docking connector. Parallel DB25 (EPP/ECP and floppy drive). Serial DB9 (115,200-bps). VGA port, D-sub 15-pin female connector – DDC compliant. 6-pin external keyboard connector. 6-pin external PS/2 mouse connector. Three audio jacks for Speaker-out, Line-in, and Microphone-in. 2-pin ac jack for ac adapter. 2 Type II or Type III PC Card slots (F1452A only). 2 universal serial bus (USB) ports.
Specifications and Regulatory Information 6IKYPEXSV] -RJSVQEXMSR Regulatory Information This section presents information that shows how the dock complies with regulations in certain regions. Any modifications to the dock not expressly approved by Hewlett-Packard could void the authority to operate the dock in these regions. This dock is for use only with the I.T.E. (Information Technology Equipment) notebook computer, models HP OmniBook 2100, 3100, 4100, and 7100. U.S.A.
Specifications and Regulatory Information 6IKYPEXSV] -RJSVQEXMSR Declaration of Conformity 6IWTSRWMFPI 4EVX] Hewlett-Packard Company Manager of Corporate Product Regulations 3000 Hanover Street Palo Alto, CA 94304 (415) 857-1501 declares that the product(s) 8VEHI REQI Hewlett-Packard Company 4VSHYGX REQI HP F1451A port replicator/ HP F1452A Mini Dock Complies with Part 15 of the FCC Rules. Operation is subject to the following two conditions: 1. This device may not cause harmful interference, and 2.
Specifications and Regulatory Information 6IKYPEXSV] -RJSVQEXMSR Europe Products sold in Europe by Hewlett-Packard and its authorized dealers meet the specifications listed below, according to ISO/IEC Guide 22 and EN 45014. . Declaration of Conformity (HP F1451A Port Replicator) Manufacturer: Hewlett-Packard Company Address: Hewlett-Packard Co. Mobile Computing Division 1000 NE Circle Blvd.
Specifications and Regulatory Information 6IKYPEXSV] -RJSVQEXMSR Declaration of Conformity (HP F1452A Mini Dock) Manufacturer: Hewlett-Packard Company Address: Hewlett-Packard Co. Mobile Computing Division 1000 NE Circle Blvd.
Index A D H ac power, 1-12 audio connections, 1-35 troubleshooting, 1-40 Declaration of Conformity, 1-46 device audio, 1-35 display, 1-28 keyboard, 1-24 parallel, 1-30 serial, 1-27 USB, 1-28 dimensions, 1-43 display external, 1-28 troubleshooting, 1-39 dock setting up, 1-12 dock tray, 1-13 docking password, 1-19 docking the OmniBook, 1-14 documentation, 1-38 hardware profile, 1-23 help, 1-38 B BIOS Setup, 1-25 button power, 1-20 system off, 1-20 C cable security, 1-21 connecting, 1-27 ac power, 1-12
P parallel device connecting, 1-30 troubleshooting, 1-39 password docking, 1-19 PC Card connecting, 1-32 removing, 1-33 ports ac adapter, 1-12 display, 1-28 keyboard, 1-24 mouse, 1-26 printer, 1-30 serial device, 1-27 USB, 1-28 power, 1-43 power button, 1-20 protection security cable, 1-21 PS/2 mouse troubleshooting, 1-40 R regulatory, 1-44 1-50 removing PC Card, 1-33 Type III CardBus devices, 1-33 repair, 1-42 turning off the OmniBook, 1-20 turning on the OmniBook, 1-20 U S security cable, 1-21 securi