HP OmniBook 2100/3100 User’s Handbook HP OMNIBOOK 2100/3100 USER’S HANDBOOK................................... 4 Using This Online Handbook....................................................................................................4 Finding More Information ........................................................................................................4 Notice .....................................................................................................................................
Checking the Status of the OmniBook....................................................................................19 To interpret status lights........................................................................................................19 To interpret the status panel indicators ..................................................................................19 Protecting the OmniBook........................................................................................................
Cleaning the Computer ...........................................................................................................40 To clean the case ...................................................................................................................40 To clean the display...............................................................................................................40 Solving Common Problems.......................................................................................
HP OmniBook 2100/3100 User’s Handbook • Using This Online Handbook. • Finding More Information. • Notice. This handbook describes how to use the OmniBook with a Microsoft® Windows® operating system. It focuses on the special Hewlett-Packard hardware and software, not the Windows operating system itself. For questions about the use of the operating system, refer to the Microsoft Windows manual shipped with the OmniBook.
website. To re-install the User’s Handbook onto your hard drive, insert the Recovery CD and run Omnibook\Hputils\Disk1\Setup.Exe. • OmniBook accessories may be purchased online. For the latest information, visit our website at http://www.hp.com/omnibook. Notice This manual and any examples contained herein are provided “as is” and are subject to change without notice.
1. Introducing the OmniBook • Identifying the Parts of the OmniBook. • Learning About Windows. • Safety Information. • Working in Comfort. Keep in mind the following features as you learn about your OmniBook. • The OmniBook’s modular design provides maximum expandability without compromising portability. • The high-performance Pentium® CPU with MMX™ technology and enhanced IDE hard drive provide you with the processing power needed to handle complex graphics and large sound files.
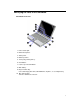
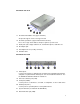
Identifying the Parts of the OmniBook OmniBook–Front View 1. Power status light. 2. Built-in microphone. 3. Status panel. 4. Built-in speakers. 5. Touch pad (pointing device). 6. Click buttons. 7. Latch to open the OmniBook. 8. Main battery. 9. Plug-in module bay. Can contain floppy disk drive, CD-ROM drive, Zip drive, or secondary battery. 10. Blue power button. Turns the OmniBook on and off.
OmniBook–Side View 11. PC Card and CardBus slots (upper and lower). Accepts two Type-II cards or one Type-III card. 12. PC Card eject buttons (upper and lower PC Card slots). Press once to pop out the button, and press again to eject the card. 13. Audio jacks (left to right): audio line-in, external microphone, audio line-out. 14. AC adapter jack. 15. Kensington lock slot (security connector). 16. Hard disk drive. OmniBook–Rear View 17. Infrared port.
23. Docking port (for a port replicator or other docking product). 24. PS/2 keyboard or PS/2 mouse port (supports Y-adapter). Learning About Windows This OmniBook User’s Handbook does not discuss the Windows operating system. Rather, it introduces the OmniBook and shows you how to operate it. For information about Windows, see the following sources: • The Windows online Help. Click Start, then Help. • The Microsoft Windows manual shipped with your OmniBook.
• Do not attempt to make any adjustment of the unit. • Avoid direct eye exposure to the infrared LED beam. Be aware that the beam is invisible light and cannot be seen. • Do not attempt to view the infrared LED beam with any type of optical device. Laser Safety The CD-ROM drive used with the OmniBook is certified as a Class 1 laser device according to the U.S.
2. Operating the OmniBook • Powering the OmniBook. • Starting and Stopping the OmniBook. • Using the Touch Pad. • Using the OmniBook Display. • Adjusting the Sound System. • Using the OmniBook Keyboard. • Checking the Status of the OmniBook. • Protecting the OmniBook. Powering the OmniBook To connect ac power There are two ways to power the OmniBook: by ac adapter and by battery. Caution Use only the HP ac adapter intended for this product, model F1454A.
automatically recharges the battery. To check the status of the battery, see “Checking the Status of the OmniBook.” Starting and Stopping the OmniBook • To start and stop the OmniBook • To reset the OmniBook. • To transport the OmniBook. To start and stop the OmniBook You can easily start and stop your OmniBook using the blue power button.
* Preserving network connections. A plug-and play operating system, such as Windows 95, can restore network connections when you turn on the OmniBook. For Windows NT 4.0 or a different operating system, you may have to reset the OmniBook or restart the operating system to restore them. ** Windows 95 only. Hint Time-out settings. In order to save power or, conversely, to increase speed, you can change the time-out settings.
1. Move a thumb or finger across the touch pad in the direction you want the pointer to move. 2. Use the click buttons, which function like the left and right buttons on a mouse, to make your selection. You can also tap on the touch pad instead of clicking a button. • To open an application, move the pointer over the icon, then press the left button twice rapidly. • To make menu selections, move the pointer to the item and press the left button once.
Brightness • Press Fn+F1 to decrease the brightness. • Press Fn+F2 to increase the brightness. Contrast (for DSTN displays only) • Press Fn+F3 to decrease the contrast. • Press Fn+F4 to increase the contrast. Hint Brightness affects battery life. To maximize your battery operating time, set the brightness to the lowest comfortable setting, so that the internal light uses less power.
2. Drag the volume control bar up or down to adjust the volume. 3. To temporarily silence the speaker without changing the volume setting, click Mute. Using the OmniBook Keyboard • To use the Fn hot keys. • To use the Windows keys. • To use the embedded keypad. • To use the Alt Gr key. Warning Improper use of keyboards and other input devices has been associated with ergonomic injury.
Fn + S Enters Standby mode. Fn + UPARROW Increases sound volume. Fn + DOWNARROW Decreases sound volume. To use the Windows keys Windows keys are located on the keyboard to the left and right of the spacebar. Brings up the Windows Start menu. There are two of these, one to each side of the spacebar. Brings up the shortcut menu for the current application. This is the same menu that appears when you click the right mouse button while pointing at the application.
SHIFT Unshifted ¬ ‘ ALT GR 18
Checking the Status of the OmniBook • To interpret the status lights. • To interpret the status panel indicators. To interpret status lights The OmniBook has a power status light on the hinge, which is visible even when the OmniBook is closed. Steady green light. OmniBook is on. Blinking green light. OmniBook is in Standby or Suspend mode. No light. OmniBook is in Off or Hibernate mode. The battery itself has four lights that indicate charge status when you press the square button on the battery.
the presence of main (upper) and second (lower) batteries. A triangle blinks slowly when that battery is charging. Battery low. No battery bars showing; triangles indicate presence of battery. The OmniBook also beeps. Defective battery. No battery bars showing and no triangles indicating presence of battery; no charging even though ac power is present. Overheated battery. The battery is too hot to charge. Not necessarily a defective battery.
To set, change, or delete password protection for this OmniBook, use the BIOS Setup utility. This program is described fully in the Reference Guide that came with your OmniBook. 1. From the Start menu, shut down, then restart the OmniBook. 2. When you see the HP logo, press F2 to enter the BIOS Setup utility. • Pointing devices do not work in the BIOS Setup utility. • Active keys are described along the bottom of the window.
3. Select the Security menu. 4. Select Set Administrator Password, then press ENTER. 5. Type the current password, then press ENTER. 6. Press ENTER at the Enter New Password prompt. 7. Press ENTER at the Confirm New Password prompt. 8. Press Continue to save changes. 9. Press F10 to Save and Exit the BIOS Setup utility. To attach a security cable Your OmniBook has a built-in connector that allows you to secure the OmniBook with a cable.
3. Managing Battery Power • Recharging and Replacing Batteries. • Conserving Battery Power. The primary portable source of power for the OmniBook is a replaceable, rechargeable battery. Your OmniBook accepts a main battery (in the battery bay) and, if desired, a secondary battery (in the plug-in module bay). Lithium-ion batteries provide the same or better battery life at a reduced weight.
• Replace the main battery with one that is charged. See "To replace the battery." –or– • Install a charged secondary battery in the plug-in module bay. See "To replace a plug-in module." To recharge the battery 1. Connect the power cord to the ac adapter, then plug the cord into an ac outlet. The light on the ac adapter shines when the adapter is powered. 2. Connect the ac adapter to the ac adapter jack on the left side of the OmniBook.
5. Slide the charged battery into the OmniBook until it clicks into place. 6. Close the safety latch. Caution Do not mutilate, puncture, or dispose of the battery in fire. The battery can burst or explode, releasing hazardous chemicals. A rechargeable battery pack must be recycled or disposed of properly. See “Battery Safety.” Conserving Battery Power • To optimize battery operating time. • To get the most from your batteries. • To change a time-out setting.
• If you work with an application that uses the serial port or an I/O PC Card, exit the application when you’re done using it. • Install a secondary battery in the plug-in module bay to double the operating time. To get the most from your batteries The following are some further suggestions for the best management of your OmniBook batteries. • Do not leave batteries unused for long periods of time. If you have more than one, rotate them.
6. Press F10 to save and exit the BIOS Setup utility.
4. Making Connections • Using Plug-In Modules and Storage Media. • Connecting External Devices. • Using PC Cards. • Using Docking Products. Using Plug-In Modules and Storage Media • To replace a plug-in module. • To install the floppy disk drive externally • To insert or eject a floppy disk. • To insert or remove a CD. • To insert or eject a Zip disk. The OmniBook Plug-In Modules User’s Guide describes OmniBook accessory modules and shows you how to install and use them.
Caution If you are inserting or removing a CD-ROM drive, floppy disk drive, or Zip drive, shut down the OmniBook. 1. From the Start menu, shut down the OmniBook. (This is not necessary if you are removing a battery from the plug-in module bay and inserting another battery). 2. Slide the safety latch for the module bay into its recess. 3. Slide and hold the release latch, then pull out the module, as shown. 4. Slide the new plug-in module into the OmniBook until it clicks into place. 5.
To insert or eject a floppy disk When the OmniBook is reading or writing data to the floppy drive, the floppy disk indicator appears on the status panel. Caution Do not insert or remove a floppy disk while the OmniBook is actively reading or writing data. Wait until the floppy drive is done. Otherwise, you could lose data or the OmniBook could stop responding. • Hold the disk with its face up, then slide it into the floppy drive slot (on the right side of the OmniBook) until it clicks into place.
To insert or eject a Zip disk Caution Do not insert or remove a Zip disk while the OmniBook is actively reading or writing data. Wait until the Zip drive is done. Otherwise, you could lose data or the OmniBook could stop responding. • Always turn on power to the OmniBook before inserting a Zip disk. • To insert the Zip disk, hold the disk with its face up, then gently insert it into the Zip drive. • To remove the Zip disk, gently press the eject button on the front of the Zip drive. Do not use force.
Hint Switching Displays. Use Fn+F5 to switch among the built-in display, an external display, and simultaneous displays. To connect a printer or other parallel device The most common parallel device is a printer. • Connect the parallel printer cable or other parallel cable to the parallel port. To connect a serial mouse or other serial device • Connect the serial cable to the serial port.
If you are connecting a serial mouse, you need to select Standard Serial Mouse in Control Panel, Mouse, General, Change. To connect an external PS/2 keyboard or a PS/2 mouse 1. From the Start menu, shut down the OmniBook. 2. Plug the mouse or keyboard PS/2 cable into the PS/2 port on the OmniBook. • To connect both a mouse and a keyboard, use the HP F1469A PS/2 Y- adapter. • To connect a device that has a PC-type jack, first connect its cable to an adapter cable with a PS/2 jack. 3.
Note Windows NT 4.0 does not support universal serial bus (USB) devices. Universal serial bus (USB) provides a bidirectional serial interface for adding peripheral devices, such as game controllers, scanners, and mice. • Plug the USB cable into the USB port on the OmniBook. The device is automatically recognized. Note If you have problems making this connection, contact the vendor of the peripheral device, as well as Hewlett-Packard, for the latest versions of the USB drivers.
The OmniBook provides an infrared port on the rear panel. The infrared port provides wireless, serial communication between the OmniBook and other infrared devices such as printers or other OmniBooks. By default, the infrared port is not enabled. You must install the appropriate infrared driver and enable it in the BIOS Setup utility. Refer to the Reference Guide and the driver's Readme file for complete information about infrared connections.
The OmniBook automatically detects and sets up a card when you insert it in a card slot. See the card’s instructions for additional information. Caution Never insert or remove a plug-in card while an OmniBook PC Card drive is actively reading or writing data. Wait until the PC Card drive is done. Otherwise, you could lose data or the OmniBook could stop responding. 1. Hold the card with its face up with its connector holes toward the card slot. 2.
Using Docking Products • To install a docking tray. • To dock the OmniBook. • To undock the OmniBook. The OmniBook docking products provide external connections for the OmniBook that you can leave in place whenever you remove the OmniBook from your desk. Instead of disconnecting and reconnecting peripheral devices, you simply undock and dock the OmniBook. Refer to the User’s Guide for OmniBook docking products for more information.
1. From the Start menu, shut down the OmniBook. If you have a plug-and-play operating system, such as Windows 95, you do not need to turn off the OmniBook before inserting it into the dock. Caution Use only the HP F1454A ac adapter (shipped with OmniBooks compatible with this dock) . Using any other ac adapter could damage the OmniBook and may void your warranty. Refer to the warranty statement for your product. 2. Plug the power cord into the ac adapter, then into an ac outlet.
To undock the OmniBook 1. From the Start menu, shut down the OmniBook. If you have a plug-and-play operating system, such as Windows 95, you do not need to turn off the OmniBook before removing it from the dock. 2. Press the undock button on the front of the dock and wait for the undock light to turn green. 3. Position your thumb as shown and pull the release lever forward. 4. Remove the OmniBook from the dock.
5. Maintenance and Troubleshooting • Cleaning the Computer. • Solving Common Problems. Cleaning the Computer • To clean the case. • To clean the display. To clean the case Use a soft, lint-free cloth to clean the case. You can use a mild detergent, but do not use abrasives or solvents, such as thinner, benzene, or isopropyl alcohol. Apply the cleaner to the cloth, and not directly onto the computer. To clean the display Use a soft, lint-free cloth to clean the display glass.
• See the printed OmniBook Reference Guide. You can obtain a backup copy of this guide from the OmniBook website (http://www.hp.com/omnibook). • Check OmniBook Notes for the most current troubleshooting suggestions (Start, Programs, OmniBook Library, OmniBook Notes). • Look at the online Help for Windows and other applications. • Check with your computer system administrator, if you have one. • Check your local library or bookstore for other books about Windows, MS-DOS, and other applications.
• Make sure the Zip disk is inserted correctly. • Reset the OmniBook. • Make sure the Zip drive module is seated correctly—remove and reinsert. Audio Problems If sounds aren’t audible • Check that the volume is not muted. Press Fn+F7 to toggle muting on and off. • Press Fn+UP-ARROW to increase the volume. • Check settings in BIOS Setup. 1. From the Start menu, shut down, then restart the OmniBook. 2. When you see the HP logo, press F2 to enter the BIOS Setup utility. 3.
Hard Disk Drive Problems If the OmniBook’s hard drive doesn’t spin • Check the power source. • Remove and reinsert the hard drive. See the OmniBook Reference Guide for instructions. If the hard disk makes buzzing or whining noise • Back up the drive immediately. • Check for alternate noise sources, such as the fan or a PC Card drive. If files are corrupted For Windows 95 and Windows NT 4.0 • Run the McAfee VirusScan program; see "To install McAfee VirusScan.
• An infrared driver must be installed and the BIOS Setup setting must be enabled. For details, refer to the driver’s Readme file located in \OmniBook\drivers. • In Windows Help, use the Print Troubleshooter. Keyboard and Pointing Device Problems If the embedded numeric keypad doesn’t work • Make sure Num Lock is on (Fn+F9). • Make sure the embedded Keypad Lock (Fn+F8) is on—or that you press and hold the Fn key to temporarily access the embedded keypad.
• Windows NT 4.0 requires that you install Phoenix Card Executive drivers. See the OmniBook Reference Guide for instructions. Performance Problems If the OmniBook gets hot • It is normal for the computer to get warm. • Make sure the air vents are clear. • DOS games and other programs that drive CPU usage toward 100% can contribute to the temperature. If the OmniBook pauses or runs sluggishly • This may be normal Windows behavior (background processing can affect response time).
• Check the Power Management settings in the BIOS Setup utility. 1. From the Start menu, shut down, then restart the OmniBook. 2. When you see the HP logo, press F2 to enter the BIOS Setup utility. 3. From the Power menu, make sure the Power Management Mode is set to Max. Power Savings. 4. Press F10 to Save and Exit the BIOS Setup utility. If battery indicator is inaccurate • After extended use with ac power, the battery indicator may no longer reliably report the actual charge on the battery.
• If the OmniBook is performing an operation, it normally waits for the operation to finish. • Check the Power Button Mode in the BIOS Setup utility (Power menu). You can configure the power button to either suspend or shut down the OmniBook. Printing Problems Hint For most printing problems, use the Print Troubleshooter in Windows Help. If a serial or parallel printer doesn’t print • Check that you are using a proper cable or cable adapter, and that the printer is on.
If an I/O card stops communicating properly • It may have been reset if the OmniBook suspended or turned off. Exit and restart the application. If the serial or parallel port is not working • Check the port connection (may be loose). • Check settings in BIOS Setup. 1. From the Start menu, shut down, then restart the OmniBook. 2. When you see the HP logo, press F2 to enter the BIOS Setup utility. 3. From the System Devices menu, check that Parallel Port or Serial Port is enabled.
Index A ac adapter charging battery, 24 connecting, 11, 24 docking product, 37 jack, 8 safety, 9 status, 19 accessories CD-ROM drive, 28 floppy disk drive, 28 problems, 41 secondary battery, 28 Zip drive, 28 adjusting brightness, 14 volume, 15 Alt Gr key, 17 audio adjusting volume, 15 connections, 34 problems, 42 audio jacks location, 8 using, 34 B backlight life, 15 backlight life, 15 backup battery, 23 battery backup, 23 brightness affects, 15 charging, 24 charging time, 24 life, 24 low warning, 23 opera
F1 (help), 4 F2 (BIOS Setup utility), 20 hot keys, 16 display activating, 31 adjusting, 14 extending life, 15 external, 31 port location, 8 problems, 42 properties, 31 docking port, 8 docking products tray, 37 using, 37 documentation, 4, 40 dragging items, 13 drive C booting from, 13 drive status, 20 G getting help information sources, 4 online manual, 4 H E embedded keypad problems, 44 using, 17 external keyboard, 33 keyboard port, 8 monitor, 31 hard disk drive problems, 43 status, 20 headphones, 34 h
L laser safety, 10 learning Windows, 9 LED safety, 9 lid switch, 12 lights ac adapter, 11 infrared, 43 status, 19 lock-up, 13 low battery charging, 24 replacing, 24 warning, 23 LPT1 port, 8 M maintenance computer, 40 display, 40 McAfee VirusScan, 22 memory problems, 44 microphone built-in, 7 connecting, 34 MicroSaver lock, 22 monitor external, 31 mouse (PS/2) port location, 8 connecting, 33 serial, 32 settings, 14 moving the pointer, 13 N Num Lock status, 20 using, 17 numeric keypad, 17 O on/off button a
rebooting the computer, 13 recharging battery, 24 Reference Guide, 4, 40 removing battery, 24 PC Cards, 36 plug-in modules, 28 replacing battery, 24 plug-in modules, 28 reset, 13 restart, 13 S safety information, 9 saving battery power, 25 Scandisk, 43 Scroll Lock, 20 secondary battery installing, 28 using, 25 security cable, 22 selecting items, 13 serial port connecting device, 32 conserving power, 25 location, 8 problems, 47 service, 9, 10 Setup utility, 26 shift keys, 16, 17, 33 shortcut keys, 16 shut d
V VGA output, 8 virus detection, 22, 43 volume, 15 Windows keys, 17 learning about, 9 Z W warning (low battery), 23 website, 4 Zip drive installing, 28 problems, 41 Zoomed Video, 35 53