HP F1381A Port Replicator for the HP OmniBook 3000 User’s Guide 1-1
Notice This manual and any examples contained herein are provided “as is” and are subject to change without notice. Hewlett-Packard Company makes no warranty of any kind with regard to this manual, including, but not limited to, the implied warranties of merchantability and fitness for a particular purpose. Hewlett-Packard Co. shall not be liable for any errors or for incidental or consequential damages in connection with the furnishing, performance, or use of this manual or the examples herein.
HP Software Product License Agreement Your HP OmniBook PC contains factory-installed software programs. Please read the Software License Agreement before proceeding. Carefully read this License Agreement before proceeding to operate this equipment. Rights in the software are offered only on the condition that the customer agrees to all terms and conditions of the License Agreement. Proceeding to operate the equipment indicates your acceptance of these terms and conditions.
the product recovery CD-ROM was originally provided. (ii) The use of any operating system software by Microsoft contained in any such product recovery CD-ROM shall be governed by the Microsoft End User License Agreement (EULA). Transfer of Rights in Software. Customer may transfer rights in the software to a third party only as part of the transfer of all rights and only if Customer obtains the prior agreement of the third party to be bound by the terms of this License Agreement.
Contents 1. Using the Port Replicator .............................. 1-7 Understanding the Basics .............................. 1-9 To dock the OmniBook ..............................1-10 To undock the OmniBook ............................1-12 To reset the OmniBook ..............................1-12 To attach a security cable ............................1-13 Making Connections ..................................1-14 To connect an external keyboard .......................1-15 To enable an external Fn key ..
1 Using the Port Replicator 1-7
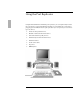
Using the Port Replicator Congratulations! With the OmniBook port replicator, you can significantly increase the convenience of your OmniBook for desktop use. By making one connection— plugging your OmniBook into the port replicator—you can get easy access to these types of devices: ♦ Printer or other parallel device. ♦ Modem or other standard serial device. ♦ Universal Serial Bus (USB) devices. ♦ External keyboard and external mouse. ♦ External monitor. ♦ Audio connections. ♦ AC power.
Using the Port Replicator Understanding the Basics Understanding the Basics Docking the OmniBook to the port replicator is just like simultaneously adding several devices to the OmniBook. Docking does not cause Windows 95 to create a new hardware profile. Similarly, undocking does not create an undocked profile. This section shows you how to get your port replicator and OmniBook up and running quickly, including how to ♦ Dock the OmniBook. ♦ Undock the OmniBook. ♦ Reset the OmniBook while docked.
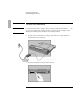
Using the Port Replicator Understanding the Basics To dock the OmniBook CAUTION Use only an HP F1377A ac adapter (the type shipped with the OmniBook) —do not use an ac adapter from another product. Using an improper adapter could damage the OmniBook and will make your warranty invalid. 1. Plug the power cord into the ac adapter, then into an ac outlet. Plug the ac adapter into the port replicator. 2. Slide the OmniBook's rear port door to the left.
Using the Port Replicator Understanding the Basics 3. Place the OmniBook on the port replicator platform, with the back of the computer facing the port replicator's docking connector. 4. Position your fingers on the platform grips as shown below. Use your thumbs to push the computer firmly toward the port replicator until the OmniBook slides into place.
Using the Port Replicator Understanding the Basics To undock the OmniBook 1. Raise the release lever at the top of the port replicator. 2. After removing the OmniBook, push the release lever back into place. To reset the OmniBook You can reset the OmniBook without undocking. • Press the reset button on the port replicator. The OmniBook restarts automatically after resetting.
Using the Port Replicator Understanding the Basics To attach a security cable Your port replicator has a built-in security port that allows you to secure the port replicator with a cable. Be sure to use a second Kensington lock to secure the OmniBook. Kensington MicroSaver lock systems work with these ports and are available at many computer stores. 1. Wrap the cable around a stationary object, such as a table leg. 2. Loop the cable to create a slip knot around the stationary object. 3.
Using the Port Replicator Making Connections Making Connections When making connections, notice that the orientation of the ports on the port replicator are the reverse of the OmniBook. Turn the connector cables over when switching from the OmniBook to the port replicator. This section describes how to connect devices to the port replicator, including the following: ♦ External keyboard. ♦ External PS/2 or serial mouse. ♦ Standard serial device (9-pin). ♦ Two Universal Serial Bus (USB) devices.
Using the Port Replicator Making Connections To connect an external keyboard You can use both the built-in OmniBook keyboard and external keyboard while docked. 1. Attach the keyboard cable to the keyboard port. 2. Dock the OmniBook in the port replicator. Keyboard port To enable an external Fn key If you are using a port replicator with an external keyboard, substitute the keystrokes CTRL+ALT for Fn. If necessary, enable the external Fn key from the BIOS Setup Utility. This is enabled by default.
Using the Port Replicator Making Connections To connect a PS/2 mouse The OmniBook has a PS/2 mouse driver installed. When you dock, the OmniBook automatically detects and sets up the mouse. 1. Attach the mouse cable to the mouse port. 2. Dock the OmniBook in the port replicator. Mouse port To switch back to the internal TouchPad Use this procedure to switch back to the built-in TouchPad from an external PS/2 mouse while docked. 1. Press the power button to suspend the OmniBook 2.
Using the Port Replicator Making Connections To connect a serial mouse 1. Attach the serial mouse cable to the serial port. Serial port To switch back to the TouchPad, see page 1-16. 2. Dock the OmniBook in the port replicator. 3. Using the TouchPad, click Start, Settings, Control Panel, Mouse, General. 4. Click Change, then select Standard Mouse Types. 5. Select your mouse type from the list, or select Standard Serial Mouse. 6. Click OK, Close, then click Yes when prompted to restart.
Using the Port Replicator Making Connections To connect a Universal Serial Bus (USB) device Universal Serial Bus (USB) provides a bi-directional serial interface for adding peripheral devices such as game controllers, serial and parallel ports, and scanners on a single bus. The OmniBook's port replicator provides two USB ports. 1. Attach the USB cable to either the upper or lower USB port. 2. Dock the OmniBook in the port replicator.
Using the Port Replicator Making Connections To use the monitor stand with an external display The optional monitor stand (HP F1369A), can support a weight of 69 kg (151.8 lb.). When setting up the monitor stand, be sure that the wide edge faces forward, as shown below. To enable the built-in and external displays • Press Fn+F5 to cycle through the external and built-in display options (Internal, External, Both). --or-1. Close all applications, then shut down Windows and reboot the OmniBook.
Using the Port Replicator Making Connections To connect a parallel device Use standard parallel cables and adapters available at computer dealers and electronic supply stores to connect parallel devices. 1. Attach the parallel cable to the parallel port. 2. Dock the OmniBook PC in the port replicator. 3. If necessary, install your parallel device driver. See your Windows or device manual for instructions. The port replicator’s 25-pin parallel port is a standard enhanced (EPP/ECP) parallel port.
Using the Port Replicator Making Connections To connect your audio equipment The port replicator provides the following audio ports: Amplified speaker-out connector for headphones or speakers. Line-in connector for an external audio source (such as a CD player). Microphone-in for an external microphone. 1. Attach the audio cable to the corresponding audio port. 2. Dock the OmniBook in the port replicator. You can press Fn+F7 to mute the sound. Pressing Fn+F7 again enables the sound.
2 Troubleshooting 1-23
Troubleshooting There are many ways to get information and technical support for your OmniBook and port replicator. If you have a question about your port replicator that this manual does not answer, you can try any of the following sources: The online OmniBook User’s Handbook The online manual provides basic information about how to operate and maintain your OmniBook. You can view the manual online or print it.
Troubleshooting Solving Problems Solving Problems If you have a problem using the port replicator, find the symptom that matches your situation. Try the suggestions one at a time. If you need to replace a lost or damaged power cord • For the replacement part number for the ac adapter power cord, contact the number in the Support and Service booklet. If a connection doesn't work • Try connecting the device to the corresponding port on the OmniBook.
3 Specifications and Regulatory Information 1-27
Specifications and Regulatory Information Your OmniBook port replicator is designed to provide trouble-free operation. The following suggestions can help you while working with your OmniBook: ♦ If you have problems, see the problem-solving suggestions and references listed in chapter 2. ♦ If you think your port replicator might need repair service, see the warranty and service information in the Support and Service booklet.
Specifications and Regulatory Information Specifications Specifications Ports 240-pin docking connector. Parallel DB25 (EPP/ECP). Serial DB9 (115,200-bps). VGA port, D-sub 15-pin female connector. 6-pin external keyboard connector. 6-pin external PS/2 mouse connector. Three audio jacks for Speaker-out, Line-in, and MIC-in. 2-pin ac jack for ac adapter. MIDI port: D-sub, 15-pin female for MIDI in/out. 2 Universal Serial Bus (USB) ports. Power Includes F1377A ac adapter.
Specifications and Regulatory Information Regulatory Information Regulatory Information This section presents information that shows how the port replicator complies with regulations in certain regions. Any modifications to the port replicator not expressly approved by Hewlett-Packard could void the authority to operate the port replicator in these regions. This port replicator is for use only with the I.T.E. (Information Technology Equipment) notebook computer, model HP OmniBook 3000. U.S.A.
Specifications and Regulatory Information Regulatory Information Canada This digital apparatus does not exceed the Class B limits for radio noise emissions from digital apparatus as set out in the radio interference regulations of the Canadian Department of Communications.
Specifications and Regulatory Information Regulatory Information Declaration of Conformity Products sold by Hewlett-Packard and its authorized dealers meet the specifications listed below, according to ISO/IEC Guide 22 and EN 45014. Manufacturer: Hewlett-Packard Company Address: Hewlett-Packard Co. Mobile Computing Division 1000 NE Circle Blvd.
Index A ac power, 1-10 audio connections, 1-21 MIDI devices, 1-20 mute key, 1-21 troubleshooting, 1-25 B BIOS Setup, 1-15 C cable security, 1-13 connecting, 1-17 ac power, 1-10 external display, 1-18 keyboard, 1-15 MIDI/Joystick, 1-20 OmniBook, 1-10 parallel device, 1-20 printer, 1-20 security cable, 1-13 serial device, 1-17 serial mouse, 1-17 USB device, 1-18 contacting HP, 1-28 D Declaration of Conformity, 1-32 device audio, 1-21 display, 1-18 keyboard, 1-15 MIDI/Joystick, 1-20 parallel, 1-20 serial,
P parallel device connecting, 1-20 troubleshooting, 1-25 ports ac, 1-10 ac adapter, 1-10 display, 1-18 keyboard, 1-15 MIDI/Joystick, 1-20 printer, 1-20 serial device, 1-17 power, 1-29 protection security cable, 1-13 PS/2 mouse switching back to TouchPad, 1-16 troubleshooting, 1-25 R regulatory, 1-30 1-34 repair, 1-28 reset button, 1-12 S security cable, 1-13 serial device, 1-17, 1-25 USB device, 1-18 service (repair), 1-28 software license, 1-3 specifications, 1-29 support, 1-28 SVGA, 1-18 U Universal