HP OmniBook Plug-In Modules User’s Guide 1-1
Notice This manual and any examples contained herein are provided “as is” and are subject to change without notice. Hewlett-Packard Company makes no warranty of any kind with regard to this manual, including, but not limited to, the implied warranties of merchantability and fitness for a particular purpose. Hewlett-Packard Co. shall not be liable for any errors or for incidental or consequential damages in connection with the furnishing, performance, or use of this manual or the examples herein.
Contents 1. Using OmniBook Plug-In Modules ..................................................1-5 Replacing a Plug-In Accessory Module........................................................1-7 To replace a plug-in module.....................................................................1-7 Using the Floppy Drive ...................................................................................1-9 To install the floppy drive externally .......................................................
1 Using OmniBook Plug-In Modules 1-5
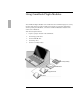
Using OmniBook Plug-In Modules The OmniBook Plug-in Modules User’s Guide describes OmniBook plug-in accessory modules and shows you how to install and use them. For complete information about operating the OmniBook, consult the OmniBook Reference Guide and the online User’s Handbook. This manual explains how to ♦ Replace a plug-in module in the OmniBook. ♦ Use the floppy disk drive. ♦ Use the CD-ROM drive. ♦ Use the Zip drive. ♦ Use the secondary battery.
Using OmniBook Plug-In Modules Replacing a Plug-In Accessory Module Replacing a Plug-In Accessory Module Important If you are inserting or removing a CD-ROM or Zip drive, turn the OmniBook off before removing or inserting the plug-in module (shut down the computer using the Start menu or press the power button for 4 or more seconds). This is not necessary if you are inserting or removing a floppy disk drive or secondary battery. To replace a plug-in module 1.
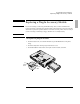
Using OmniBook Plug-In Modules Replacing a Plug-In Accessory Module 4. Slide the plug-in module into the OmniBook until it clicks into place. CAUTION Be sure the safety latch is open. Otherwise you could damage the module or your OmniBook. 5. Slide the safety latch back to its original position (in the direction of the arrow).
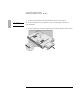
Using OmniBook Plug-In Modules Using the Floppy Drive Using the Floppy Drive You can install the floppy drive in the plug-in module bay or attach it externally to the parallel port. This section describes how to ♦ Install the floppy disk drive externally. ♦ Insert or eject a floppy disk. To install the floppy drive externally • Connect the external floppy-drive cable to the OmniBook’s parallel port.
Using OmniBook Plug-In Modules Using the Floppy Drive To insert or eject a floppy disk CAUTION Do not insert or remove a floppy disk while the OmniBook is actively reading or writing data. Otherwise, you could lose data or the OmniBook could stop responding. 1. Hold the disk with its face up, then slide it into the floppy drive slot until it clicks into place. 2. To remove the floppy disk, press the eject button on the front of the drive.
Using OmniBook Plug-In Modules Using the CD-ROM Drive Using the CD-ROM Drive To use both the CD-ROM drive and the floppy disk drive, connect the floppy disk drive to the OmniBook’s parallel port. This section describes how to ♦ Insert or remove a CD. ♦ Use the CD-ROM drive safely. ♦ Open the CD-ROM drive manually. To insert or remove a CD CAUTION Do not insert or remove a CD while the OmniBook is actively reading data. Otherwise, the OmniBook could stop responding and you could lose data. 1.
Using OmniBook Plug-In Modules Using the CD-ROM Drive To use the CD-ROM drive safely • If the unit requires service, contact an authorized HP service center—see the OmniBook Support and Service booklet. • Do not attempt to make any adjustment of the unit. • Avoid direct exposure to the laser beam—do not open the unit.
Using OmniBook Plug-In Modules Using the Zip Drive Using the Zip Drive To use both the Zip drive and the floppy disk drive, connect the floppy disk drive to the OmniBook’s parallel port. This section describes how to ♦ Install the drivers and software for the Zip drive. ♦ Insert or eject a zip disk. ♦ Eject a Zip disk manually. To install the Zip drive software The Zip drive comes with a CD containing drivers and software for the Zip drive. Follow these steps to set up this software. 1.
Using OmniBook Plug-In Modules Using the Zip Drive To insert or eject a Zip disk When the OmniBook is reading or writing data to the Zip drive, the Zip disk indicator appears on the OmniBook status anel (above the function keys). CAUTION Always turn on power to the OmniBook before inserting a Zip disk. When you insert a Zip Disk, the green busy light will flash momentarily and go out. (If the light continues to blink slowly, push the disk eject button to eject the Zip disk, then insert it again.
Using OmniBook Plug-In Modules Using the Zip Drive To eject a Zip disk manually The OmniBook must be powered on for normal disk ejection from the Zip drive. If you need to remove a Zip disk from the drive when power is off, carefully push a straightened paper clip into the emergency eject hole located on the eject button. CAUTION Use the manual disk eject procedure only when OmniBook power is off. Do not try to forcibly remove a Zip disk from the drive.
Using OmniBook Plug-In Modules Using the Secondary Battery Using the Secondary Battery To increase the time you can work on battery power, you can install a secondary battery in the OmniBook’s plug-in module bay. The Battery gauge shows the combined charge level of the both the primary and secondary battery.
Using OmniBook Plug-In Modules Using the Secondary Battery To maintain and preserve battery life To preserve the life of your battery, be sure to charge the battery regularly. In cases of long-term storage, the battery must be charged at 20-50% to save capacity loss by self-discharge and to avoid deterioration of battery performance. In a discharge condition, the battery voltage decreases faster.
2 Troubleshooting 1-19
Troubleshooting If you run into problems installing your OmniBook accessories, you can use the suggestions in this chapter to correct the problems. If you have questions that this manual doesn’t answer, you can • If you have problems, see the problem-solving suggestions and references listed in the troubleshooting section of this manual, the OmniBook Reference Guide, and the online User’s Handbook. • Check with your computer system administrator, if you have one.
Troubleshooting Solving Problems with Plug-In Accessories Solving Problems with Plug-In Accessories If your OmniBook accessory doesn’t seem to work properly, find the symptom below that matches your situation. Try the suggestions one at a time. This section separates problems into the following categories: ♦ Floppy disk drive problems. ♦ CD-ROM drive problems. ♦ Zip drive problems ♦ Battery problems. Floppy disk drive problems If a floppy drive doesn’t work • Remove and reinsert the floppy disk.
Troubleshooting Solving Problems with Plug-In Accessories Zip drive problems If a Zip drive doesn’t work • Remove and reinsert the Zip disk. • Remove and insert the Zip drive again. • Restart the OmniBook. CD-ROM drive problems If the CD-ROM drive stops responding • Restart the OmniBook. • If restarting the OmniBook does not solve the problem, remove and insert the CD-ROM drive again. If you cannot boot from a CD in the CD-ROM drive • Check that the CD is bootable.
Troubleshooting Solving Problems with Plug-In Accessories • If nothing happens, press the blue power button for four seconds, then wait 10 seconds and press the power button again. If the battery pack doesn’t charge or stops charging • Check that the battery is fully installed and locked in place with the safety latch. • Shut down the OmniBook and remove the battery, then check that the battery contacts are clean. Make sure that the ac adapter cables are fully plugged in.
3 Specifications and Regulatory Information 1-25
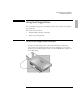
Specifications and Regulatory Information Your OmniBook accessories are designed to provide trouble-free operation. The following suggestions can help you while working with your OmniBook: ♦ Observe the temperature limits and other specifications listed in the next section. ♦ If you think your OmniBook might need repair service, see the warranty and service information in the Support and Service booklet.
Specifications and Regulatory Information Hardware Specifications Hardware Specifications Floppy disk drive Modular 3.5-inch 1.44-MB floppy disk drive with parallel cable for internal or external use. Zip drive Modular 3.5-inch 100-MB Zip drive. Hard disk drive Modular 2.5-inch IDE drive. Available capacities: 2.1 GB and 4.0 GB. CD-ROM drive Modular 20x maximum speed drive.
Specifications and Regulatory Information Regulatory Information Regulatory Information This section presents information that shows how the OmniBook plug-in modules comply with regulations in certain regions. Any modifications to the OmniBook or plug-in modules not expressly approved by Hewlett-Packard could void the authority to operate the OmniBook in these regions. U.S.A. The HP F1384A floppy drive generates and uses radio frequency energy and may interfere with radio and television reception.
Specifications and Regulatory Information Regulatory Information Declaration of Conformity Responsible Party: Hewlett-Packard Company Manager of Corporate Product Regulations 3000 Hanover Street Palo Alto, CA 94304 (415) 857-1501 declares that the product(s) Trade name: Hewlett-Packard Company Product name: F1384A floppy drive Complies with Part 15 of the FCC Rules. Operation is subject to the following two conditions: 1. This device may not cause harmful interference, and 2.
Specifications and Regulatory Information Regulatory Information Declarations of Conformity Products sold in Europe by Hewlett-Packard and its authorized dealers meet the specifications listed below. Declaration of Conformity (according to ISO/IEC Guide 22 and EN 45014) Manufacturer: Address: Product name: Options: Safety: EMC: Supplementary Information: Hewlett-Packard Company Hewlett-Packard Co. Mobile Computing Division 19310 Pruneridge Ave.
Specifications and Regulatory Information Regulatory Information Declaration of Conformity (according to ISO/IEC Guide 22 and EN 45014) Manufacturer: Address: Product name: Options: Safety: EMC: Supplementary Information: Hewlett-Packard Company Hewlett-Packard Co. Mobile Computing Division 19310 Pruneridge Ave.
Specifications and Regulatory Information Regulatory Information Declaration of Conformity (according to ISO/IEC Guide 22 and EN 45014) Manufacturer: Address: Product name: Options: Safety: EMC: Supplementary Information: Hewlett-Packard Company Hewlett-Packard Co. Mobile Computing Division 19310 Pruneridge Ave.